My colleagues and I have played with Cilium from Isovalent for a while now and we have successfully deployed it as simple CNI (Container Network Interface) along with Hubble on several production Kubernetes cluster of our customers.
However, over the past year there has been several very interesting new features being released. Smartly, Isovalent gives you the opportunity to play with each new feature in their excellent labs they have now put together in this original map quest. You follow the instructions to learn how the feature works and earn a badge (for the main features) if you solve the final challenge. Be careful it is very addictive, as soon as you earn your first badge you will then want to collect all of them!
Simplifying a Kubernetes cluster architecture
Cilium just became a Graduated CNCF project and I wanted to try to combine several of its features together to simplify our traditional Kubernetes cluster architecture for future projects.
If you are using a Kubernetes on-premise cluster that hosts applications reachable from outside of this cluster then you are using an Ingress Controller and a load balancer (probably MetalLB using Layer 2 configuration). This is the traditional architecture we deploy and with Cilium it is now possible to replace these two components by using a combination of the following features: Ingress Controller, LoadBalancer IPAM and L2 Service Announcement.
I’ve done my tests with Minikube as at this stage I just wanted to see how the combining configuration would work. I didn’t see yet some examples of those 3 features together so if you are also interested to optimize the architecture of your Kubernetes cluster with Cilium then read on!
Overview of the configuration
If you are like me, you like to have some visuals about what we are doing. So I start by giving the summary of my configuration that combine the 3 Cilium features (with their name in bold in the diagram below). The colored rectangle boxes show the important parameters of the objects and when they are of the same color, it is how the link is made between the objects.
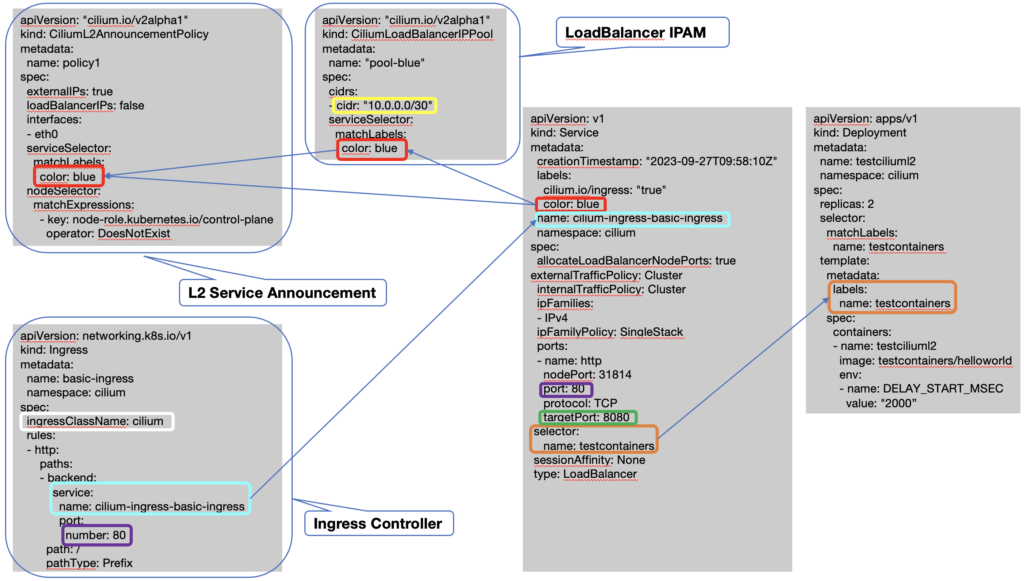
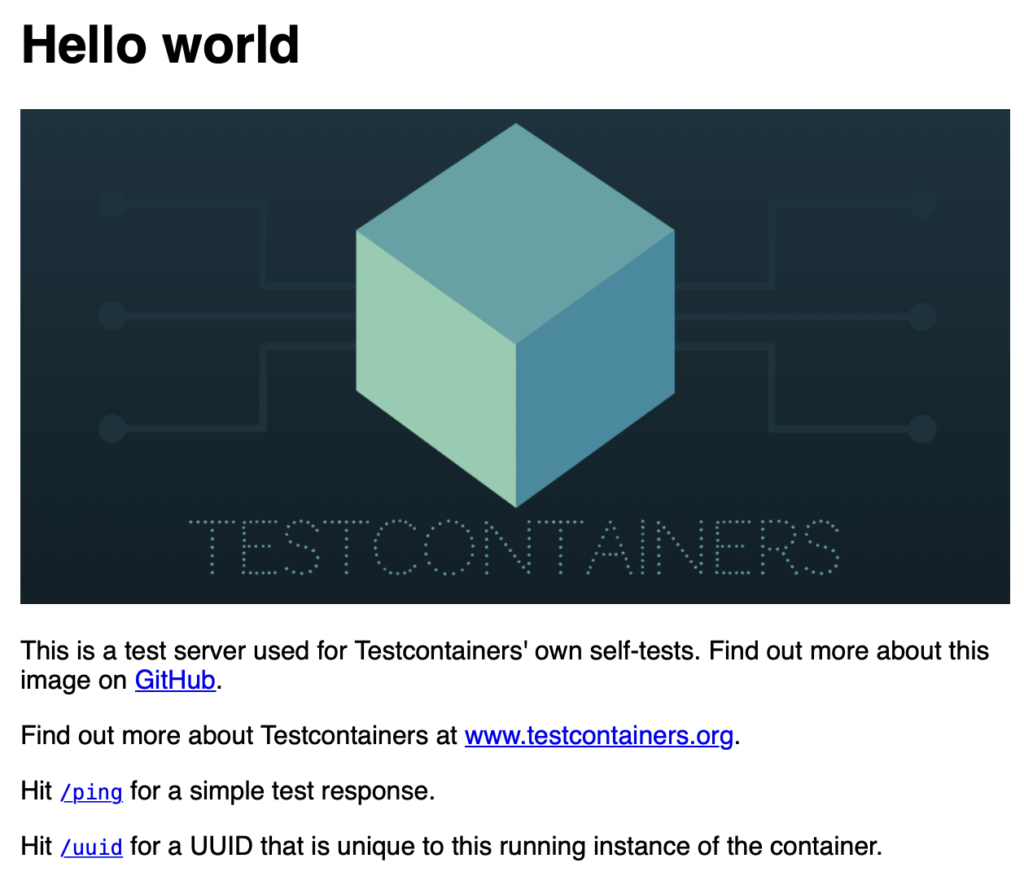
I’ve used the application “testcontainers/helloworld” that I want to expose outside of my cluster. So from my laptop I should be able to reach it and this is my goal for this first stage of testing.
Each feature brings its customized object (CRD) and you can see in the diagram above the configuration of the object for each of the 3 features. The service object with the type LoadBalancer is automatically created when the feature Ingress Controller is enabled. We then just associate a deployment for our “testcontainers/helloworld” application to this service by using the selector/labels association.
Minikube configuration
Let’s start from the beginning, here is my Minikube configuration for testing these features. I’ve started a new Minikube cluster with 3 nodes, no cni and I like to create a separate profile called here cluster-cilium to separate that cluster from the other cluster tests I’m doing.
$ minikube start --nodes 3 --network-plugin=cni --cni=false --memory=4096 -p cluster-cilium
When my cluster is up and running, I install Cilium 1.14.2 and activate all the features and parameters I need for my testing. I also like to install Cilium in a separate namespace called here cilium:
$ kubectl create ns cilium
$ cilium install --version 1.14.2 --set kubeProxyReplacement=strict --set ingressController.enabled=true --set ingressController.loadbalancerMode=dedicated --set kubeProxyReplacement=true --set l2announcements.enabled=true --set l2announcements.leaseDuration="3s" --set l2announcements.leaseRenewDeadline="1s" --set l2announcements.leaseRetryPeriod="500ms" --set l2podAnnouncements.enabled=true --set l2podAnnouncements.interface="eth0" --set externalIPs.enabled=true -n cilium
Combined features configuration
When my cluster is ready, I can check the LoadBalancer service is automatically created with an http and https nodePort. For this example I’ve edited this service and removed the https port to avoid any confusion. The http nodePort 31814 was automatically created but that value could be changed. For my testing I’ll not use it:
$ kubectl get svc -n cilium
NAME             TYPE           CLUSTER-IP       EXTERNAL-IP   PORT(S)                      AGE
cilium-ingress-basic-ingress   LoadBalancer   10.107.176.240   <pending>      80:31814/TCP   16h
You can see that this service doesn’t have any external IP address yet (the status shows pending). To provide one, we need to create an object CiliumLoadBalancerIPPool and define a cidr range of IP to use as external IP Address. Note that /30 (so 2 IP Addresses) is the minimum range you can use. It is not possible to use just 1 IP Address in a pool. We then set a serviceSelector to match the label blue (in this example) so each LoadBalancer service that have that label will take an IP Address from this pool if there is one available. If all IP Addresses are already taken then the EXTERNAL-IP field of the service will stay in the pending state. Below is the CiliumLoadBalancerIPPool configuration:
apiVersion: "cilium.io/v2alpha1"
kind: CiliumLoadBalancerIPPool
metadata:
  name: "pool-blue"
spec:
  cidrs:
  - cidr: "10.0.0.0/30"
  serviceSelector:
    matchLabels:
      color: blue
You’ll then need to add the blue label to the LoadBalancer service
$ kubectl edit svc -n cilium cilium-ingress-basic-ingress
Just add the label color: blue and you’ll then see the following:
$ kubectl get svc -n cilium
NAME             TYPE           CLUSTER-IP       EXTERNAL-IP   PORT(S)                      AGE
cilium-ingress-basic-ingress   LoadBalancer   10.107.176.240   10.0.0.1      80:31814/TCP   16h
Now our service has an external IP Address that comes from the pool-blue we have defined previously.
We can create our deployment by applying the following yaml file:
apiVersion: apps/v1
kind: Deployment
metadata:
  name: testciliuml2
  namespace: cilium
spec:
  replicas: 2
  selector:
    matchLabels:
      name: testcontainers
  template:
    metadata:
      labels:
        name: testcontainers
    spec:
      containers:
      - name: testciliuml2
        image: testcontainers/helloworld
        env:
        - name: DELAY_START_MSEC
          value: "2000"
You can see we use the label name: testcontainers for this deployment. We will then need to edit again our LoadBalancer service to associate it with that deployment label (you can also see it in the diagram above if you want to check):
  selector:
    name: testcontainers
Finally we can configure an ingress object to link it to our LoadBalancer service by using the yaml file below:
apiVersion: networking.k8s.io/v1
kind: Ingress
metadata:
  name: basic-ingress
  namespace: cilium
spec:
  ingressClassName: cilium
  rules:
  - http:
      paths:
      - backend:
          service:
            name: cilium-ingress-basic-ingress
            port:
              number: 80
        path: /
        pathType: Prefix
Note that the ingressClassName field uses the value cilium. This instructs Kubernetes to use Cilium as the Ingress controller for this resource. We can check the state of our ingress:
 kubectl get ing -n cilium
NAME            CLASS    HOSTS   ADDRESS    PORTS   AGE
basic-ingress   cilium   *       10.0.0.1   80      30d
You can recognize the external IP Address of our LoadBalancer service.
Test of connection to the LoadBalancer service
To fully test the flow from our laptop through the ingress and down to the pod, we would need the external IP Address to be reachable from my laptop. In production you will not use this external IP Address directly but use a URL with a domain name that will be resolved by a DNS to this external IP Address.
Here I will just test the connection to the LoadBalancer service with kubectl port-forward to reach port 80 of this service as it would be by our ingress rule:
$ kubectl port-forward svc/cilium-ingress-basic-ingress -n cilium 8080:80 &
I can then reach my application from my laptop by using the URL http://localhost:8080
As a conclusion, I’ve found the configuration of all these features pretty easy to bound together. It is then very simple to provide a complete Kubernetes architecture with only Cilium features to reach my application from outside of this cluster.
The next step will be to test it in a real Kubernetes cluster with some failover scenarii but that all look very promising to me!
![Thumbnail [90x90]](https://www.dbi-services.com/blog/wp-content/uploads/2022/08/GRE_web-min-scaled.jpg)
![Thumbnail [90x90]](https://www.dbi-services.com/blog/wp-content/uploads/2022/08/ADE_WEB-min-scaled.jpg)
![Thumbnail [90x90]](https://www.dbi-services.com/blog/wp-content/uploads/2022/08/NME_web-min-scaled.jpg)