By Franck Pachot
.
Here is how to quickly install the CLI (Command Line Interface) for the following public clouds: Amazon, Google, Microsoft and Oracle. On Linux, I’m using wget but you can use curl. I’ll install all cloud command line interfaces into a $HOME/cloud directory and add an alias into $HOME/.bashrc if not already existing
Amazon – AWS
AWS – install
( mkdir -p ~/cloud/aws-cli ; cd /var/tmp && wget -qc https://awscli.amazonaws.com/awscli-exe-linux-x86_64.zip && unzip -qo awscli-exe-linux-x86_64.zip && ./aws/install --update --install-dir ~/cloud/aws-cli --bin-dir ~/cloud/aws-cli && rm -rf ./awscli-exe-linux-x86_64.zip ./aws )
alias aws || echo 'alias aws=~/cloud/aws-cli/aws' >> ~/.bashrc && . ~/.bashrc
aws --version
AWS – update
As I used the –update flag in the install command line, and the url goes to the latest version, I just run the same to update the CLI
AWS – configure
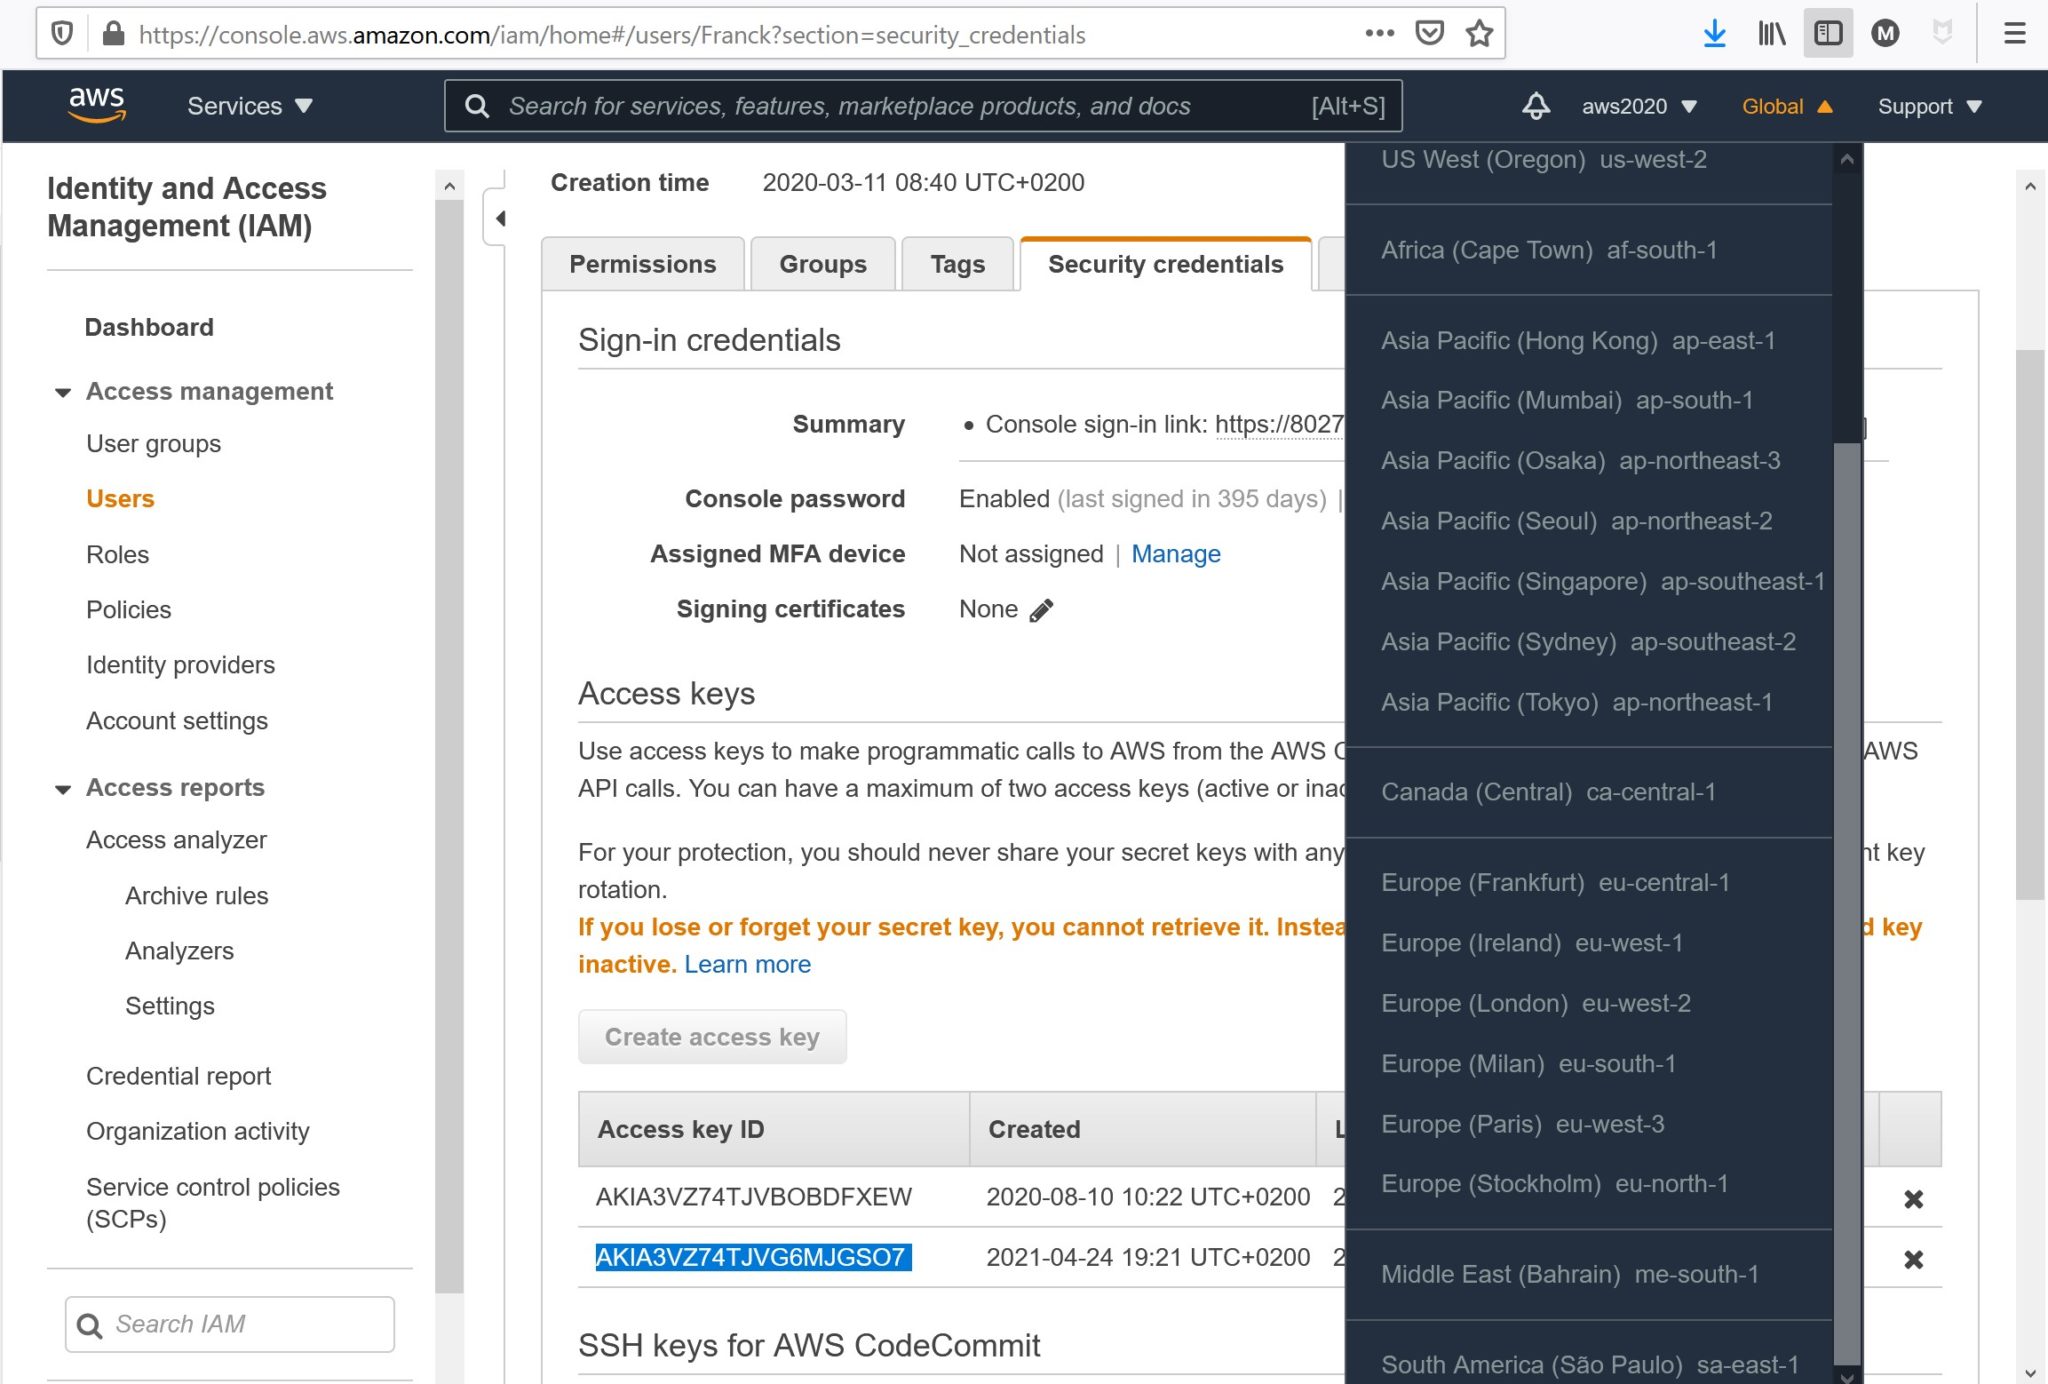
- You need to get the “AWS Access Key ID” and “Secret access key” define for the user (go to https://console.aws.amazon.com/iam/home#/users, select the user, Security Credentials and Create Access Key). You cannot have many of them (I think only two for the time to change it in all CLI) so if you have one already created, just use the same (which means you have access to a previous CLI config).
- You can define the default region (which you find in the console menu, when you are in a regional service – go to https://console.aws.amazon.com/cloudshell/home and it will appear in the url)
- I define text as default output because others sometimes lie to me (see https://dev.to/aws-heroes/dynamodb-scan-and-why-128-5-rcu-2k25)
You find all info in one screen as you can see in the screenshot
$ aws configure

AWS Access Key ID [None]: AKIA3VX74TJVG6MJGSO7
AWS Secret Access Key [None]: 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
Default region name [None]: eu-west-1
Default output format [None]: text

[opc@cern-exa18-ecktj1 ~]$ cat ~/.aws/config

[default]
region = eu-west-1
output = text
[opc@cern-exa18-ecktj1 ~]$ cat ~/.aws/credentials

[default]
aws_access_key_id = AKIA3VX74TJVG6MJGSO7
aws_secret_access_key = 9AWS6denUHQxRGZlobSNmhXGzQE+1XKrsObgTJlZ
This is an example where you can set that the information is written into a ~/.aws directory, associated with a [default] profile. You can use a different profile with –profile or set all values with arguments and environment variables like:
$ AWS_ACCESS_KEY_ID=AKIA3VX74TJVG6MJGSO7 AWS_SECRET_ACCESS_KEY=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 AWS_DEFAULT_REGION=eu-west-1 aws dynamodb list-tables --region eu-west-1 --output json

{
    "TableNames": [
        "SkiLifts"
    ]
}
Of course, with those credentials you can access to my account, you must keep them safe and secret. And use the least priviledged user. I’ll remove them from my IAM account before publishing this post.
AWS – uninstall
To uninstall I remove the cli and the configuration:
rm -rf ~/cloud/aws-cli/aws ~/.aws
Google – GCP
GCLOUD – install
Here, unfortunately, the URL mentions the version and there’s no URL to get the latest one.
( mkdir -p ~/cloud/gcp-cli ; cd /var/tmp && wget -qc https://dl.google.com/dl/cloudsdk/channels/rapid/downloads/google-cloud-sdk-337.0.0-linux-x86_64.tar.gz && tar -zxf $(basename $_) -C ~/cloud/gcp-cli && ~/cloud/gcp-cli/google-cloud-sdk/install.sh --usage-reporting false --screen-reader false --command-completion false --path-update true --rc-path ~/cloud/.bashrc --override-components && rm -rf google-cloud-sdk-linux-x86_64.tar.gz && gcloud config set disable_usage_reporting false)
alias gcloud || echo 'alias gcloud=~/cloud/gcp-cli/google-cloud-sdk/bin/gcloud' >> ~/.bashrc && . ~/.bashrc
alias gsutil || echo 'alias gsutil=~/cloud/gcp-cli/google-cloud-sdk/bin/gsutil' >> ~/.bashrc && . ~/.bashrc
alias bq    || echo 'alias      bq=~/cloud/gcp-cli/google-cloud-sdk/bin/bq'     >> ~/.bashrc && . ~/.bashrc
gcloud --version
I choose to disable usage reporting here. And update a .bashrc in my ~/cloud directory rather than the default one
GCLOUD – update
As the url may get a past version, better to upgrade
$ yes | gcloud components update
Beginning update. This process may take several minutes.
This updates all components
GCLOUD – config
$ gcloud init
The authentication gives you an URL where you allow and get a verification code to paste. You can optionally set the default region and zone. Those are visible in ~/.config/gcloud
$ cat ~/.config/gcloud/configurations/config_default

[core]
disable_usage_reporting = false
account = [email protected]
project = disco-abacus-424242

[compute]
zone = europe-west2-a
region = europe-west2
The credentials are stored in a sqlite database
GCLOUD- uninstall
This removes the cli and all configuration:
rm -rf ~/cloud/gcp-cli/google-cloud-sdk ~/.config/gcloud
Microsoft – Azure
AZ- install
( rm -rf ~/cloud/azure-cli ; touch ~/cloud/.bashrc; mkdir -p ~/cloud/azure-cli && cd /var/tmp && wget -qc https://aka.ms/InstallAzureCli && sh $(basename $_) && rm -f /var/tmp/InstallAzureCli )
~/cloud/azure-cli
~/cloud/azure-cli
y
~/cloud/.bashrc
I’ve copy-pasted the answers. I didn’t look at the way they do that but I’ve found no obvious way to pass them as parameters or here file. And given how those scripts works I don’t want them to touch my .bashrc file to I do it in one I create in ~/cloud.
alias az || echo 'alias az=~/cloud/azure-cli/az' >> ~/.bashrc && . ~/.bashrc
az version
AZ- update
az upgrade
AZ- config
$ az login
The authentication gives you an URL where you allow paste a code and the authentication is automatic. The info and credential tokens are stored in ~/.azure/azureProfile.json ~/.azure/accessTokens.json
AZ- uninstall
rm -rf ~/cloud/azure-cli
Oracle – OCI
OCI – install
( mkdir -p ~/cloud/oci-cli ; cd /var/tmp && wget -qcO oci-cli-install.sh https://raw.githubusercontent.com/oracle/oci-cli/master/scripts/install/install.sh && sh oci-cli-install.sh --install-dir ~/cloud/oci-cli --exec-dir ~/cloud/oci-cli --script-dir ~/cloud/oci-cli --optional-features db --rc-file-path ~/cloud/.bashrc --accept-all-defaults && rm oci-cli-install.sh )
As I did with the previous one I don’t let it change my .bashrc for autocompletion but do it in ~/cloud/.bashrc
alias oci || echo 'alias oci=~/cloud/oci-cli/oci' >> ~/.bashrc && . ~/.bashrc

oci --version
OCI – update
sudo yum install -y python-pip & pip install oci-cli --upgrade
OCI – config
Here you will need to generate a key and get multiple identifiers:
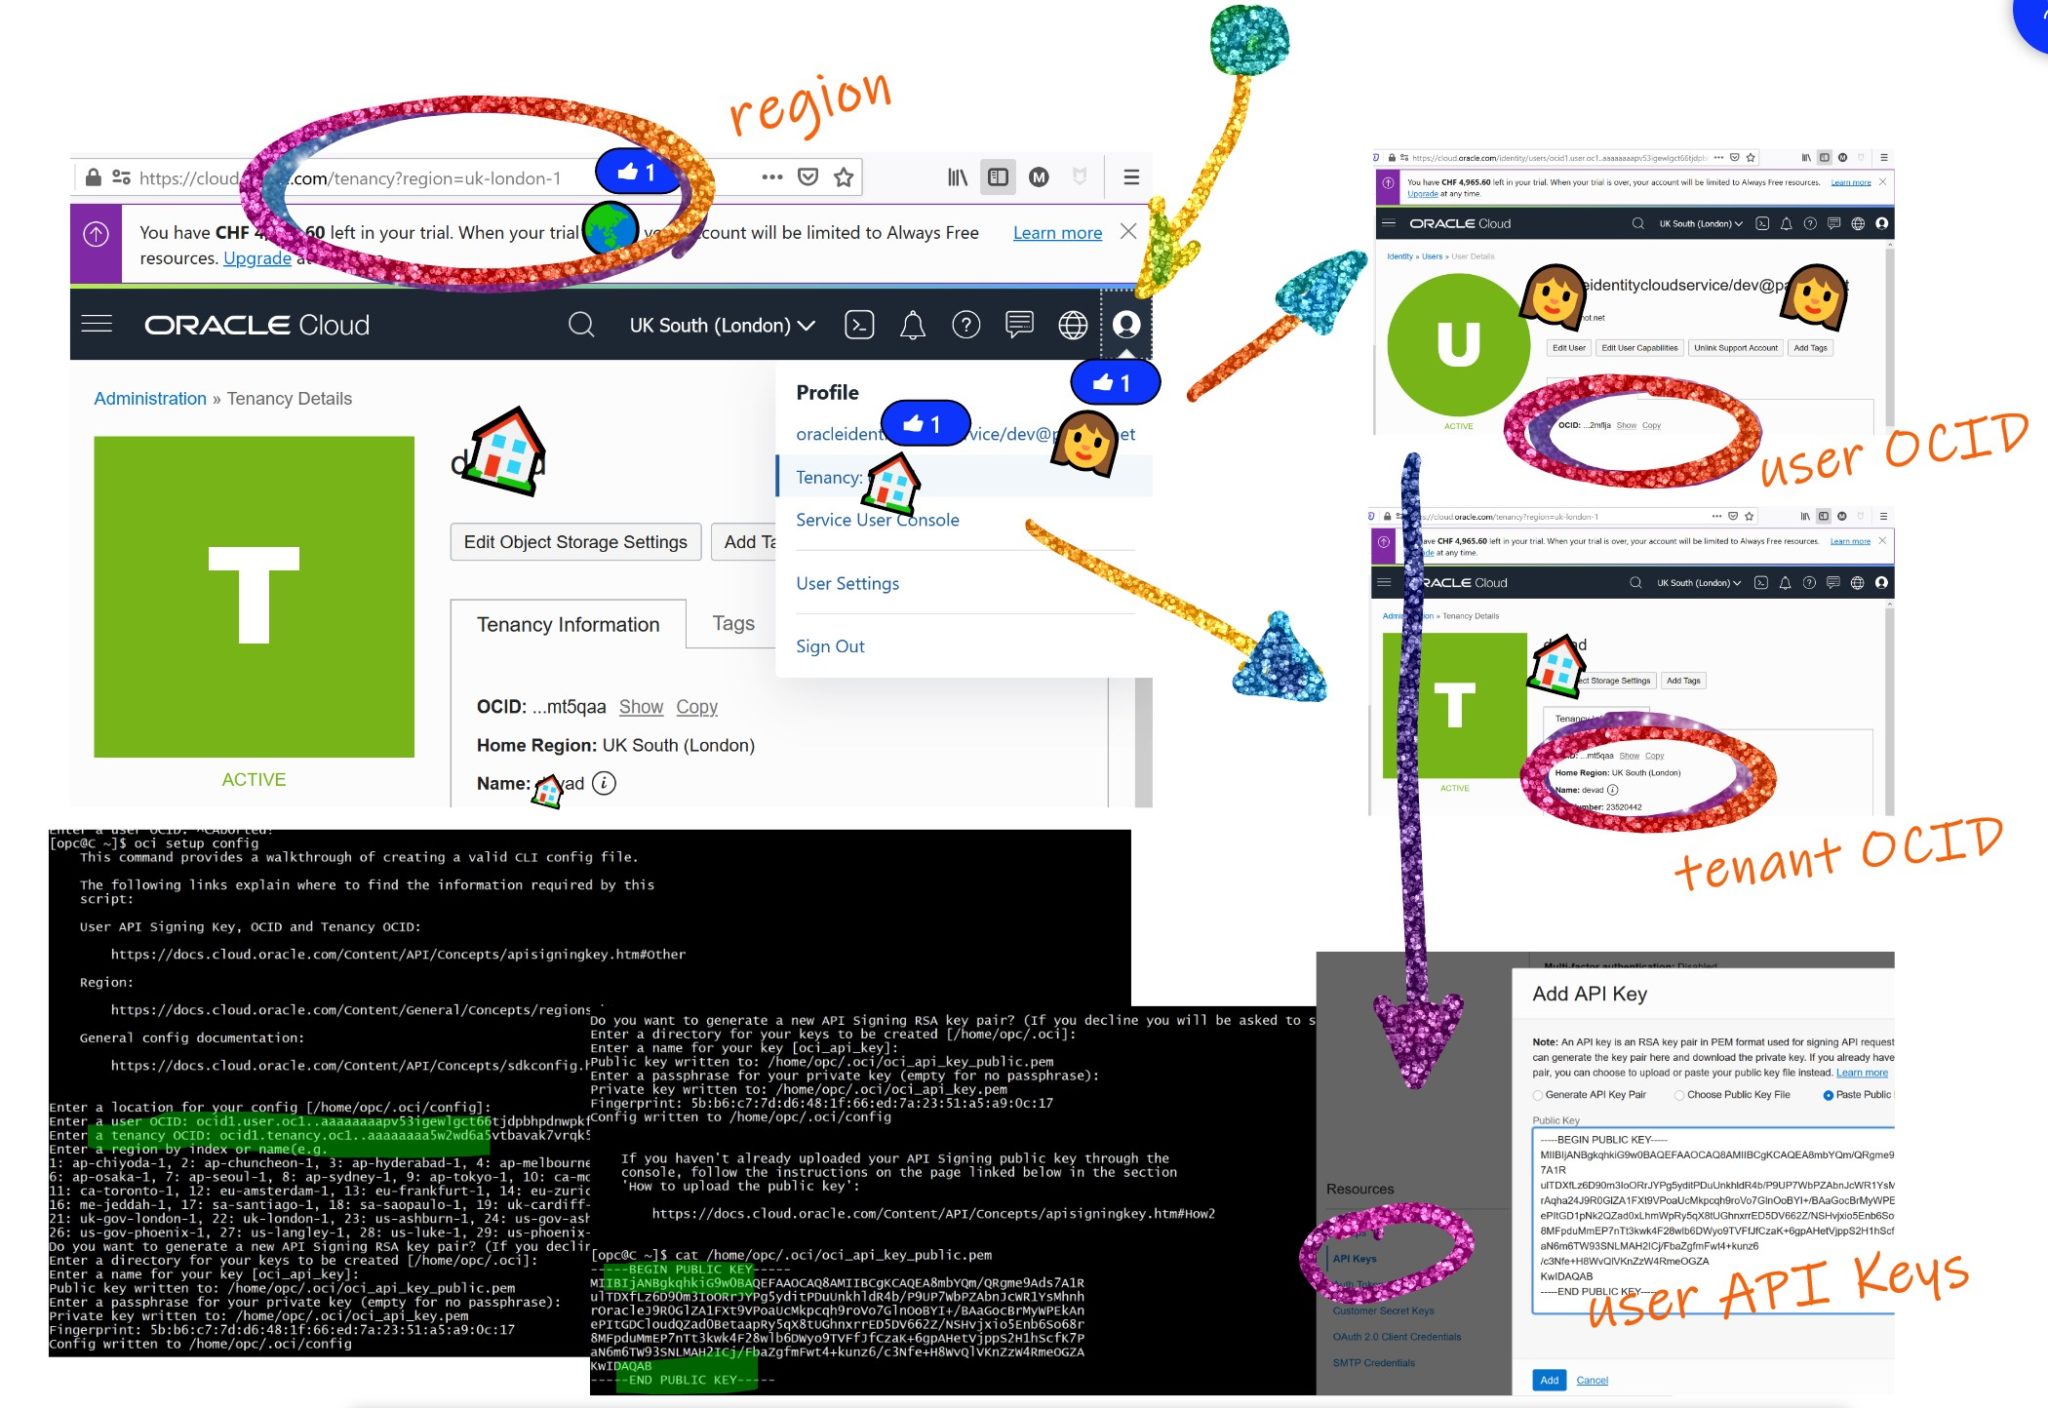
oci setup config
The tool displays a link to the documentation. Better follow it as the console sometimes changes.
Basically, as in the screenshot above, you will need the default region identifier (which you find in the url), the tenant OCID and the user OCID (for which you will add the API key) – can can find those from “profile” upper-right menu.
OCI – uninstall
pip uninstall oci-cli

    $HOME/lib/oracle-cli
    $HOME/bin/oci
    $HOME/bin/oci-cli-scripts
![Thumbnail [90x90]](https://www.dbi-services.com/blog/wp-content/uploads/2024/03/AHI_web.jpg)
![Thumbnail [90x90]](https://www.dbi-services.com/blog/wp-content/uploads/2025/07/ALK_MIN.jpeg)
![Thumbnail [90x90]](https://www.dbi-services.com/blog/wp-content/uploads/2025/05/JDE_Web-1-scaled.jpg)
![Thumbnail [90x90]](https://www.dbi-services.com/blog/wp-content/uploads/2022/08/ADE_WEB-min-scaled.jpg)
Chris Stacks
13.08.2023Hi, I am working on something similar here: https://github.com/stacksc/goat