SQL Server database backup & restore from On-Premise to Azure is a feature introduced with SQL Server 2012 SP1 CU2. In the past, it could be used with these three tools:
- Transact-SQL (T-SQL)
- PowerShell
- SQL Server Management Objects (SMO)
With SQL Server 2014, backup & restore can also be enabled via SQL Server Management Studio (SSMS).
Concept
This feature is quite similar to a “classic” backup & restore tool. Indeed, the main different lies in the backup location. That is why you need to specify an URL, instead of a path for a disk.
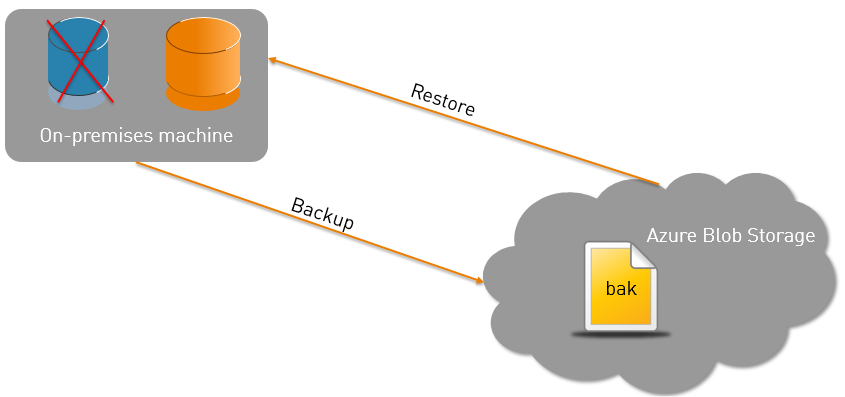
The following schema explains the main process of the feature:
- An On-Premise database needs to be backed up
- A backup is performed to Azure
- The backup is stored in Azure
- The On-Premise database needs to be restored
- The On-Premise database is restored from the backup in Azure
Prerequisites
Azure Account Creation
Obviously, the first requirement is an Azure account! To create an Azure account, go to the official Azure website.
Azure Storage Creation
Once the Azure account has been set, an Azure Storage must be created. It represents the highest level of namespace for accessing the backup file stored in Azure.
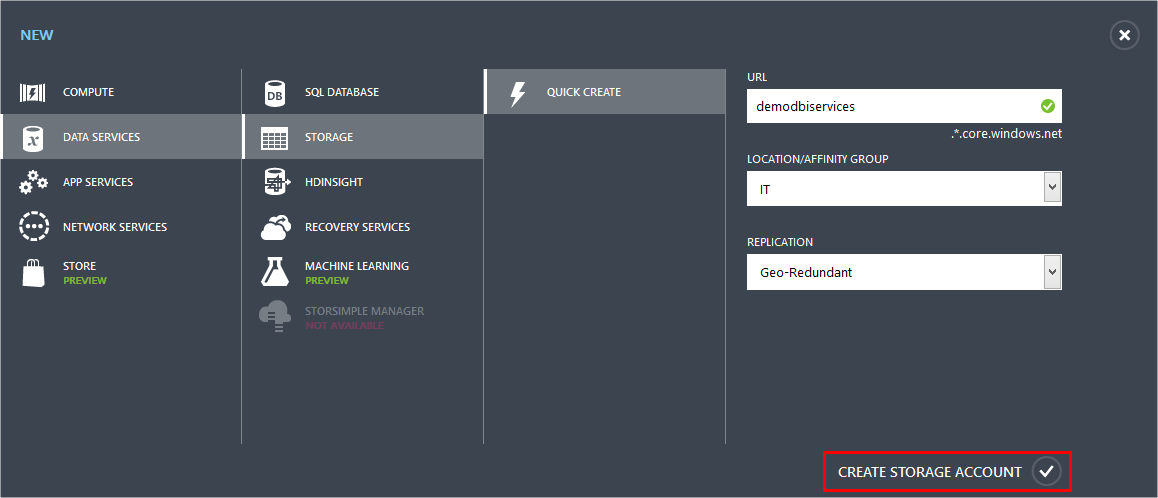
The creation requires three fields: a prefix for the storage URL, a location or an affinity group and a replication:
The URL provides the location of the storage, and will be used to access a future backup file.
The location field allows to choose in which Azure storage the backup must be stored. It is recommended to choose the Azure location closest to your On-Premise server. For more information about Azure locations, see details on Azure Regions.
An affinity group is a simple way to abstract the Azure location by associating a name to it.
A replication offers a redundancy of you storage. For more information, there is a very good msdn article on this subject named Windows Azure Storage Redundancy Options and Read Asses Geo Redundant Storage.
Finally, the Azure storage is now created.
Azure Container Creation
A backup file will be stored in Azure Storage as a Binary Large Object (Blob). It is a file of any type and size, representing a sequence of bytes.
A container provides a grouping of a set of Blobs, and can contain an unlimited number of Blobs. But the Storage Account cannot exceed 100 TB.
All Blobs must be in a container, so the container creation is part of the prerequisites. A container can be saw as a folder, and a blob as a file.
The container’s creation should be performed on Microsoft Azure, in the Storage Account location:
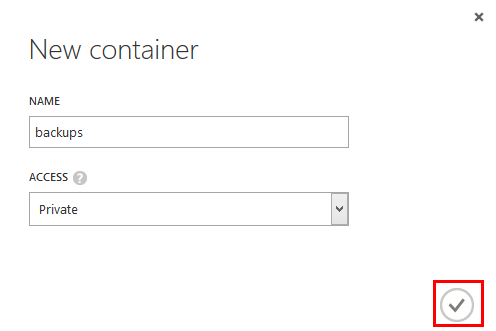
The creation of a container requires two fields: a name and an access policy.
In this example, the name of the container is “backups”.
The access type is set as default (private), so it can be accessed only by the account owner (Microsoft recommendation):
Finally, the container is created.
Azure Credential
The last prerequisite is the generation of Azure credentials on the On-Premise Instance to be able to access the Azure Storage.
The credentials can either be generated by GUI or Script. In this example, the Azure credential will be generated by GUI.
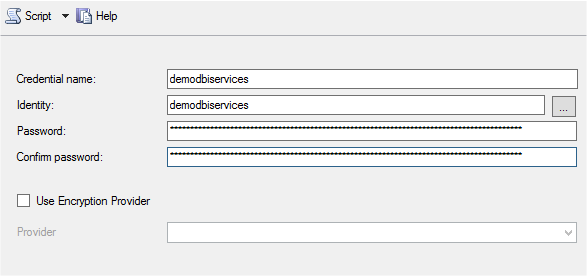
The credentials’ creation requires three different fields: a name, an identity, and a password:
The identity is the name of the Storage Account which is “demodbiservices” in our case.
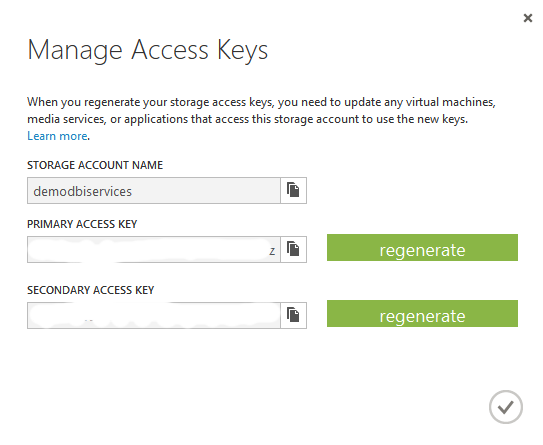
The password is one of the ACCESS KEYS of the container. It can be found in Azure, in the Manage Access Keys section of the Storage Account:
A Storage Account is composed of two access keys. The PRIMARY ACCESS KEY is commonly used as a permanent key, whereas the SECONDARY ACCESS KEY is used as a temporary key. According to the requirements, one key is preferred to the other.
Backup & restore of the database
The demonstration will be performed via GUI only, to show the new feature introduced in SQL Server 2014.
Backup the database
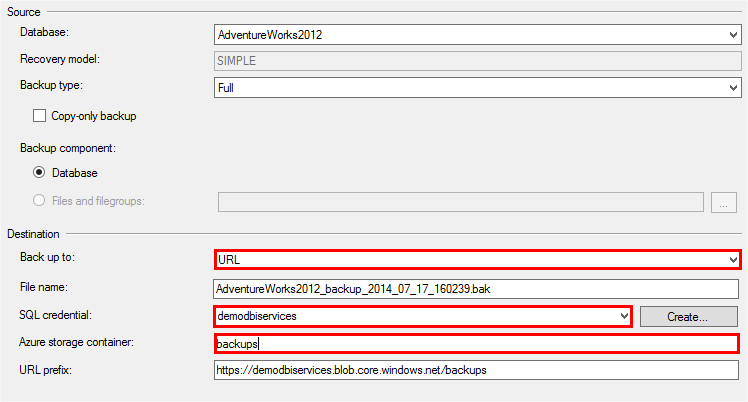
A full database backup will be performed on the container previously created. To open the required window in SSMS, just do a “classic” backup:
As soon as the URL destination is chosen instead of the disk, new fields instantly appear.
Then, the Azure Credentials are required at this step in order to access the Azure Storage.
And finally, the container name must be specified to store the backup.
The backup is completed successfully!
Restore the database
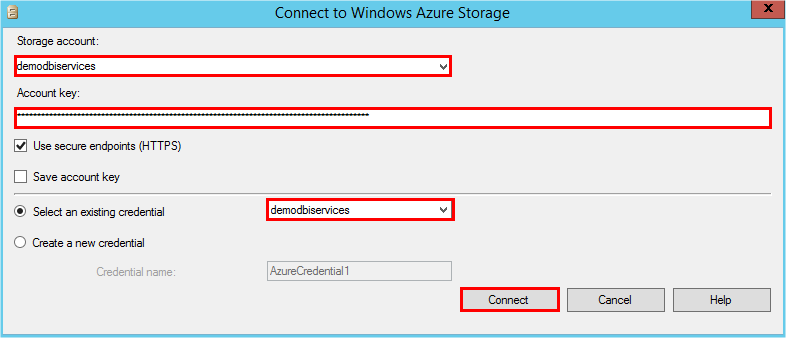
To restore the database, just go ahead the “classic” way again. SQL Server will detect that a backup has been performed to Azur, and will ask to provide the Azure credentials:
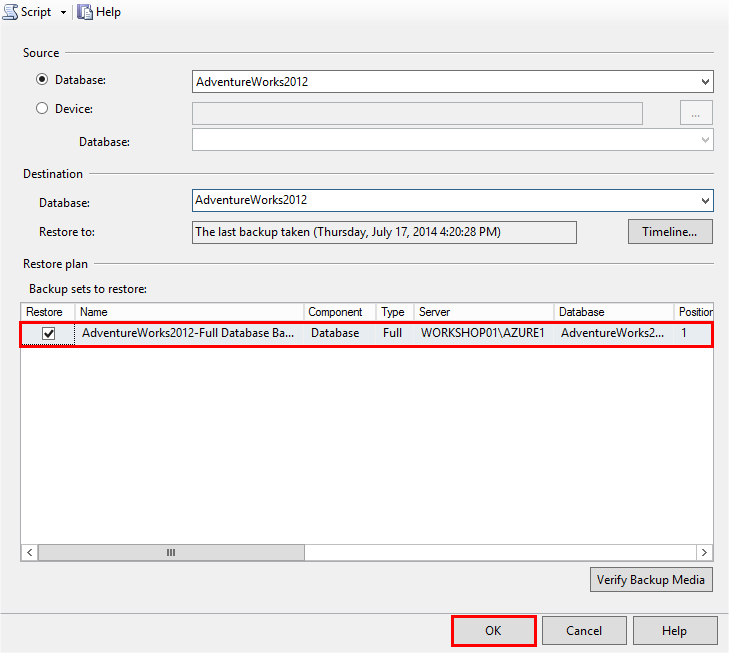
Once the connection has been made, SQL Server will detect all the backups performed to Azure. Select the Full backup and then restore the database:
The database is successfully restored!
Limitations
There are some limitations with backing up a database to Azure Storage, such as the MAXTRANSFERSIZE and BLOCKSIZE options, which are not supported.
For more information, see “Limitations” section of SQL Server Backup to URL on TechNet.
Managed Backup
Concept
Managed Backup is a new feature introduced in SQL Server 2014. It is an easy and simple way to perform, schedule, and manage backups to Azure.
It automates and manages SQL Server backups based on a retention period. This retention period has a range from 1 day to 30 days.
It supports point in time restore, and it is based on the system jobs (needs the Agent service started and running).
It is only configurable by T-SQL, and can be enabled at the instance and/or database level.
It only performs Full and Log backups to Azure Blob Storage, for user databases in Recovery Model set to Full or Bulk-logged.
Execution
A full database backup is scheduled when:
- Managed backup is enabled for the first time
- The log growth is 1 GB or larger
- The last full database is older than 1 week
- The log chain is broken
A transaction log backup is scheduled when:
- No log backup history is available
- The log space is 5 MB or larger
- The last log backup is older than 2 hours
- A full database has been performed
Enable & Configure
The stored procedure to be used for enabling and configuring Managed Backup is “smart_admin.sp_set_db_backup”.
Here is an example on how to activate the feature for an instance or a specific database:
Other stored procedures or functions can be used to managed and configure Managed Backup.
For more information, visit the SQL Server Managed Backup to Windows Azure in TechNet.
Tools
If the different ways to perform backups from an On-Premise environment to Azure do not meet your requirements, it is time to move to a third party tool.
One of the best-known free tools is Microsoft SQL Server Backup to Microsoft Windows Azure Tool. However, it does not offer a significant improvement, just a friendly interface.
Some third-party tools (most are not cost-free) offer more maneuverability and in-depth functionalities. The best known one is CloudBerry Backup for Microsoft Azure.
Conclusion
Performing backups to Azure Storage can be very attractive because it increases the high availability of an organization by offering an alternate way to store data.
Moreover, it offers the possiblity to restore virtually from everywhere.
However, it is interesting to focus on the new feature Managed Backup which is very easy to configure as well as to maintain – and which responds (in most cases) to the needs of the DBAs.





![Thumbnail [60x60]](https://www.dbi-services.com/blog/wp-content/uploads/2022/08/NAC_web-min-scaled.jpg)
![Thumbnail [90x90]](https://www.dbi-services.com/blog/wp-content/uploads/2024/04/SIT_web.png)
![Thumbnail [90x90]](https://www.dbi-services.com/blog/wp-content/uploads/2022/08/JDU_web-min-scaled.jpg)