In one of my last blog, named: “Oracle Audit Vault and Database Firewall (AVDF) 12.1 – installation on VirtualBox” I explained how to install AVDF on VirtualBox. Since some of you asked for a blog on “How to configure AVDF”, I decided to write this posting on AVDF post-installation configuration. This one only concerns the post-installation phase, a third blog will be dedicated to practical cases concerning the configuration of Database Firewall Policies.
Specifying the Audit Vault Server Certificate and IP Address
You must associate each Database Firewall with an Audit Vault Server by specifying the server’s certificate and IP address, so that the Audit Vault Server can manage the firewall. If you are using a resilient pair of Audit Vault Servers for high availability, you must associate the firewall to both servers.
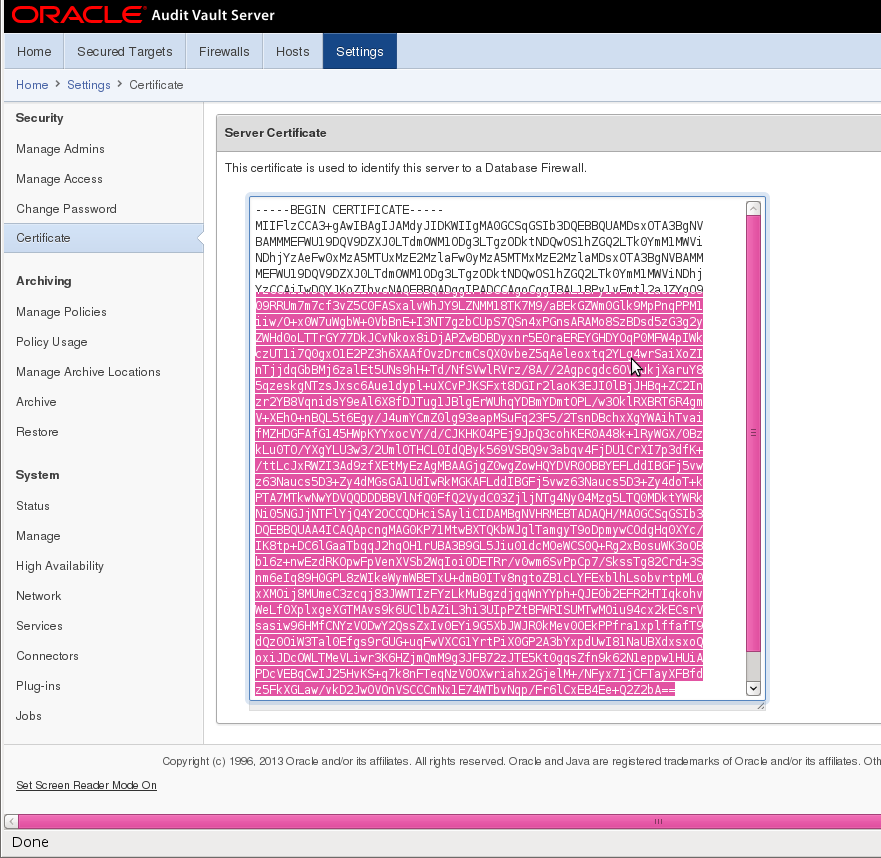
1. Log in to the Audit Vault Server as an administrator, and then click the Settings tab.
2. In the Security menu, click Certificate. The server’s certificate is displayed.
3. Copy the server’s certificate.
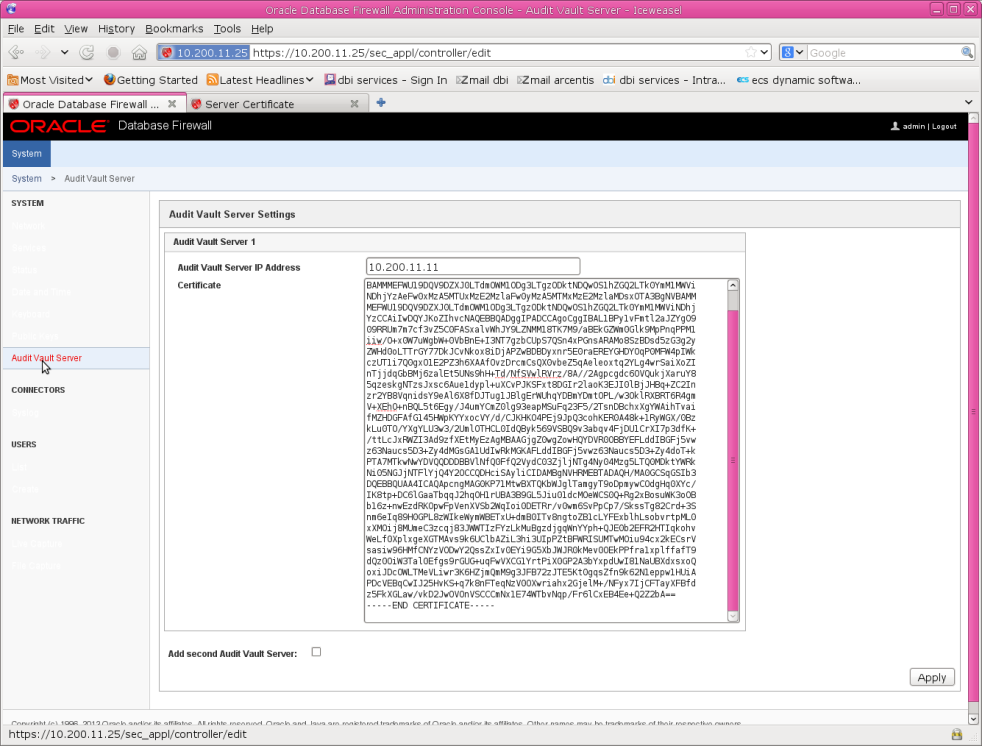
4. Log in to the Database Firewall administration console
5. In the System menu, click Audit Vault Server.
6. Enter the IP Address of the Audit Vault Server.
7. Paste the Audit Vault Server’s Certificate in the next field.
8. Click Apply.
Registering Oracle Secured Target
Ensure That Auditing Is Enabled in the Oracle Secured Target
Databaseoracle@vmtest12c:/home/oracle/ [DUMMY] SOUK
******** dbi services Ltd. ********
STATUS         : OPEN
DB_UNIQUE_NAME : SOUK
OPEN_MODE      : READ WRITE
LOG_MODE       : NOARCHIVELOG
DATABASE_ROLE  : PRIMARY
FLASHBACK_ON   : NO
FORCE_LOGGING  : NO
VERSION        : 11.2.0.3.0
***********************************
oracle@vmtest12c:/home/oracle/ [SOUK] sqlplus "/as sysdba"SQL*Plus: Release 11.2.0.3.0 Production on Sun Sep 15 22:35:49 2013Copyright (c) 1982, 2011, Oracle.  All rights reserved.
Connected to:
Oracle Database 11g Enterprise Edition Release 11.2.0.3.0 - 64bit ProductionSQL>SQL>
SQL> SHOW PARAMETER AUDIT_TRAILNAME                                 TYPE        VALUE
------------------------------------ ----------- ---------------------------
audit_trail                          string      DB
If the output of the SHOW PARAMETER command is NONE or if it is an auditing value that you want to change, then you can change the setting as follows.For example, if you want to change to XML, and if you are using a server parameter file, you would enter the following:
SQL> ALTER SYSTEM SET AUDIT_TRAIL=XML SCOPE=SPFILE;
SQL> SHUTDOWN IMMEDIATE;
SQL> STARTUP;
Registering Hosts in the Audit Vault Server
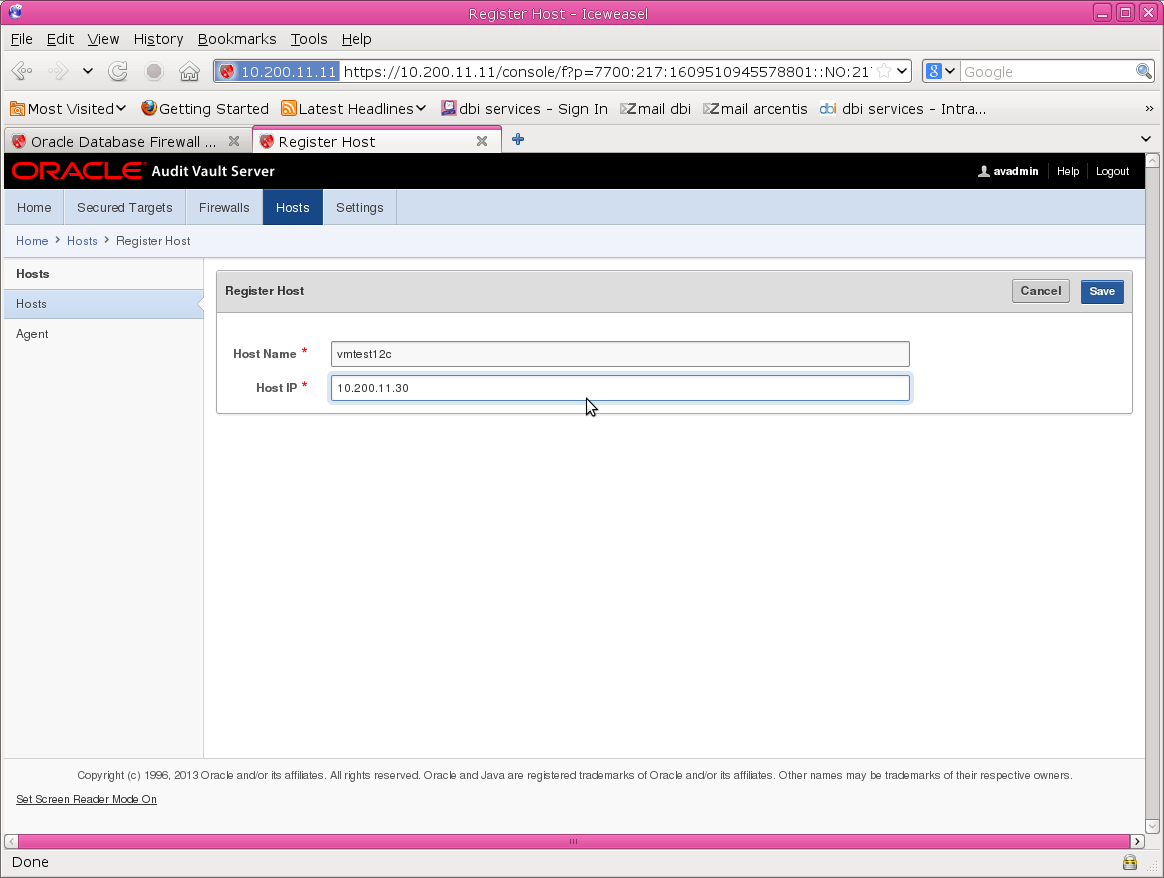
1. Log in to the Audit Vault Server console as an administrator.
2. Click the Hosts tab. A list of the registered hosts, if present, appears in the Hosts page. To control the view of this list see “Working With Lists of Objects in the UI”.
3. Click Register.
4. Enter the Host Name and Host IP address.
5. Click Save.
Deploying and Activating the Audit Vault Agent on Secured Target Hosts
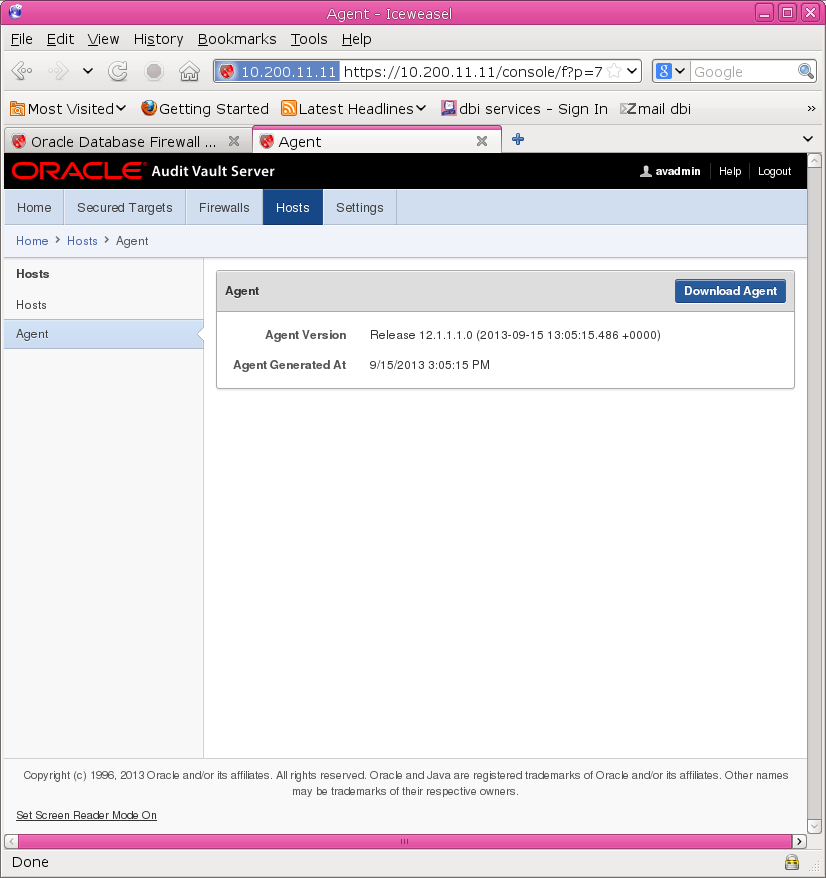
1. Log in to the Audit Vault Server console as an administrator.
2. Click the Hosts tab, and then from the Hosts menu, click Agent.
3. Click “Download Agent” and save the agent.jar file to a location of your choice.
4. Using an OS user account, copy the agent.jar file to the secured target’s host computer.
5. On the host machine, set JAVA_HOME to the installation directory of the jdk1.6 (or higher version), and make sure the java executable corresponds to this JAVA_HOME setting.
6. Start a command prompt with Run as Administrator. In the directory where you placed the agent.jar file, extract it by running:
java -jar agent.jar -d Agent_Home
Request agent Activation
To request activation of the Audit Vault Agent:
1. On the secured target host computer, go to the following directory:
Agent_Home/bin
2. Agent_Home is the directory created in the step 7 above. Run the following command:
./agentctl activate
Activate and Start the Agent
In this step, you approve the agent activation request in the Audit Vault Server, then start the agent on the secured target host machine.To activate and start the agent:
1. Log in to the Audit Vault Server console as an administrator.
2. Click the Hosts tab.
3. Select the host you want to activate, and then click Activate.
This will generate a new activation key under the Agent Activation Key column.You can only activate a host if you have completed the procedures in Step 1: Deploy the Audit Vault Agent on the Host Machine. Otherwise the Agent Activation Status for that host will be No Request.
4. Change directory as follows:
cd Agent_Home/bin
Agent_Home is the directory created in the step 7 above.
5. On the secured target host machine, run the following command and provide the activation key from Step 3:
./agentctl start -k key
Note: the -k argument is not needed after the initial agentctl start command.
Stopping and Starting the Audit Vault Agent
To stop or start the Audit Vault Agent after initial activation and start, run one of the following commands from the Agent_Home/bin directory on the secured target host machine:
./agentctl stop
./agentctl start
Changing the Logging Level for the Audit Vault Agent
The logging level you set affects the amount of information written to the log files. You may need to take this into account for disc space limitations.The following logging levels are listed in the order of amount of information written to log files, with debug providing the most information:
- error – Writes only error messages
- warn – (Default) Writes warning and error messages
- info – Writes informational, warning, and error messages
- debug – Writes detailed messages for debugging purposes
To change the logging level for an Audit Vault Agent:
1. Ensure that you are logged into AVCLI on the Audit Vault Server.
2. Run the ALTER HOST command. The syntax is as follows:
ALTER HOST host_name SET LOGLEVEL=av.agent:log_level
In this specification:
- host_name: The name of the host where the Audit Vault Agent is deployed.
- log_level: Enter a value of info, warn, debug, or error.
Registering Secured Targets
1. If you will collect audit data from a secured target, do stored procedure auditing (SPA), entitlements auditing, or enable database interrogation, create a user account on the secured target, with the appropriate privileges to allow Oracle AVDF to access the required data.
Setup scripts: Scripts are available to configure user account privileges for these secured target types:- “Oracle Database Setup Scripts”
- “Sybase ASE Setup Scripts”
- “Microsoft SQL Server Setup Scripts”
- “IBM DB2 for LUW Setup Scripts”
- “MySQL Setup Scripts”
- “Sybase SQL Anywhere Setup Scripts”
Linux secured targets: Assign the Oracle AVDF user to the log_group parameter in the Linux /etc/audit/auditd.conf configuration file. This user must have execute permission on the folder that contains the audit.log file (default folder is /var/log/audit).
Other types of secured targets: You must create a user that has the appropriate privileges to access the audit trail required. For example, for a Windows secured target, this user must have administrative permissions in order to read the security log.
Note: Oracle AVDF does not accept user names with quotation marks. For example, “JSmith” would not be a valid user name for an Audit Vault and Database Firewall user account on secured targets.
2. Log in to the Audit Vault Server console as an administrator.
3. Click the Secured Targets tab. The Secured Targets page lists the configured secured targets to which you have access. You can sort or filter the list of targets. See “Working With Lists of Objects in the UI”.
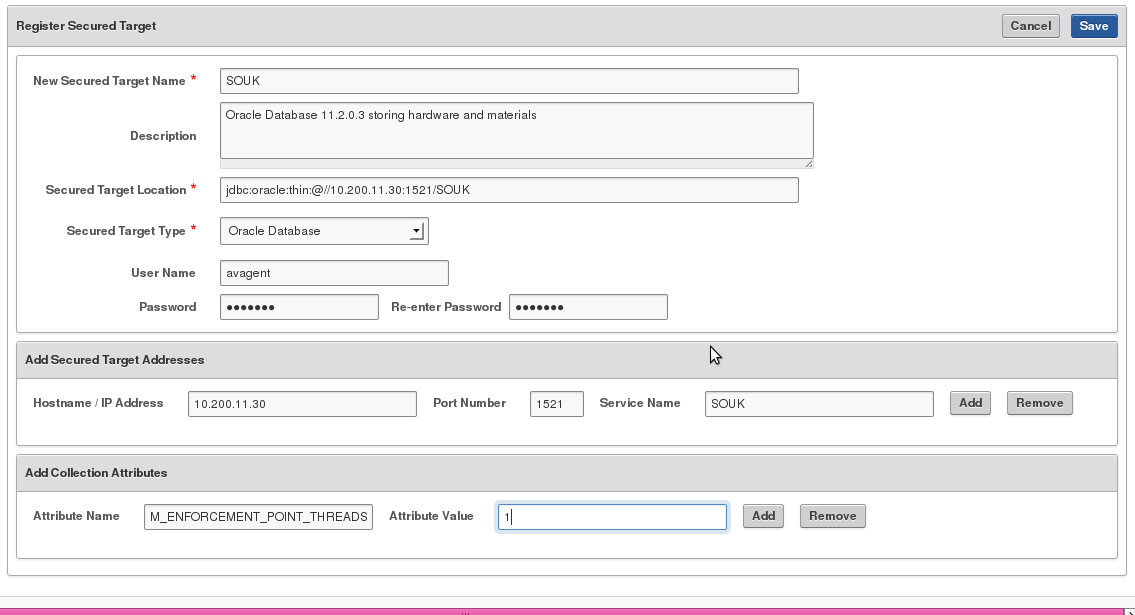
4. Click Register, and in the Register Secured Target page, enter a name and description for the new target.
5. In the Secured Target Location field, enter the connect string for the secured target. See “Secured Target Locations (Connect Strings)” for the connect string format for a specific secured target type. For example, for Oracle Database, the string might look like the following:
jdbc:oracle:thin:@//HOSTNAME:PORT/SERVICE_NAME
6. In the Secured Target Type field, select the secured target type, for example, Oracle Database.
7. In the User Name, Password, and Re-enter Password fields, enter the credentials for the secured target user account you created in Step 1.
8. If you will monitor this secured target with a Database Firewall, in the Add Secured Target Addresses area, for each available connection of this database enter the following information, and then click Add.
- IP Address (or Host Name)
- Port Number
- Service Name (Oracle Database only)
9. If required, enter values for Attribute Name and Attribute Value at the bottom of the page, and click Add. Collection attributes may be required by the Audit Vault Agent depending on the secured target type. See “Collection Attributes” to look up requirements for a specific secured target type.
10. If you will monitor this secured target with a Database Firewall, you can increase the processing resource for this secured target by adding the following Collection Attribute:
- Attribute Name: MAXIMUM_ENFORCEMENT_POINT_THREADS
- Attribute Value: A number between 1 – 16 (default is 1)
This defines the maximum number of Database Firewall processes (1 – 16) that may be used for the enforcement point associated with this secured target. You should consider defining this if the number of secured targets you are monitoring is less than the number of processing cores available on the system running the Database Firewall. Setting a value when it is not appropriate wastes resources.
11. Click Save.
Configuring an Audit Trail in the Audit Vault Server
In order to start collecting audit data, you must configure an audit trail for each secured target in the Audit Vault Server, and then start the audit trail collection manually. Before configuring an audit trail for any secured target, you must:
- Add the secured target in the Audit Vault Server. See “Registering or Removing Secured Targets in the Audit Vault Server” for details.
- Register the secured target host machine and deploy and activate the agent on that machine. See “Registering Hosts”.
This procedure assumes that the Audit Vault Agent is installed on the same computer as the secured target.
To configure an audit trail for a secured target:
1. Log in to the Audit Vault Server console as an administrator.
2. Click the Secured Targets tab.
3. Under Monitoring, click Audit Trails. The Audit Trails page appears, listing the configured audit trails and their status.
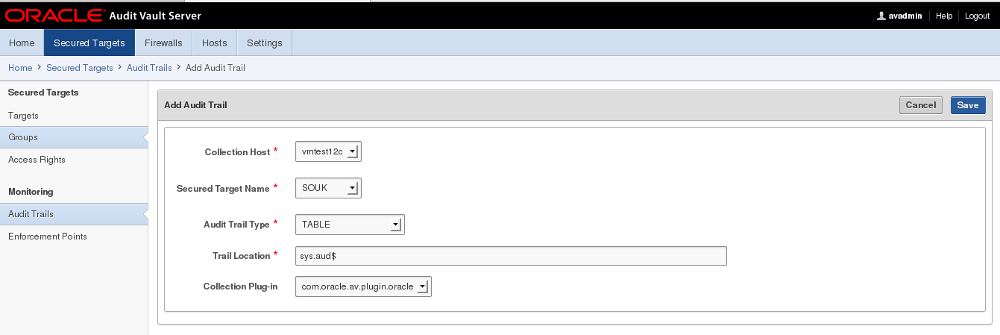
4. In the Audit Trails page, click Add.
5. From the Collection Host drop-down list, select the host computer of the secured target.
6. From the Secured Target Name drop-down list, select the secured target’s name.
7. From the Audit Trail Type drop-down list, select one of the following:
- CUSTOM
- DIRECTORY
- EVENT LOG
- NETWORK
- SYSLOG
- TABLE
- TRANSACTION LOG
See Table B-13 for details on which type(s) of audit trails can be collected for a specific secured target type, and “Data Collected for Each Audit Trail Type” for descriptions of data collected.
8. In the Trail Location field, enter the location of the audit trail on the secured target computer, for example, sys.aud$. The trail location depends on the type of secured target. See “Audit Trail Locations” for supported trail locations. Note: If you selected DIRECTORY for Audit Trail Type, the Trail Location must be a directory mask.
9. If you have deployed plug-ins for this type of secured target, select the plug-in in the Collection Plug-in drop-down list. For more information on plug-ins, see “About Agent Plug-ins”.
10. Click Save.
Starting and Stopping Audit Trails in the Audit Vault Server
To start or stop audit trail collection for a secured target:
1. Log in to the Audit Vault Server console as an administrator.
2. Click the Secured Targets tab.
3. Click Audit Trails.
4. Select the audit trail(s) you want to start or stop, and then click Start or Stop. 
I very do hope that this blog will help you delpoying AVDF. Do not hesitate to post comments if you have any questions.


![Thumbnail [60x60]](https://www.dbi-services.com/blog/wp-content/uploads/2022/08/GRS_web-min-scaled.jpg)
![Thumbnail [90x90]](https://www.dbi-services.com/blog/wp-content/uploads/2022/10/STS_web-min-scaled.jpg)
![Thumbnail [90x90]](https://www.dbi-services.com/blog/wp-content/uploads/2022/08/STH_web-min-scaled.jpg)
![Thumbnail [90x90]](https://www.dbi-services.com/blog/wp-content/uploads/2024/01/HME_web.jpg)