Automating Oracle Linux Installation with Kickstart
Kickstart ?
If you need to setup from scratch several Oracle Linux systems for your Oracle databases, it can be boring to repeat the install tasks again and again on each servers.
Automation and standardization are the keys.
Kickstart can provide an easy way to accomplish mass deployment.
Kickstart configuration files
Kickstart will use a Kickstart configuration file to perform the deployment.
Maintaining ready to go Kickstart configurations is easy.
We will use in our demo an ftp server to store and access our configuration file.
Direct access to the video:

Lets go !
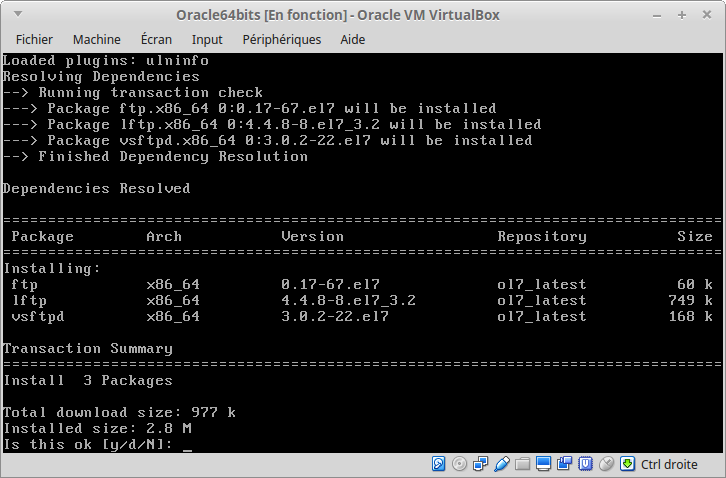
Fisrt install an ftp server
On an oralinux 7.2 server, just type following command to install an ftp server + an ftp client
yum install vsftpd ftp lftp
Then adapt timeout parameter to avoid disconnection when deploying your server.
Be sure anonymous access is enable.
[root@localhost ~]# sed '/^#/d' /etc/vsftpd/vsftpd.conf
anonymous_enable=YES
local_enable=YES
write_enable=YES
local_umask=022
dirmessage_enable=YES
xferlog_enable=YES
connect_from_port_20=YES
xferlog_std_format=YES
idle_session_timeout=6000
data_connection_timeout=1200
listen=NO
listen_ipv6=YES
pam_service_name=vsftpd
userlist_enable=YES
tcp_wrappers=YES
and start your ftpd server.
systemctl start vsftpd
Then put your kickstart configuration file in it. i will explain the file later:
vi /var/ftp/pub/myksfile.ks
And copy/paste the whole content. I will explain the file later:
########################################################################
########################################################################
##                                                                    ##
##               Kickstart for OEL7 :  olg.dbi-services.com           ##
##                                                                    ##
########################################################################
########################################################################

# install through HTTP
########################################################################
install
cdrom


# locale settings
########################################################################
lang en_US.UTF-8
keyboard --vckeymap=ch --xlayouts='ch'
timezone --utc Europe/Zurich


# X is not configured on the installed system.
########################################################################
skipx


# installation mode
########################################################################
text
reboot --eject


# Partition table initialization
########################################################################
zerombr


# Network configuration
# Oracle Linux 7: How to modify Network Interface names (Doc ID 2080965.1)
########################################################################
### network --device eth0 --bootproto static --ip 192.168.56.102 --netmask 255.255.255.0 --gateway 192.168.56.1 --nameserver it.dbi-services.com --hostname olg.dbi-services.com net.ifnames=0


# security settings
########################################################################
rootpw      toor
firewall    --enabled --ssh
selinux   --enforcing
authconfig  --enableshadow --passalgo=sha512


# Partitioning and bootloader
########################################################################
# only 1 disk presented to the O.S during installation time
# net.ifnames=0 to use eth name for network devices
bootloader      --location=mbr  --append="nofb quiet splash=quiet crashkernel=auto net.ifnames=0"
firstboot       --disable
clearpart       --all          --initlabel
part /boot      --fstype xfs   --ondisk=/dev/sda --size=512
part swap       --size=2048   --ondisk=/dev/sda
part pv.01      --size=100     --ondisk=/dev/sda --grow
volgroup RHELVG pv.01
logvol /        --fstype xfs   --name=RootLV   --vgname=RHELVG --size=8196
logvol /usr     --fstype xfs   --name=UsrLV    --vgname=RHELVG --size=2048
logvol /tmp     --fstype xfs   --name=TmpLV    --vgname=RHELVG --size=2048
logvol /var     --fstype xfs   --name=VarLV    --vgname=RHELVG --size=4096
logvol /var/log/audit     --fstype xfs   --name=AuditLV    --vgname=RHELVG --size=2048
logvol /opt     --fstype xfs   --name=OptLV    --vgname=RHELVG --size=2048
logvol /home    --fstype xfs   --name=HomeLV   --vgname=RHELVG --size=2048
logvol /u01     --fstype xfs   --name=u01LV    --vgname=RHELVG --size=2048


# packages + RPMs
########################################################################
%packages
@base

# system components
device-mapper-multipath
kexec-tools
lvm2
e4fsprogs
sg3_utils
lsscsi
dstat
ntp
perl
postfix
bc

# VI
vim-common
vim-enhanced

# SELINUX
setroubleshoot
setroubleshoot-server
setroubleshoot-plugins

%end


# POST installations tasks
########################################################################
%post

modprobe --first-time bonding
# VLAN kernel module
# modprobe --first-time 8021q

# configure bond
################
echo "DEVICE=bond0
TYPE=Bond
BONDING_MASTER=yes
BOOTPROTO=static
IPADDR=192.168.56.149
NETMASK=255.255.255.0
GATEWAY=192.168.56.1
BONDING_OPTS=\"mode=active-backup miimon=100\"
ONPARENT=yes
ONBOOT=yes" > /etc/sysconfig/network-scripts/ifcfg-bond0

echo "DEVICE=eth0
ONBOOT=yes
MASTER=bond0
BOOTPROTO=none
NM_CONTROLLED=no
SLAVE=yes" > /etc/sysconfig/network-scripts/ifcfg-eth0

echo "DEVICE=eth1
ONBOOT=yes
MASTER=bond0
BOOTPROTO=none
NM_CONTROLLED=no
SLAVE=yes" > /etc/sysconfig/network-scripts/ifcfg-eth1

echo "DEVICE=eth2
ONBOOT=yes
BOOTPROTO=dhcp
NM_CONTROLLED=no
" > /etc/sysconfig/network-scripts/ifcfg-eth2

rm -f /etc/sysconfig/network-scripts/ifcfg-en*

systemctl restart network
systemctl stop NetworkManager.service
systemctl disable NetworkManager.service


# Switch to Postfix
###################
alternatives --set mta  /usr/sbin/sendmail.postfix


# HOSTS FILE
############
cat >> /etc/hosts <> /etc/ntp.conf

# DNS config
#############
cat > /etc/resolv.conf < /etc/postfix/main.cf < /etc/postfix/master.cf <> /etc/postfix/generic
postmap /etc/postfix/generic


# user management + SUDO privilege delegation
########################################################################
adduser admora
echo toor | passwd admora --stdin

echo "admora    ALL=NOPASSWD: ALL
#admora  ALL = NOPASSWD: /bin/su - oracle , /bin/su -" >> /etc/sudoers


# Enable services
########################################################################
systemctl enable ntpd.service
systemctl start ntpd.service
systemctl enable ntpdate.service


# Oracle +Nagios prereqs
########################################################################
yum -y install oracle-rdbms-server-11gR2-preinstall oracle-rdbms-server-12cR1-preinstall oracle-database-server-12cR2-preinstall
yum -y install openssl openssl-devel
yum -y install net-tools
# as of ALUA RHEL7.4 incompatibilities (stay on 7.2 and lock repo. later)
#yum -y update


# Oracle tuned configuration
########################################################################
mkdir -p /usr/lib/tuned/dbiOracle
cat > /usr/lib/tuned/dbiOracle/tuned.conf < /sys/class/fc_host/host1/issue_lip
echo 1 > /sys/class/fc_host/host2/issue_lip

echo "# Format:
# alias wwid
#
LUN_ORAFRA 360030d90466abf0660191bde985bba15
LUN_ORADBF 360030d906382c2065827918ddb6506da" >> /etc/multipath/bindings

cat > /etc/multipath.conf <<EOF

defaults {
   polling_interval 60
         }

blacklist {
 devnode "^sd[a]"
        devnode "^(zram|ram|raw|loop|fd|md|dm-|sr|scd|st)[0-9]*"
        devnode "^hd[a-z]"
        devnode "^cciss!c[0-9]d[0-9]*"
}
blacklist_exceptions {
 wwid "360030d90466abf0660191bde985bba15"
 wwid "360030d906382c2065827918ddb6506da"
 #vendor   "DataCore"
 #product   "Virtual Disk"
              }
devices {
 device {
   vendor    "DataCore"
   product   "Virtual Disk"
   path_checker   tur
   prio     alua
   failback   10
   no_path_retry   fail

   dev_loss_tmo   infinity
   fast_io_fail_tmo  5

   rr_min_io_rq    100
   # Alternative option – See notes below
   # rr_min_io  100

   path_grouping_policy  group_by_prio
   # Alternative policy - See notes below
   # path_grouping_policy failover

    # optional - See notes below
   user_friendly_names yes
                 }
         }
EOF

systemctl reload multipathd

# final post steps (Bugs, security)
####################################
systemctl disable rdma.service
touch /.autorelabel
dracut -f

%end
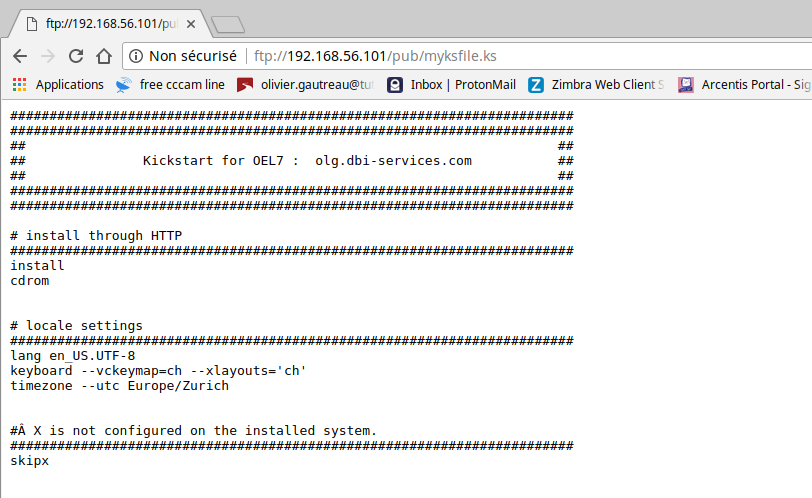
Test that you can access anonymously to your file through ftp with your browser
ftp://192.168.56.101/pub/myksfile.ks
Or via an ftp client
$ lftp ftp://192.168.56.101
lftp 192.168.56.101:~> cat /pub/myksfile.ks
You can now deploy your Oracle Linux server for a new database:
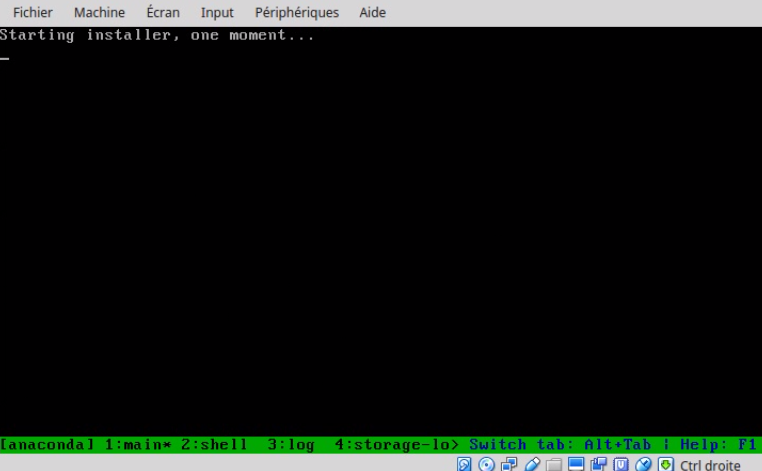
When you arrive on the installation screen,
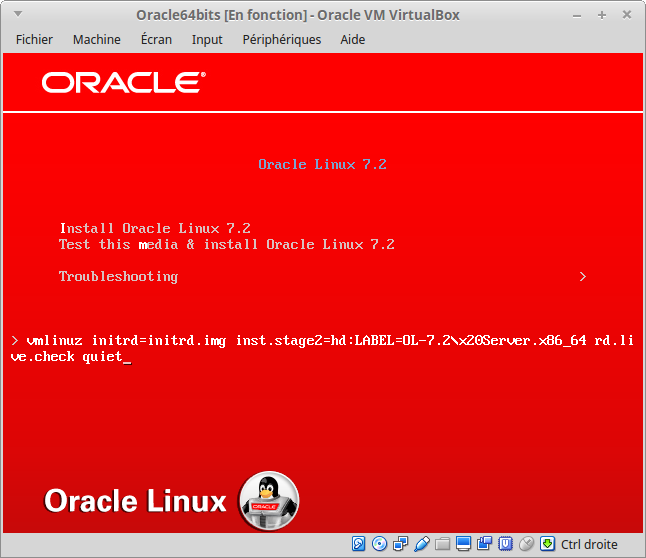
Booting from dvd, press ESC to get the boot prompt and type
For the demo, I’m using Virtual Box VM, + 1 dvd drive for the ISO file i have downloaded from the oracle site: V100082-01.iso (oralinux7.2)
linux ks=ftp://192.168.56.101/pub/myksfile.ks
Then press ENTER as shown in this demo:
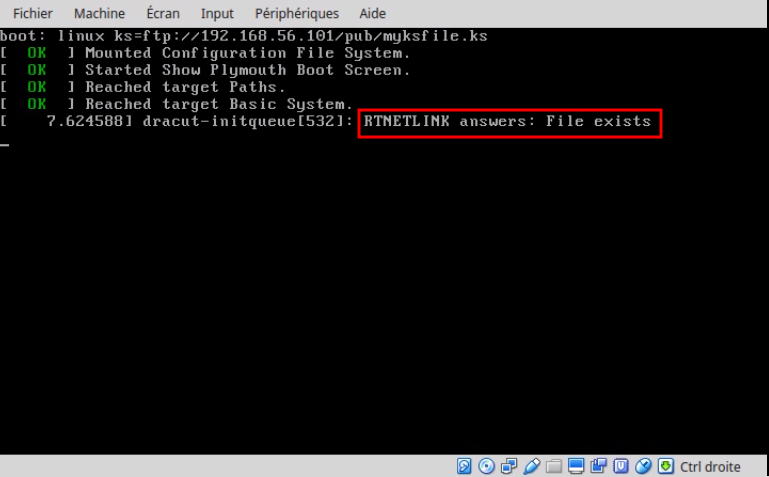
Here, if you don’t get RNETLINK answers: File exists, something is wrong in your network configuration.
At this step, if you see the green line, it’s mean you entered in anaconda and that your installation process is ongoing.
If you receive some Pane errors, once again, something is wrong in the network configuration. This is the hard part. Depending of the customer infrastructure, you could need to set up ip manually.
Below 2 examples: one using a static IP configuration and the other a VLAN configuration.
static IP configuration
linux ip=192.168.56.102 netmask=255.255.255.0 gateway=192.168.56.1 servername=it.dbi-services.com ks=ftp://192.168.56.101/pub/myksfile.ks net.ifnames=0
static IP configuration with use of VLAN (VLANID=27 in this example)
linux ip=192.168.56.102 netmask=255.255.255.128 gateway=192.168.56.1 servername=it.dbi-services.com ks=ftp://192.168.56.1/myksfile.ks net.ifnames=0 vlan=VLAN27.27:eth0
Anaconda will now perform the partitioning part:
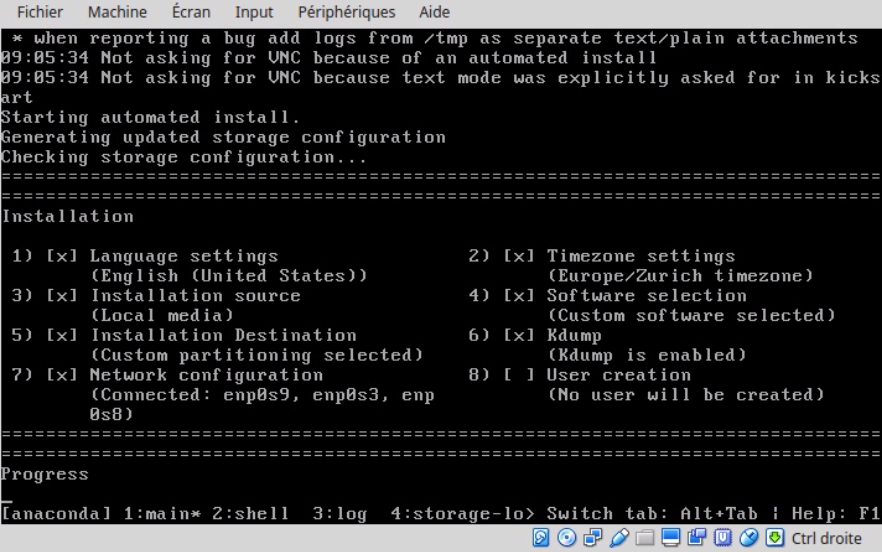
For the demo, I’m using a 40G disk. If you don’t give enough space, or if you have done some errors in your configuration, you will be prompt to fix the configuration issues. You would better restart the installation from the beginning.
# Partitioning and bootloader
########################################################################
# only 1 disk presented to the O.S during installation time
# net.ifnames=0 to use eth name for network devices
bootloader      --location=mbr  --append="nofb quiet splash=quiet crashkernel=auto net.ifnames=0"
firstboot       --disable
clearpart       --all          --initlabel
part /boot      --fstype xfs   --ondisk=/dev/sda --size=512
part swap       --size=2048   --ondisk=/dev/sda
part pv.01      --size=100     --ondisk=/dev/sda --grow
volgroup RHELVG pv.01
logvol /        --fstype xfs   --name=RootLV   --vgname=RHELVG --size=8196
logvol /usr     --fstype xfs   --name=UsrLV    --vgname=RHELVG --size=2048
logvol /tmp     --fstype xfs   --name=TmpLV    --vgname=RHELVG --size=2048
logvol /var     --fstype xfs   --name=VarLV    --vgname=RHELVG --size=4096
logvol /var/log/audit     --fstype xfs   --name=AuditLV    --vgname=RHELVG --size=2048
logvol /opt     --fstype xfs   --name=OptLV    --vgname=RHELVG --size=2048
logvol /home    --fstype xfs   --name=HomeLV   --vgname=RHELVG --size=2048
logvol /u01     --fstype xfs   --name=u01LV    --vgname=RHELVG --size=2048
When the partitioning part is finish, the package installation process will begin.
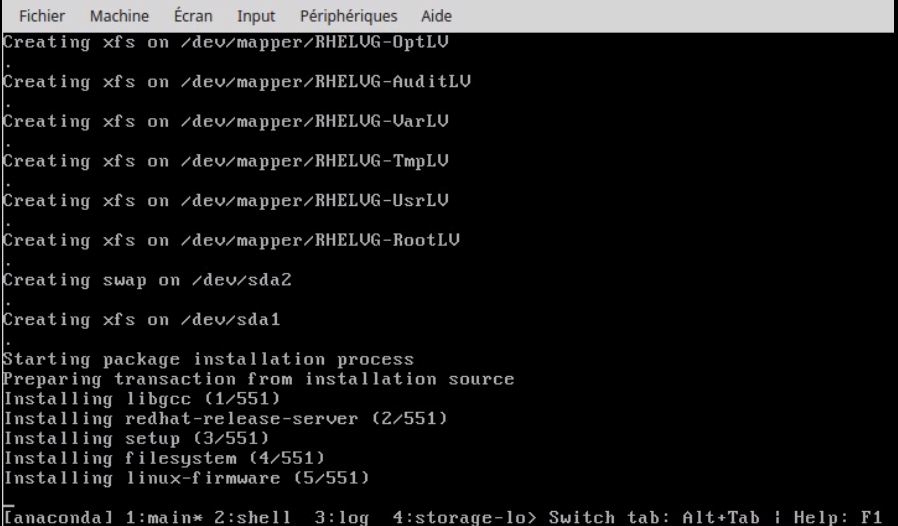
You can add personalize the packages you want install from the dvd.
# packages + RPMs
########################################################################
%packages
@base

# system components
device-mapper-multipath
kexec-tools
lvm2
e4fsprogs
sg3_utils
lsscsi
dstat
ntp
perl
postfix
bc
During the installation, you can TAB between console to get more information on what’s going on.
Console 2 permit you to type shell commands:
For the demo, I’m using 3 Ethernet cards: 2 for the bonding, 1 NAT for internet connection.
With ip a command, i can see which the interface names and IP i’m currently using during the installation process:
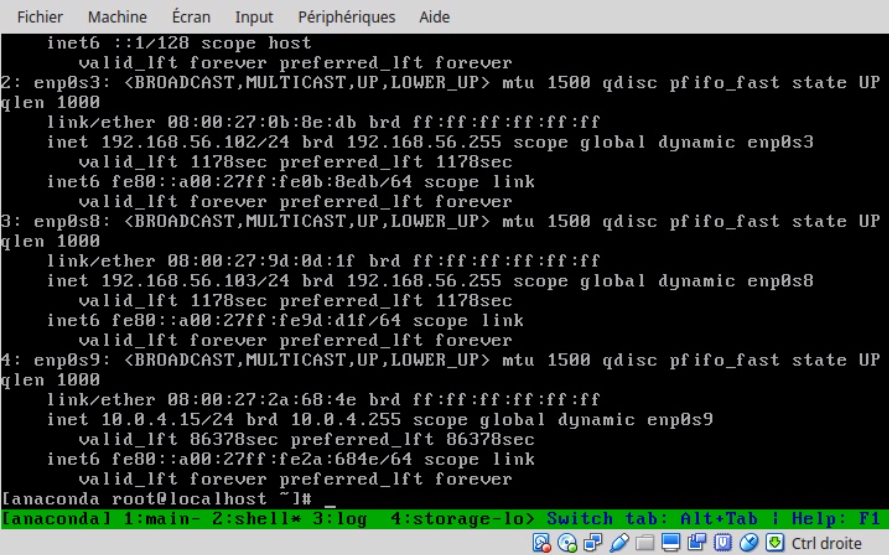
Because I set net.ifnames=0, eth will be used after rebooting for my netcard interfaces name. I will configure them in the POST installations tasks.
bootloader --location=mbr --append="nofb quiet splash=quiet crashkernel=auto net.ifnames=0
Switching between Console 1 / Console 3 / Console 5 permit to see what anaconda is doing. Interesting part it the %%post message.
It means you are in the POST installations tasks.
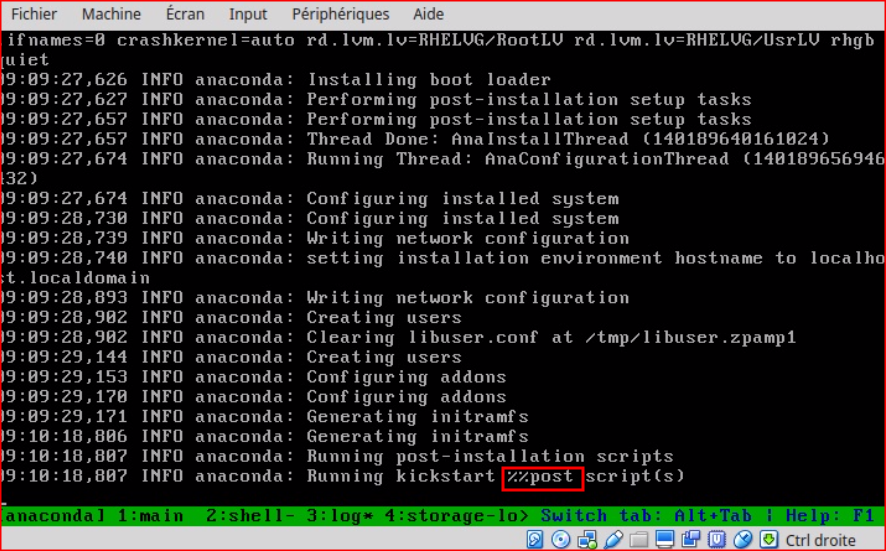
Configuration files of your system can be modified.
In my demo, i will configure bonding, postfix, multipathing + yum install oracle-database-server-12cR2-preinstall package with dependencies !
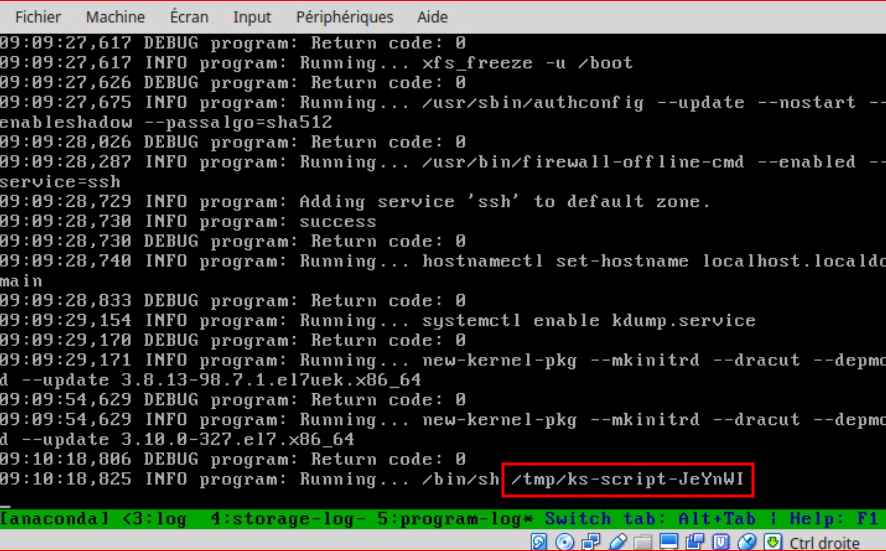
The script coming from the kickstart configuration file is stored in the /tmp folders. It is called /tmp/ks-script-JeYnWI.log in my demo.
After reboot, you can inspect it if you like to.
![Thumbnail [60x60]](https://www.dbi-services.com/blog/wp-content/uploads/2022/12/oracle-square.png)
![Thumbnail [90x90]](https://www.dbi-services.com/blog/wp-content/uploads/2025/05/martin_bracher_2048x1536.jpg)
![Thumbnail [90x90]](https://www.dbi-services.com/blog/wp-content/uploads/2022/08/DWE_web-min-scaled.jpg)