Terraform is a strong open-source declarative and platform agnostic infrastructure as code (IaC) tool developed by HashiCorp. It facilitates the deployment and whole management of infrastructure. In this hands on blog I will show you how you can use Terraform to automate your cloud deployments in Azure.
Initial Setup:
For this blog I’m using a ubuntu server as a automation server where I’m running Terraform. You can install Terraform on different operating systems. For instructions how to install Terraform check out this link from HashiCorp.
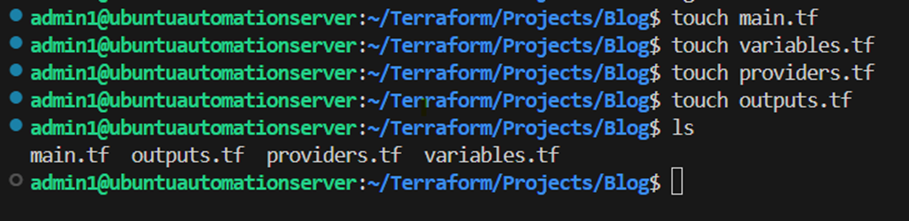
Starting with the hands on part I’m creating a new dedicated directory for my new Terraform project:

Within this new directory I’m creating the following files which will hold my configuration code:
- main.tf
- providers.tf
- variables.tf
- outputs.tf
Installing the Azure CLI:
For the authentication with Azure I’m using the Azure CLI command line tool. You can Install the Azure CLI on Ubuntu with one command which curls a script, provided by Microsoft, from the internet and executes it on your system:
curl -sL https://aka.ms/InstallAzureCLIDeb | sudo bash
To get more information’s about how to install the Azure CLI on your system, checkout this link from Microsoft.
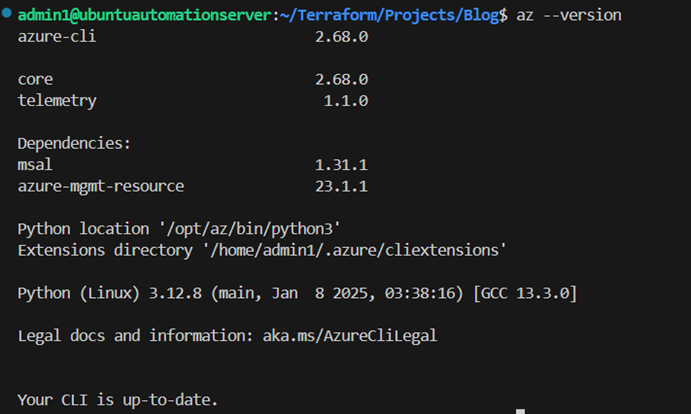
As far as the installation is successfully done, you can verify it with the following command:
az –version
Then use the following command for connecting to Azure:
az login
This command will open a browser window where you can sign in to Azure:

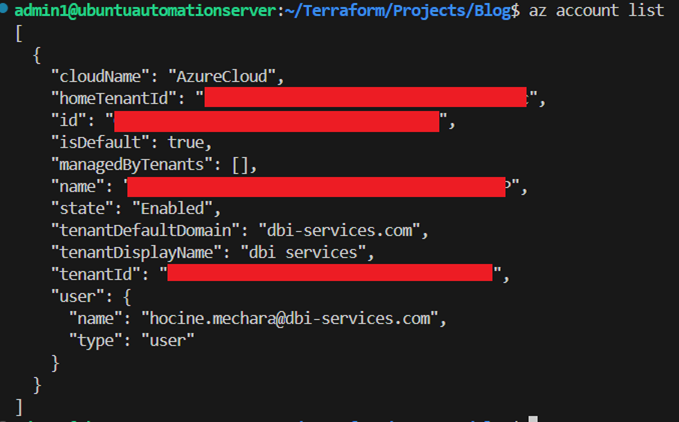
After you successfully authenticated yourself to Azure, you can check your available subscriptions with the following command:
az account list
Initialize Terraform:
As the Azure CLI is now installed on the system and we are successfully authenticated to Azure, we can now start with the configuration of Terraform and the required provider for interacting with the Azure cloud platform.
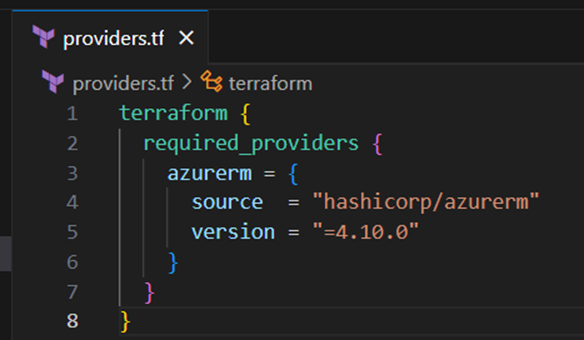
Therefore I add the code block below into the providers.tf file which will tell terraform to install and initialize the azurerm provider with the specific version 4.10.0, which is the latest at the moment:
To configure the azurerm provider, I add the provider code block below additionally into the providers.tf file.
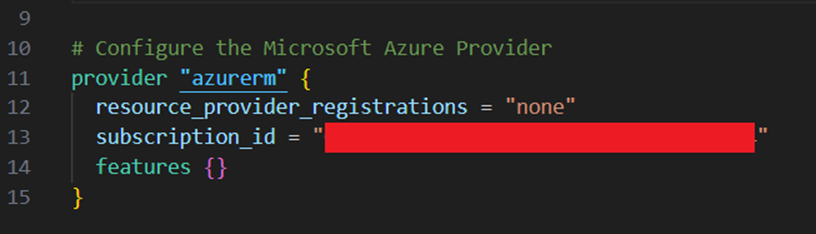
You can find your subscription ID in the output from the “az account list” command above.
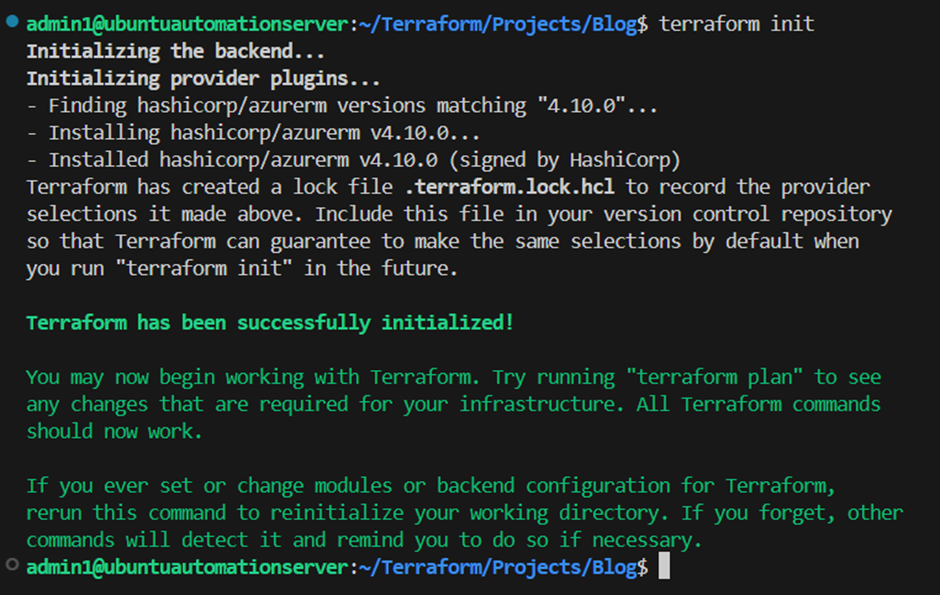
After inserting those code blocks into the providers.tf file, we can install the defined azurerm provider and initialize Terraform by running the below command in our project directory:
terraform init
Terraform Workspaces:
As Terraform is now successfully initialized and the required provider is installed, we can start with the development of our infrastructure code.
But before doing so I would like to target the concept of workspaces in Terraform. Workspaces enables you to use the same configuration code for multiple environments through separate state files. You can imagine workspaces as a separated deployment environment and you terraform code as a independent plan or image of your infrastructure. As an example, imagine you added a new virtual machine to your terraform code and deployed it in production. If you now want to have the same virtual machine for test purposes, you just have to switch into your test workspace and run the terraform code again. You will have the exact same virtual machine within a few minutes!
To check the workspaces you have in your Terraform project, use the following command:
terraform workspace list

As you can see we just have the default workspace in our new Terraform project. I want to deploy my infrastructure in this hands on blog post for multiple environments, therefore I will create some new workspaces. Lets assume we have a development, test and production stage for our infrastructure. I will create therefore the workspaces accordingly with the commands below:
terraform workspace new development
terraform workspace new test
terraform workspace new production
After executing these commands, we can now check again our available workspaces in our terraform project:

Note that terraform will let you know your current workspace through the “*” symbol behind the particular workspace. We want to deploy our infrastructure for development first. So I will switch back into the development workspace with the following command:
terraform workspace select development

Create an Azure Resource Group:
As the workspaces are now successfully created, we can start with our configuration code.
First of all I go into the variables.tf file and add the variable code block below to that file:
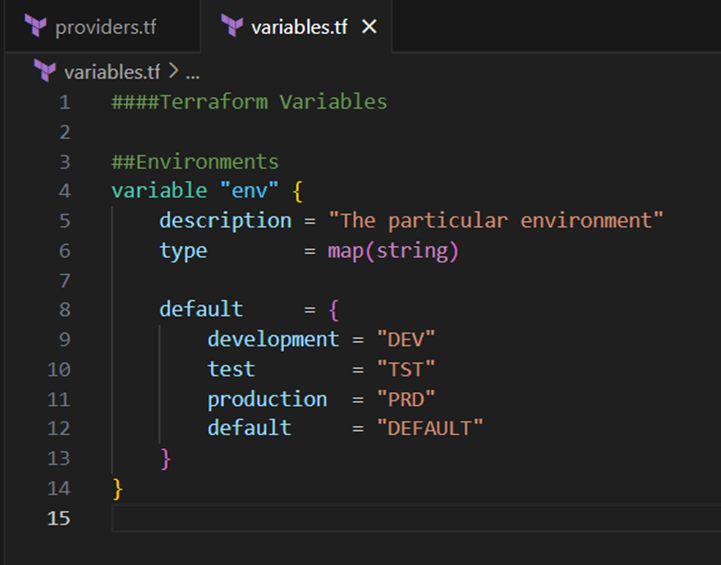
I will use this “env” variable for the suffix or prefix of resource names, which I will deploy, to simple recognize to which environment these resources belong.
Next I will create a resource group in Azure. Therefore I add the code block below to the main.tf file:
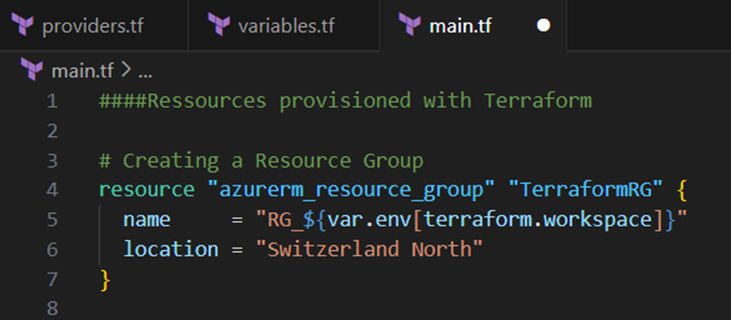
As you can see I set the name of the resource group dynamically with the prefix “RG_” and the value for the current workspace in the variable “env”, which I’ve defined before in the variables.tf file. The variable “terraform.workspace” is a default variable which refers to the current workspace.
To check which resource terraform would create in case we would apply the current configuration code, we can run the following command:
terraform plan
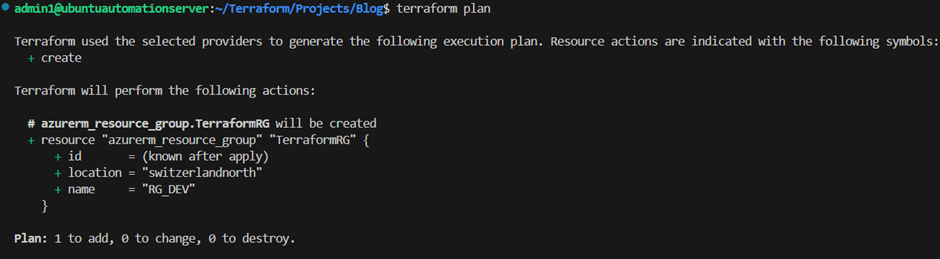
We can see that terraform would create a new resource group with the name “RG_DEV”.
Create a Virtual Network and Subnets:
Next I will create a virtual network. Therefore I add the variable code block below to the variables.tf file. This variable defines for each environment stage a own address space:
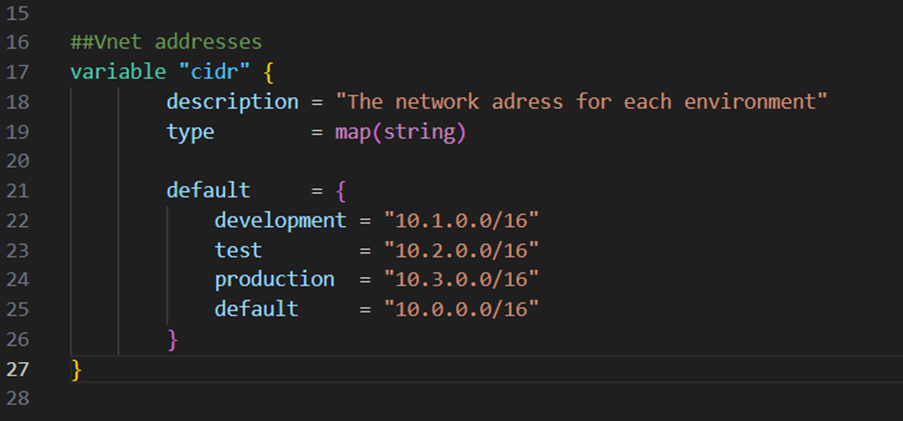
I add now the code block below to the main.tf file to create a virtual network:
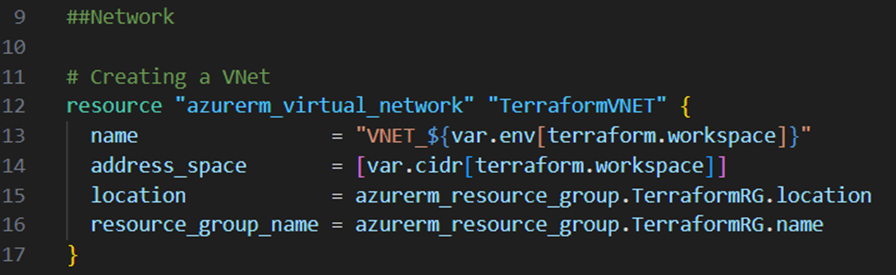
As you can see I’m referencing here as well to the “env” variable for dynamically setting the suffix of the network name and as well to the new “cidr” variable to set the address space of the virtual network.
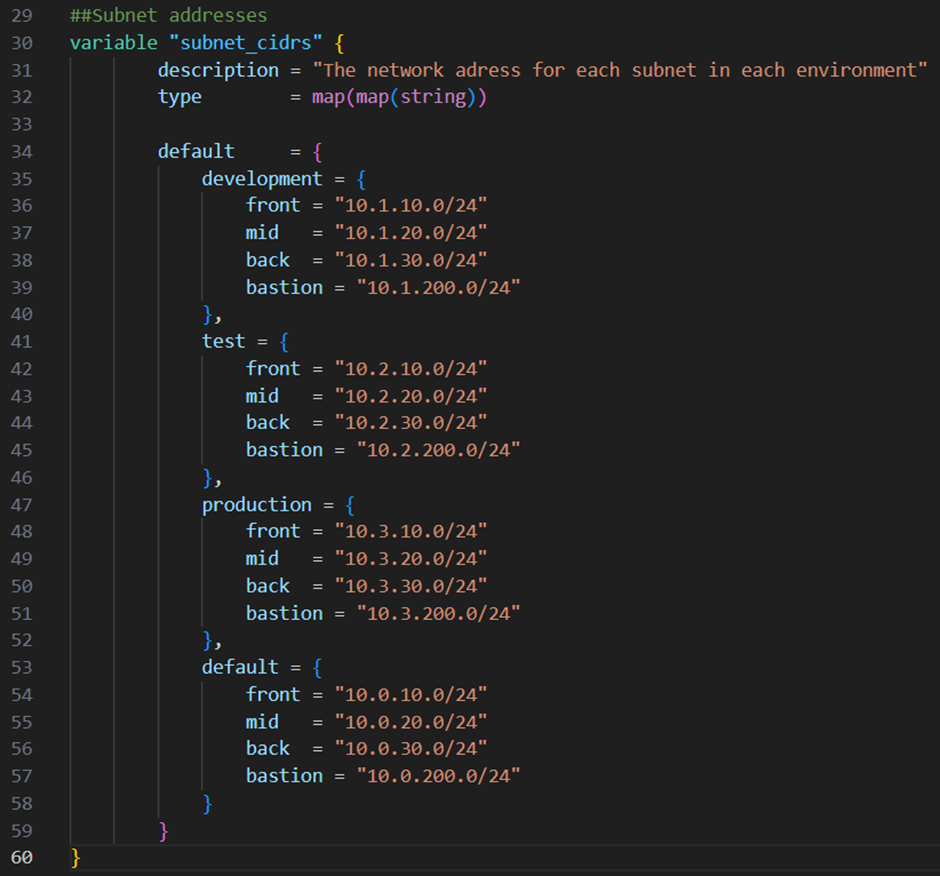
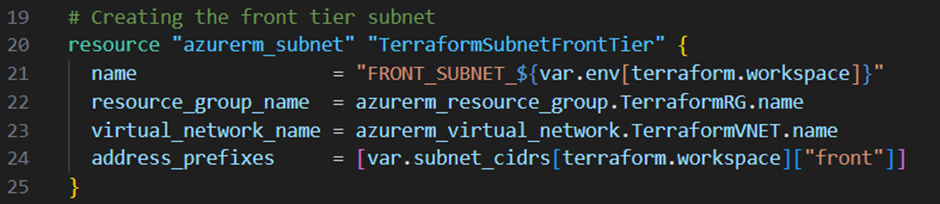
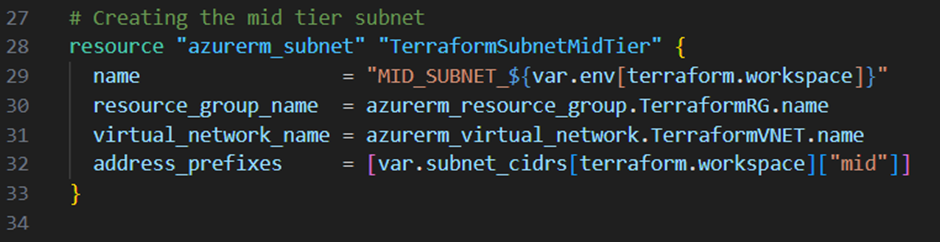
Next I will create some subnets within the virtual network. I want to create 4 subnets in total:
- A front tier subnet
- A middle tier subnet
- A backend tier subnet
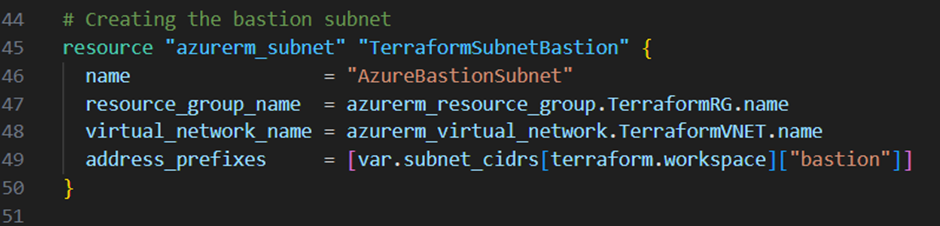
- A bastion subnet for the administration
Therefore I add the variable below to my variables.tf file, which defines for each environment stage and subnet an address space:
Next I will add for each subnet a new resource block to the main.tf file:
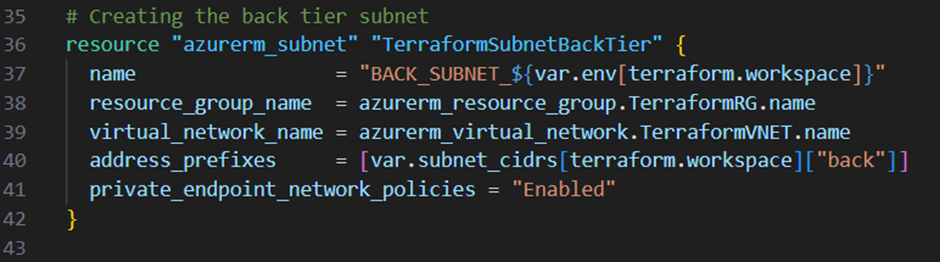
Note that I enabled in the backend tier subnet the option “private_endpoint_network_policies”. This is a option which enforces the network security groups to take effect on the private endpoints in the particular subnet. Checkout this link from Microsoft for more information’s about this option.
Create an Azure SQL Database:
Next I will create an Azure SQL Server. Therefore I add the variable below to my variables.tf file. This variable is supposed to hold the admin password of the Azure SQL Server. I set the sensitivity option for this variable which will prevent the password to be exposed in the terminal output or in the Terraform logs:
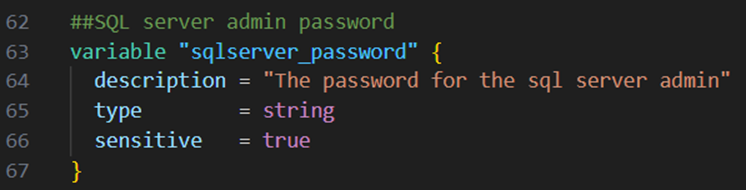
I did also not set any value in the configuration files, instead I will set the variable value as a environment variable before applying the configuration.
Next I add the code block below to my main.tf file:
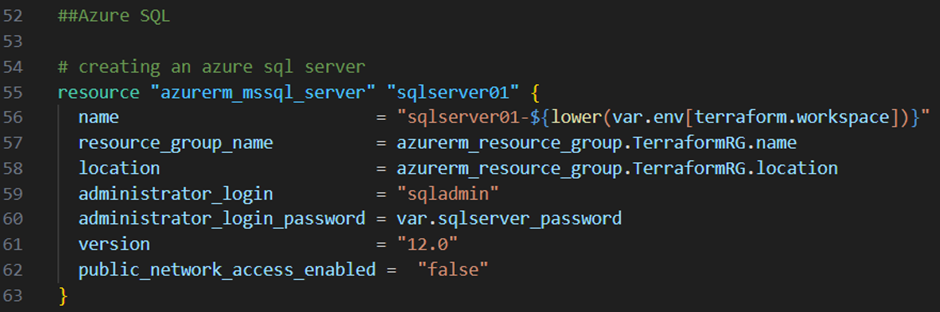
As you can see I referenced the “sqlserver_password” variable to set the password for the “sqladmin” user. I also disabled the public network access to prevent database access over the public endpoint of the server. I will create instead a private endpoint later on.
Next I will create the Azure SQL Database. Therefore I add the variable below to my variables.tf file:
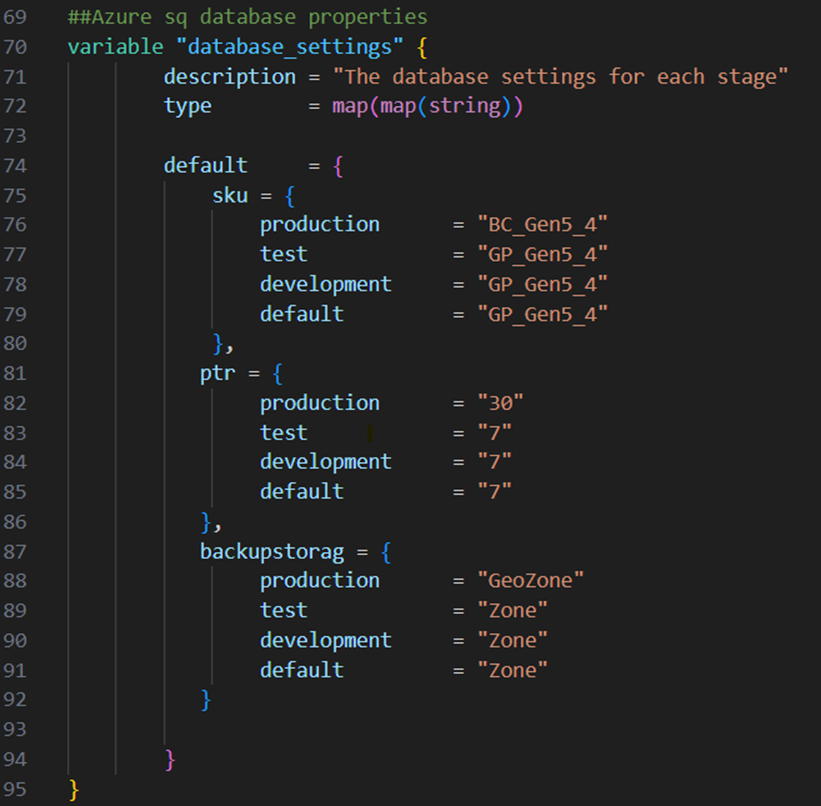
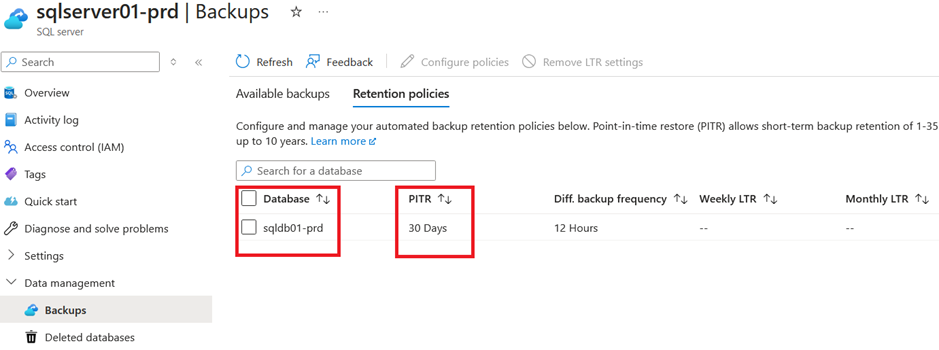
The thought behind this variable is, that we have different requirements for the different stages. The general purpose SKU is sufficient for the non-productive databases but for the productive one we want the business critical service tier. As well as we want to have 30 days of point in time recovery for our productive data while 7 days is sufficient for non-productive and we want to store our productive database backups on geo-zone redundant storage while zone redundant storage is sufficient for the non-productive databases.
Then I add the resource block below into my main.tf file:
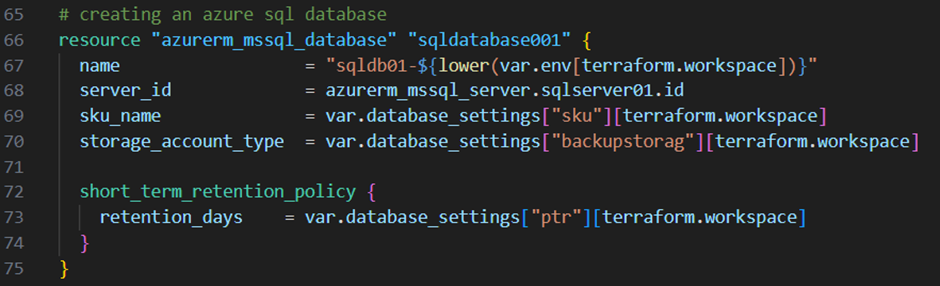
As you can see I’m referencing to my “database_settings” variable to set the configuration options dynamically.
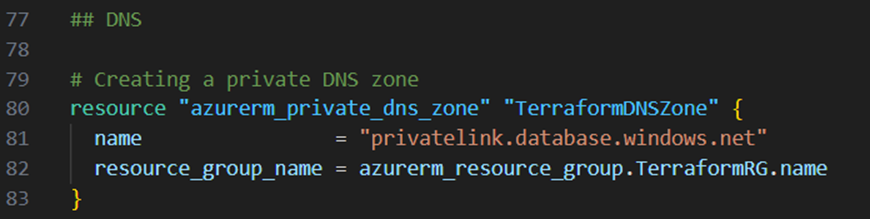
Create a DNS Zone and a Private Endpoint:
For name resolution I will next create a private DNS zone. For that I add the resource block below to my main.tf file:
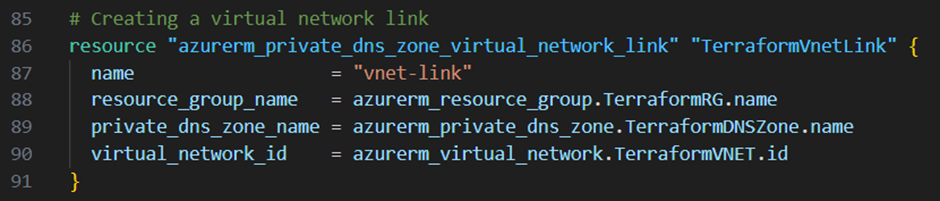
To associate this private DNS zone now with my virtual network, I will next create a virtual network link. Therefore I add the resource block below to my main.tf file:
To be able to securely connect to my azure sql database I will now create a private endpoint in my backend subnet. Therefore I add the resource block below to my main.tf file:

With this configuration code, I create a private endpoint with the name of the Azure SQL Server and the suffix “-endpoint”. Through the option “subnet_id” I place this endpoint in the backend subnet with a private service connection to the Azure SQL Server. I also associate the endpoint to the private DNS zone, which I’ve created just before, for name resolution.
Create an Azure Bastion:
Lets now continue and create an azure bastion host for the administration of our environment. Therefore I first create a public IP address through adding the resource block below to my main.tf file:

Next I create the bastion host itself. For that I add the code block below to my main.tf file:

Create a Virtual Machine:
Now I will add a virtual machine to my middle tier subnet. Therefore I need to create first a network interface for that virtual machine. The resource block below will create the needed network interface:

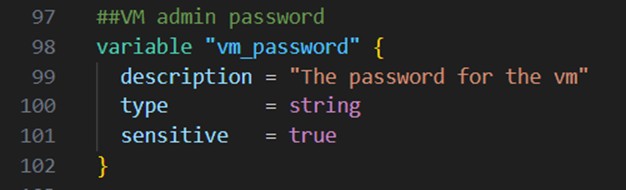
As the virtual machine, which I intend to create, needs an admin password like the azure sql server, I will create an additional password variable. Therefore I add the code block below to my variables.tf file:
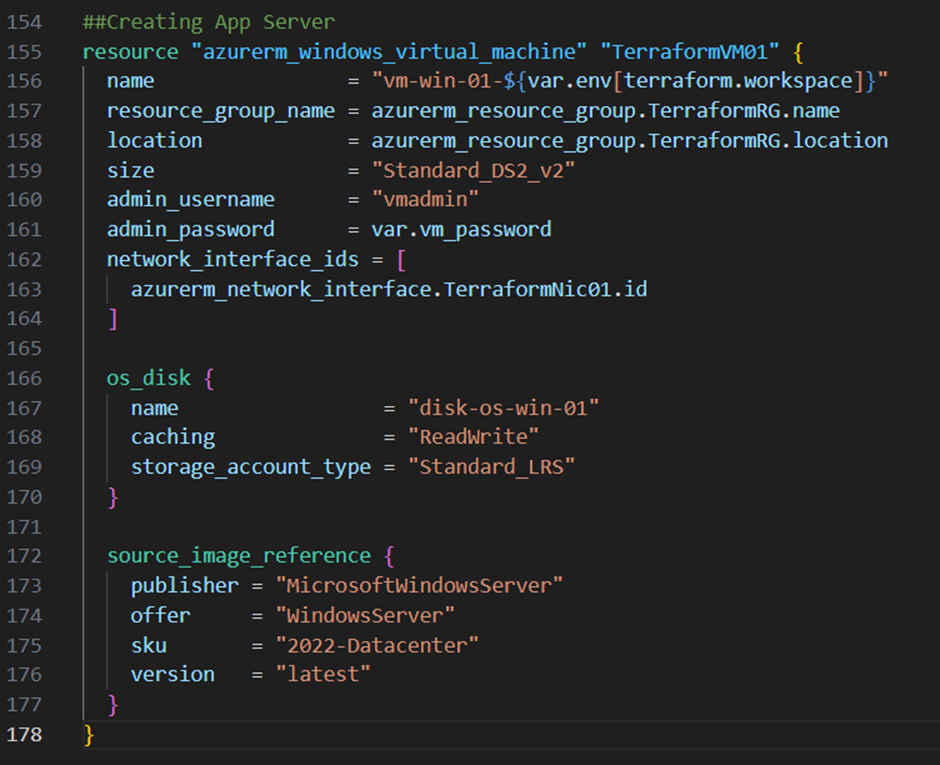
To create the virtual machine itself, I add the resource block below to my main.tf file:
Create Network Security Groups and Rules:
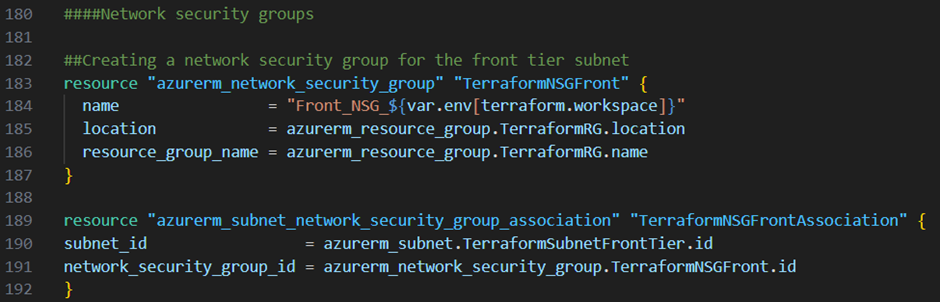
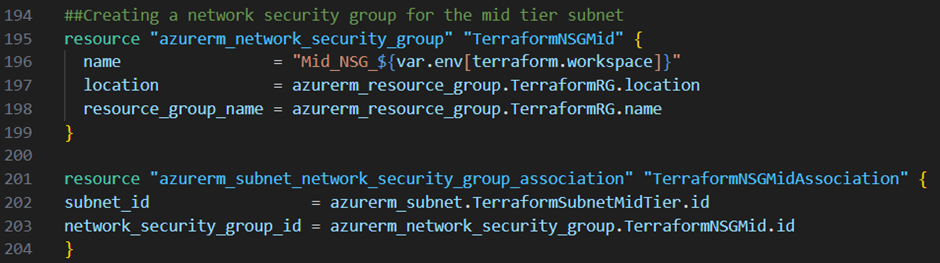
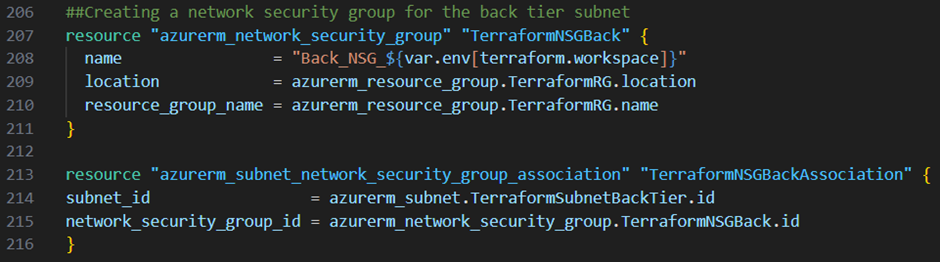
Next I want to secure my subnets. Therefore I create for my front tier, middle tier and backend tier subnet a network security group by adding the resource blocks below to my main.tf file:
Next I create for each network security group particular rules.
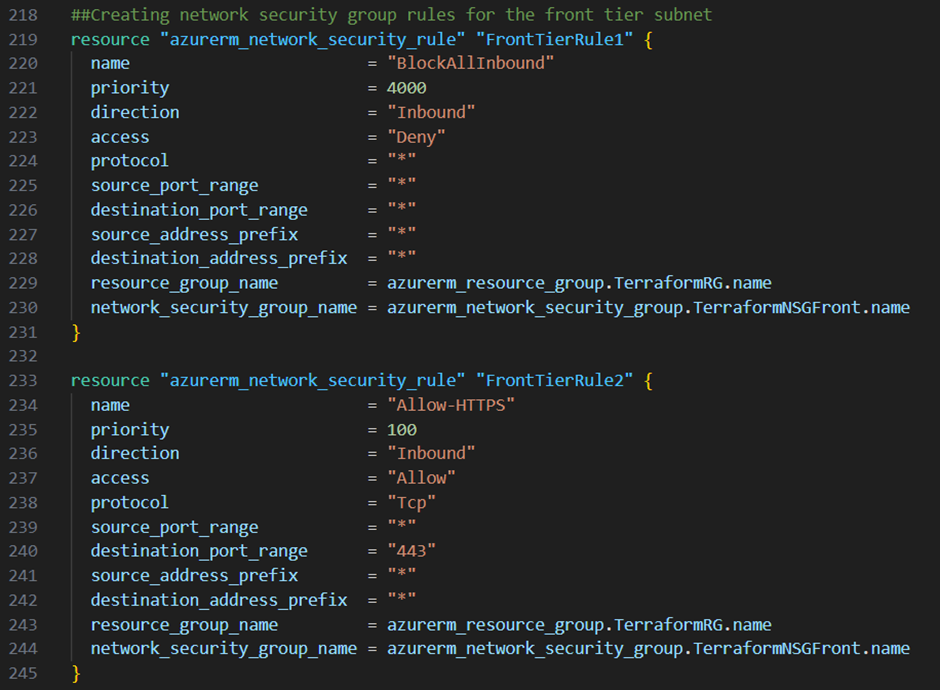
Starting with the front tier subnet I want to block all Inbound traffic except traffic over https. Therefore I add the two resource blocks below to my main.tf file:
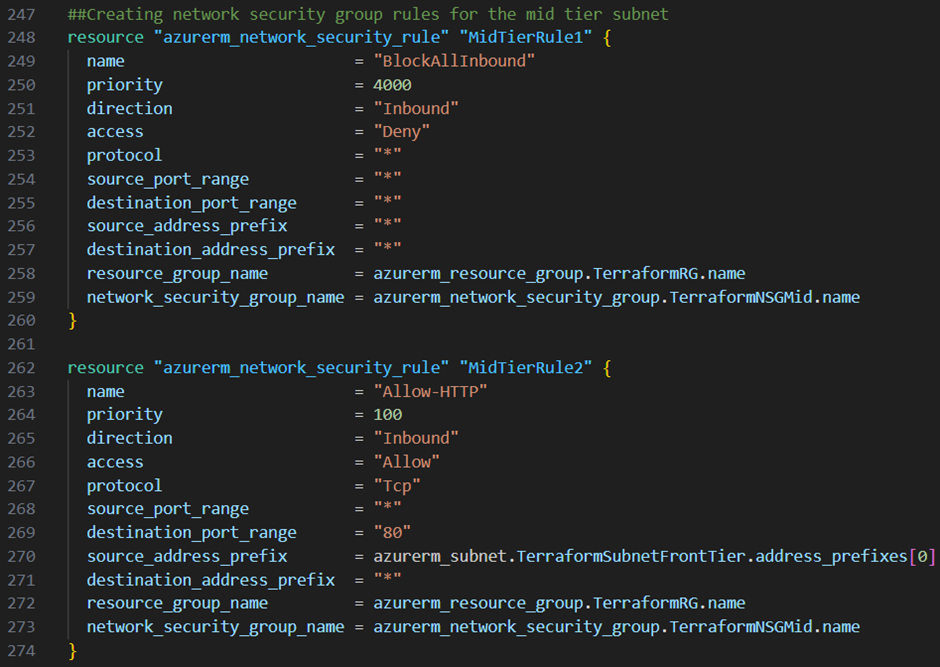
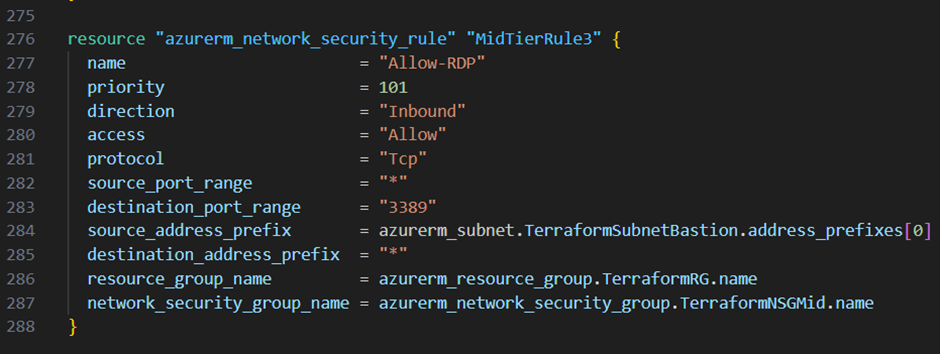
Continuing with the middle tier subnet I want to block all inbound traffic but allow http traffic only from the front tier subnet and allow rdp traffic only from the bastion subnet. Therefore I add the three resource blocks below to my main.tf file:
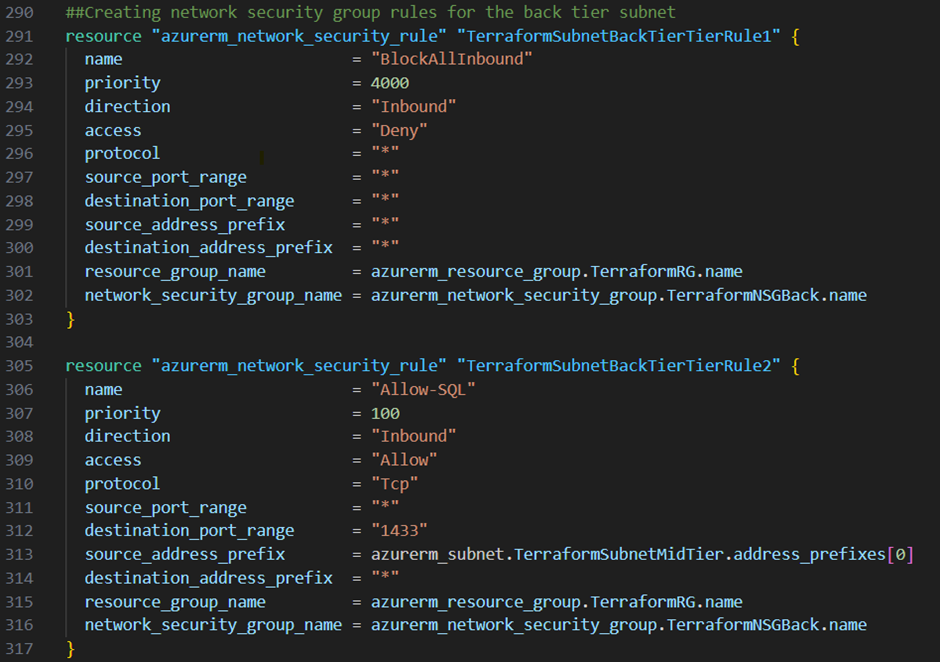
Last but not least I want to block all Inbound traffic to my backend tier subnet except traffic to the sql-server port from the middle tier subnet. In addition I want to block explicitly the internet access from this subnet.
You are questioning why I’m explicitly block internet access from this subnet while I haven’t any public IP address or NAT gateway for this subnet? That’s because Microsoft provides access to the internet through a default outbound IP address in case no explicit way is defined. That’s a feature which will be deprecated on the 30th September 2025. To get more information’s about this feature check out this link from Microsoft.
To create the rules for the backend tier subnet I add the three resource blocks below to my main.tf file:

Define Output Variables:
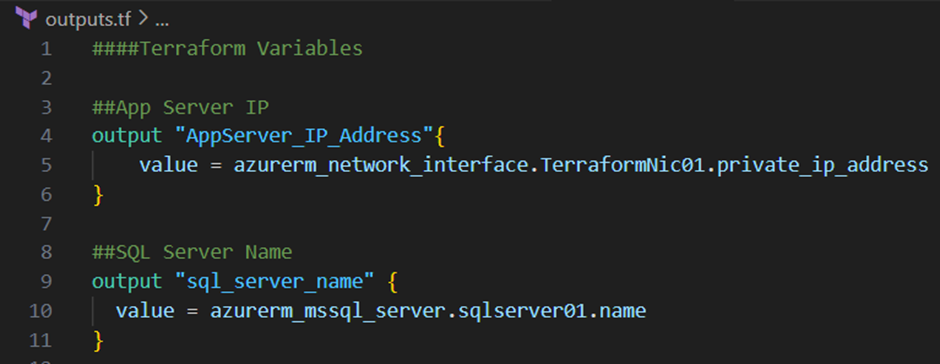
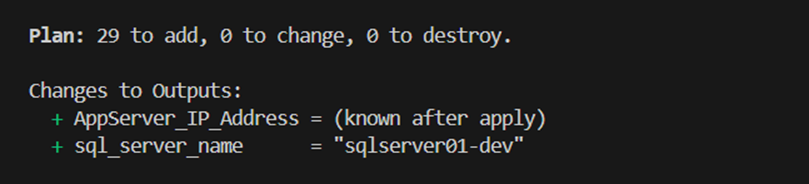
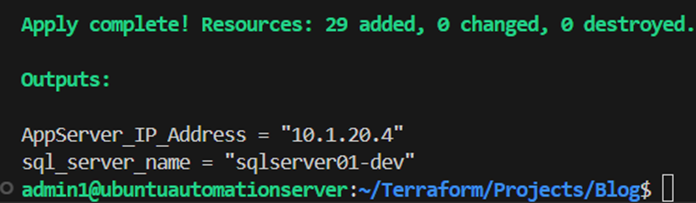
I will stop with the creation of resources for this blog post and will show you finally how you can define outputs. For example let’s assume we want to have the name of the Azure SQL Server and the IP address of the virtual machine extracted after the deployment. Therefore I add the two output variables below to the outputs.tf file:
Outputs are especially useful when you need to pass up information’s from the deployment to a higher context. For example when you are working with modules in terraform and you want to pass information’s from a child module to a parent module. In our case the outputs will just be printed out to the command line after the deployment.
Apply the Configuration Code:
As I am now done with the definition of the configuration code for this blog post, I will plan and apply my configuration for each stage. Before doing so, I need to first set a value for my password variables. On Ubuntu this can be done with this command:
export TF_VAR_sqlserver_password=”your password”
export TF_VAR_vm_password=”your password”
After I’ve set the variables, I run the terraform plan command and we can see that terraform would create 29 resources:
This seems to be good for my so I run the terraform apply command to deploy my infrastructure:
terraform apply
After some minutes of patience terraform applied the configuration code successfully:
Check the Infrastructure in the Azure Portal:
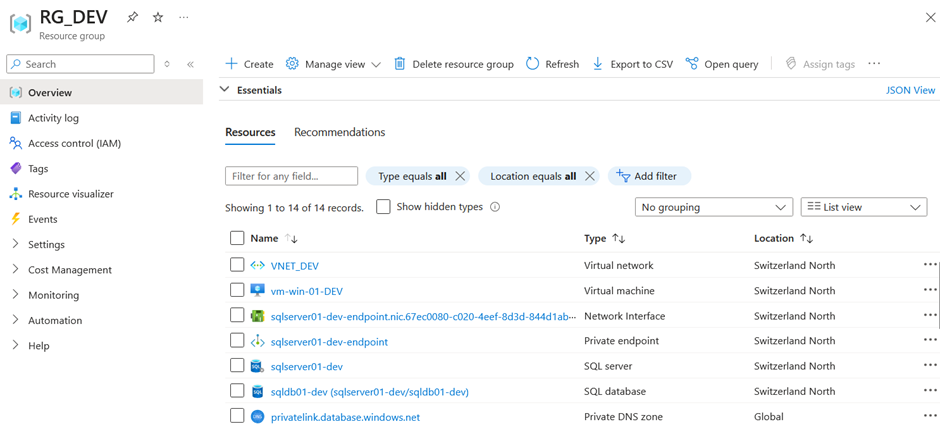
When I’m signing in to the Azure portal I can see my development resource group with all the resources inside:
I want to have my test and production resources as well so I switch the terraform workspace to test and production and run in both workspaces again the terraform apply command.
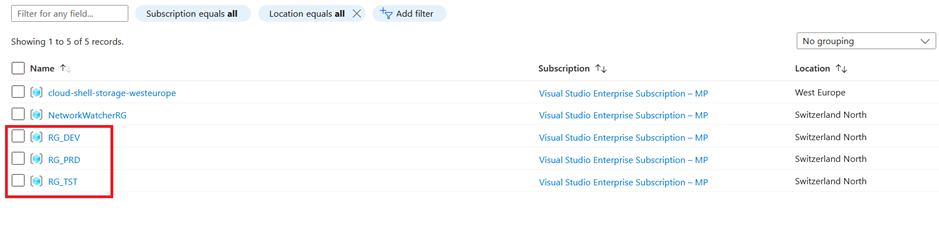
After some additional minutes of patience we can see in the Azure portal that we have now all resources for each environment stage:
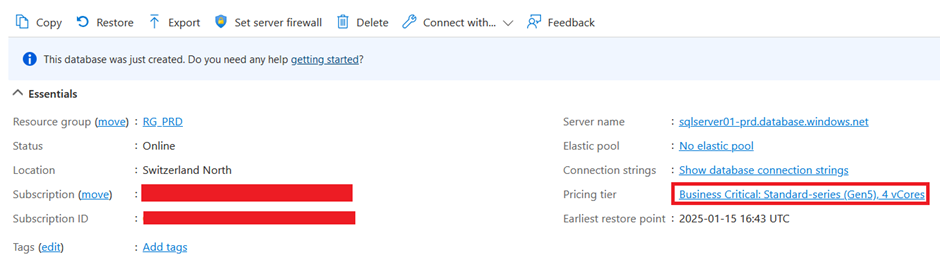
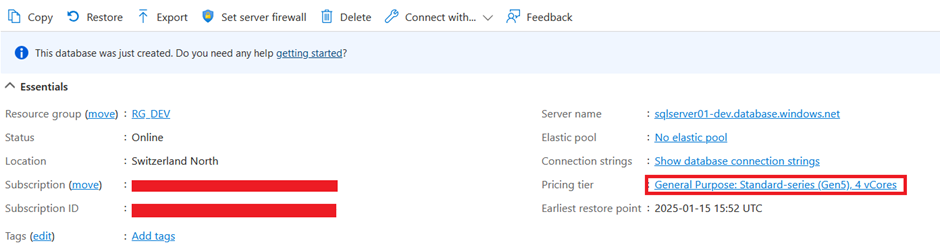
Lets now compare the settings from the productive database with the development database and we can see that the SKU for the productive one is business critical while the SKU for the non-productive one is general purpose:
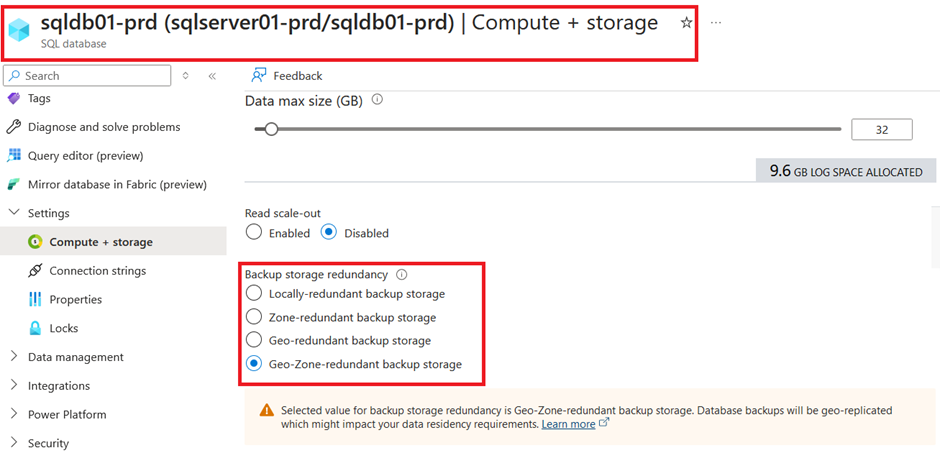
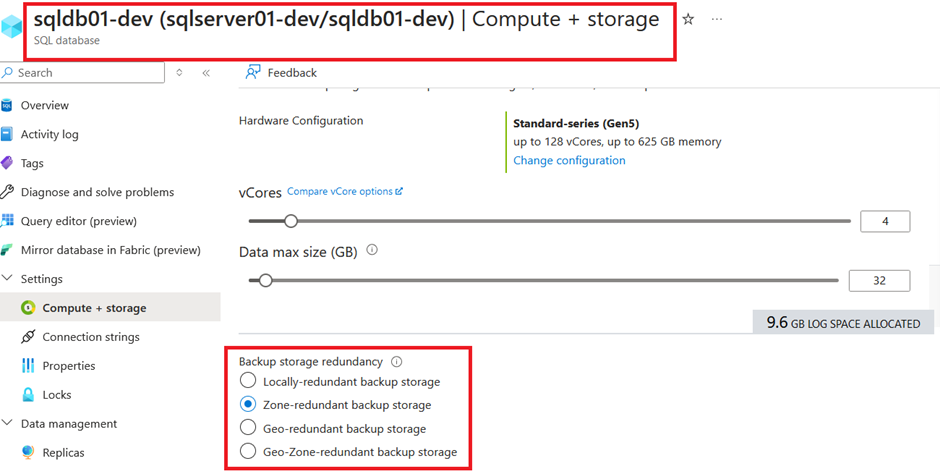
The Backup storage has also been set according to the “database_settings” variable:
We can see the same for the point in time recovery option:

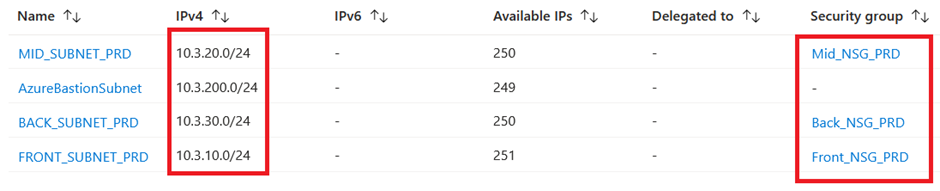
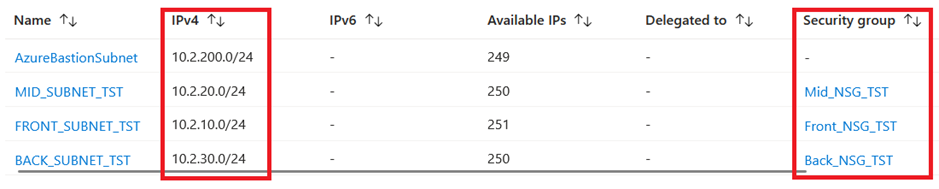
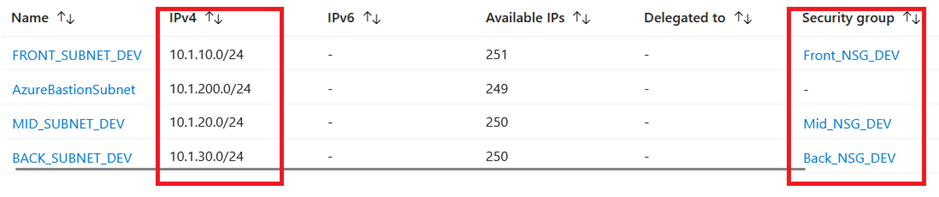
We can see that our subnets are also all in place with the corresponding address space and network security group associated:
Lets check the private endpoint of the Azure SQL Server. We can see that we have a private IP address within our backend subnet which is linked to the Azure SQL Server:

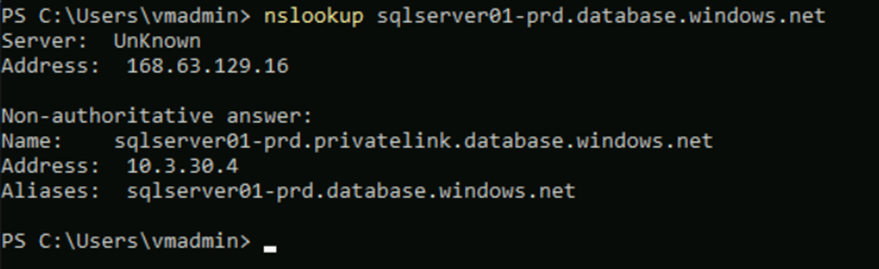
Lets connect to the virtual machine and try a name resolution. You can see that we were able to successfully resolve the FQDN:
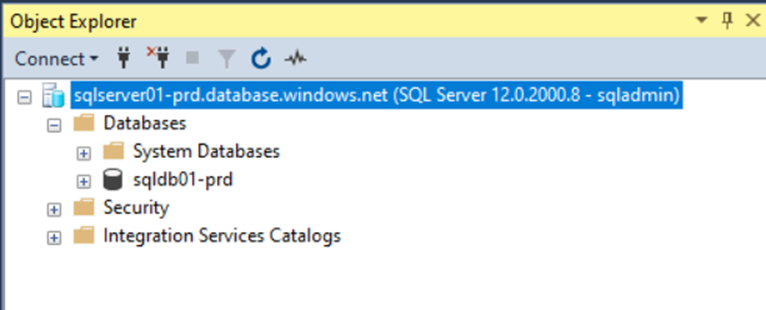
After installing SQL-Server management studio on the virtual machine, we can also connect to the Azure SQL Server through the FQDN of the private endpoint:
Delete the Deployed Resources:
For now preventing getting a high bill for something I didn’t use, I will now delete all resources which I’ve created with Terraform. This is very simple, and can be done through running the terraform destroy command in each workspace:
terraform destroy
I hope you got some interesting examples and ideas about Terraform and Azure! Feel free to share your questions and feelings about Terraform and Azure with me in the comment section below.
PS: I’ve uploaded the configuration code used in this blog post to a GitHub repository to make it easier for you to reproduce the steps and examples. You can find it here.
![Thumbnail [60x60]](https://www.dbi-services.com/blog/wp-content/uploads/2024/01/HME_web.jpg)
![Thumbnail [90x90]](https://www.dbi-services.com/blog/wp-content/uploads/2023/01/APY_web-scaled.jpg)
![Thumbnail [90x90]](https://www.dbi-services.com/blog/wp-content/uploads/2025/11/LTO_WEB.jpg)