Oracle DBAAS (Database As a Service) offers a good solution for on demand access to software and infrastructure. In this posting, I will describe the DBAAS implementation with Enterprise Manager Cloud 12c.
Why Database as a Service is interesting
When a developer team needs a new database, the system administrator has to configure the host, the storage administrator has to configure the storage, and the database administrator has to download the latest oracle database version and install it on a host. These configuration operations last at least two days. If we need to implement a high availability solution and to configure the backup operations correctly, the total implementation time can go up to one week.
All these operations have a cost and as organizations have more and more applications to maintain, the IT directors are starting to have a closer look at data management.
This is why Oracle DBAAS (Database As a Service) can be an interesting solution.
Installing Oracle Database as a Service (DBAAS)
First, you have to implement the following plugins, which are required to enable Database as a Service (DbaaS) in EM Cloud 12.1.0.3.0:
- Enterprise Manager for Oracle Cloud
- Enterprise Manager for Oracle Virtualization
- Enterprise Manager for Oracle Consolidation Planning and Chargeback
- Enterprise Manager for Oracle Database
- Enterprise Manager for Storage Management
We have to deploy the plugin on the management server:
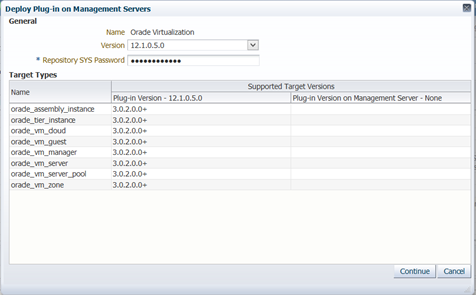
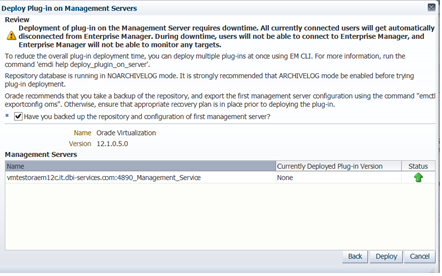
There will be a downtime during the plugin installation; the OMS server won’t be available during the configuration.
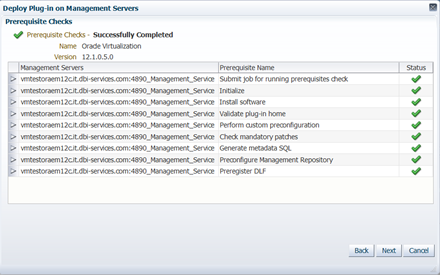
The following command will show us how the deployment is running on the OMS server:
oracle@vmtestoraem12c:/u01/app/oracle/MiddleWare_12103/oms/ [oms12c] emctl status oms -details
Oracle Enterprise Manager Cloud Control 12c Release 3
WebTier is Down
Unable to deploy or undeploy the plug-in. Oracle Management Server is down possibly because the following plug-ins are being deployed or undeployed from it. Try again after some time.
Plug-in Deployment/Undeployment Status
Plug-in Name         : Oracle Virtualization
Version              : 12.1.0.5.0
ID                   : oracle.sysman.vt
Content              : Plug-in
Action               : Deployment
Status               : Deploying
Steps Info:
Step                                     Start Time                End Time                  Status
Submit job for deployment                9/6/13 9:16:34 AM CEST    9/6/13 9:16:34 AM CEST    Success
Initialize                               9/6/13 9:16:37 AM CEST    9/6/13 9:16:43 AM CEST    Success
Install software                         9/6/13 9:16:44 AM CEST    9/6/13 9:16:45 AM CEST    Success
Validate plug-in home                    9/6/13 9:16:47 AM CEST    9/6/13 9:16:47 AM CEST    Success
Perform custom preconfiguration          9/6/13 9:16:47 AM CEST    9/6/13 9:16:47 AM CEST    Success
Check mandatory patches                  9/6/13 9:16:47 AM CEST    9/6/13 9:16:47 AM CEST    Success
Generate metadata SQL                    9/6/13 9:16:47 AM CEST    9/6/13 9:16:47 AM CEST    Success
Preconfigure Management Repository       9/6/13 9:16:47 AM CEST    9/6/13 9:16:47 AM CEST    Success
Stop management server                   9/6/13 9:16:51 AM CEST    9/6/13 9:17:44 AM CEST    Success
Register DLF                             9/6/13 9:17:44 AM CEST    N/A                       Running
Configure Management Repository          9/6/13 9:17:45 AM CEST    N/A                       Running
Configure middle tier                    9/6/13 9:17:45 AM CEST    N/A                       Running
After a few minutes, the Web Tier and the Oracle Management server are up and running and the needed plugins are correctly deployed.
We also have to install the Cloud plugin in the same way we deployed the previous plugins.
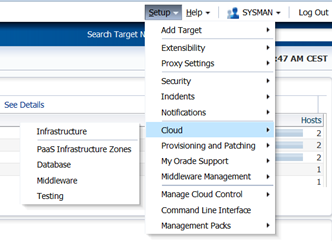
Finally, the setup menu has the new Cloud infrastructure menu:
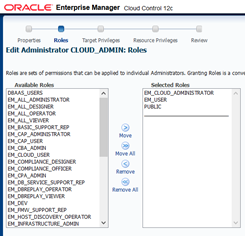
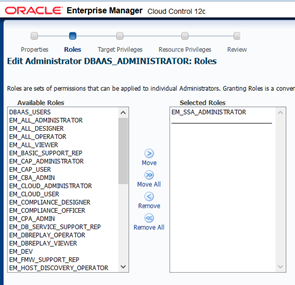
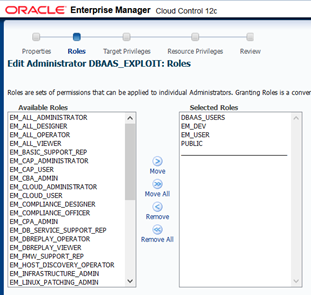
We have to create roles and users via the setup security administrators menu with its own Cloud User privileges in the following way:
A user named cloud_admin with the EM_CLOUD_ADMINISTRATOR role allowing it to setup and deploy the cloud.
A user named dbaas_administrator who has the em_ssa_administrator role to define quotas and constraints for the self-service user and grant them access privileges:
And finally, a user named dbaas_exploit will be the self-service portal user:
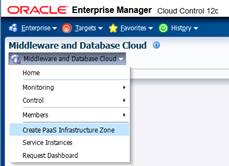
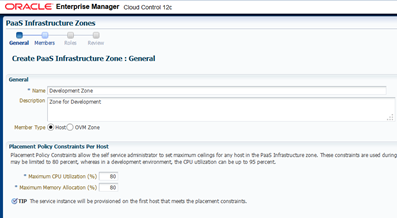
Once all the plugins are installed, the first operation consists in creating a PaaS infrastructure zone. A Paas (Paltform As A Service) zone is a group of hosts discovered in Enterprise Manager Cloud 12c.
Connected as cloud_admin. From the Enterprise menu, Middleware and database Cloud, we select Create Paas Infrastructure Zone:
We define a development zone with members of type host and we define the maximum CPU and memory utilization:
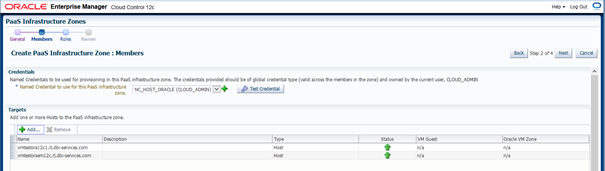
We define credentials and we add hosts:
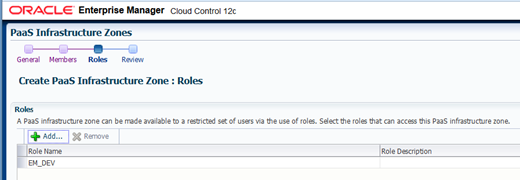
We select the roles that can access this Paas zone:
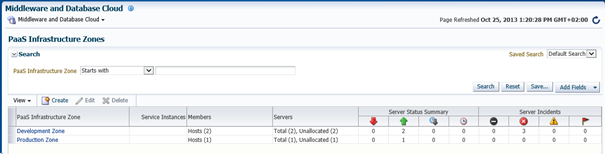
Finally, the Pass infrastructure zone is correctly created:
In the same way, we can create a Production zone made of production hosts:
A database pool is a set of resources that can be used to provision a database instance in a Paas infrastructure zone. We can define pools for databases and pool for schemas.
A pool for databases is a collection of servers with database software installed.
A pool for schemas is a collection of databases containing schemas.
From a practical point of view, the database administrator will create provisioning profiles which will be stored in the software library. A provisioning profile can be an Oracle database with or without the software, or can an extract of a database. Provisioning profiles can be created using rman backups, dbca templates, snapshots, or expdp dumps.
In the following example, I will show you how to create a database pool with a rman backup and a schema pool.
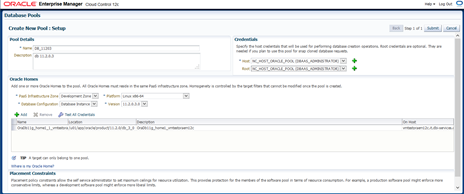
Connected as DBAAS_ADMINISTRATOR, we can create a database pool as follows:
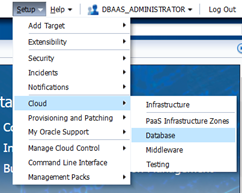
From the setup menu, we select Cloud and Database:
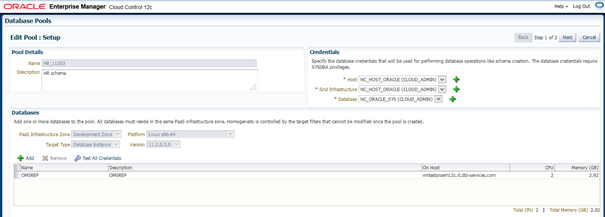
We fill in the pool name, the credentials, the PaaS zone, the platform version, and the oracle software version.
You should then immediately test the credentials:
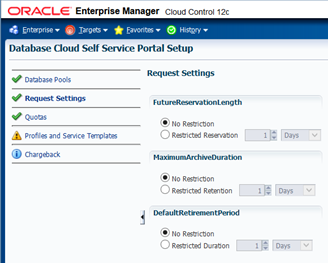
Concerning the “Request Settings”, I set everything on “No restriction”:
I define the following quotas: 4 Gb memory, 100 Gb storage, and 10 schema service requests:

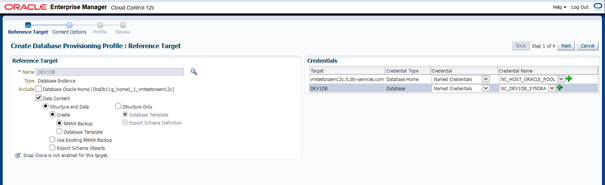
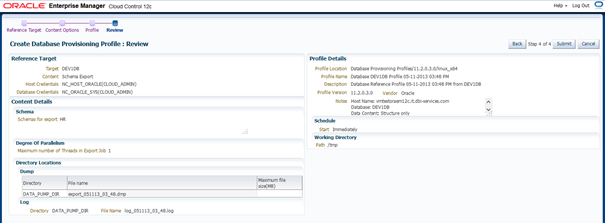
It’s time now to define a database provisioning profile. In my example, I will chosse Structure only with a database template:
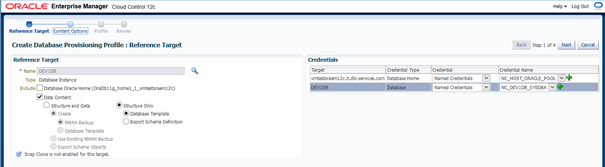
Or an RMAN backup:
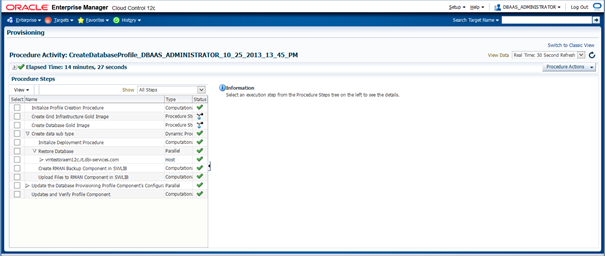
We submit the Database Provisioning Profile creation; we can view the deployment in the Procedure Activity screen:
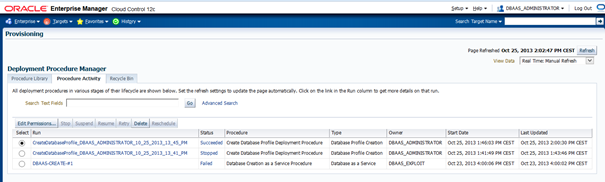
The next page shows that the Profile has been correctly created in the Procedure Activity page:
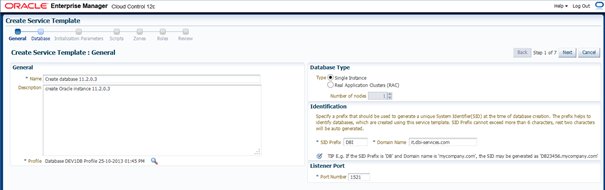
The next step consists in creating a service template: We give a name and a description, and choose the database type.
We also have to specify a prefix for the database to be created in the future, as well as a domain name:
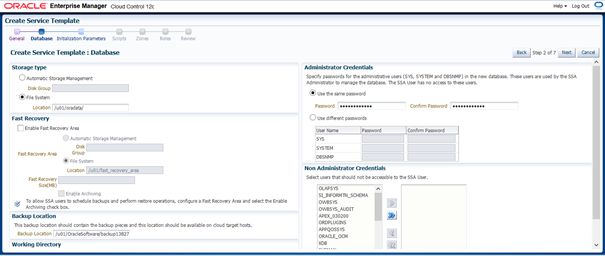
We define the storage type (ASM or File System), administrator Credentials, and select “Next”:
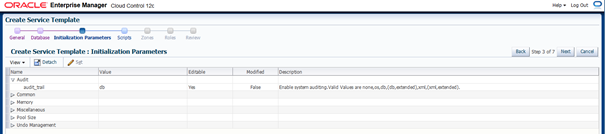
We can also define specific initialization parameters:
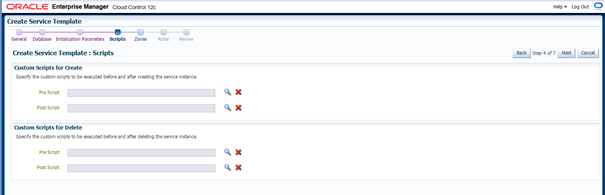
We also have the possibility to define scripts to be run before and after the service instance creation:
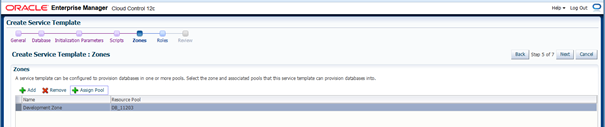
Then we select a zone and assign a pool and define a role:

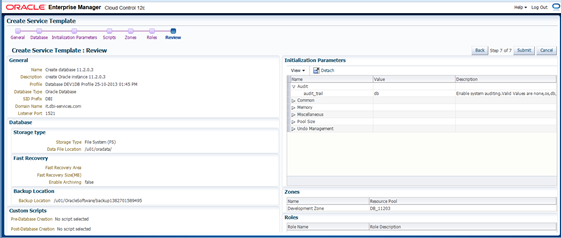
We can review our settings before submitting:
We can also define a schema pool. Let’s create a new database pool:
As before, we set the services requests to no restrictions and allow the same quotas.
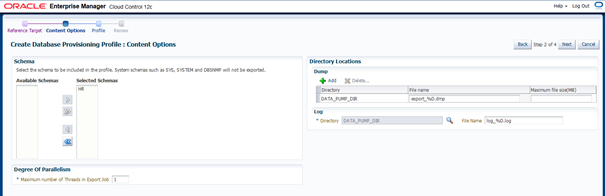
Then we create a profile and select export Schema definition:

We select the schema name and the directory location:
Let’s review our settings before submitting:
Then we create a service template that will be available in the self-service portal:
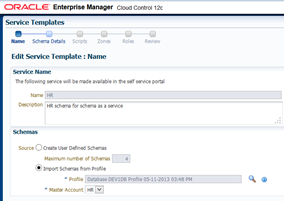
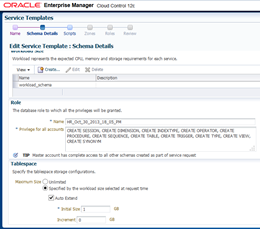
We have the possibility to define the schemas details:
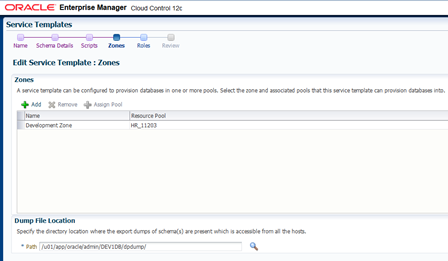
We select the zone and the resource pool the service template will provision:
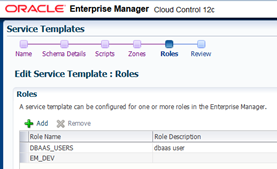
We define the roles authorized to use this service template:
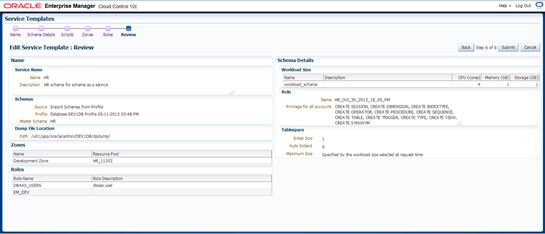
We review our settings:
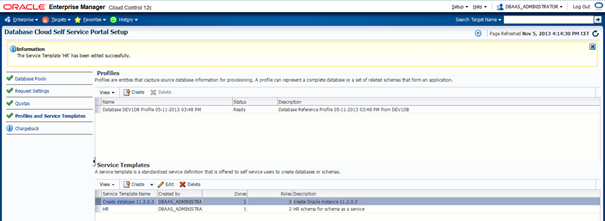
Finally we have created two service templates: one for creating a 11.2.0.3 database and another containing a schema dump.
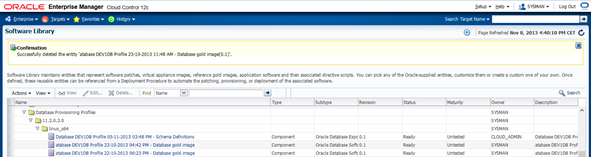
Notice that the provisioning profiles can be seen in the software library:
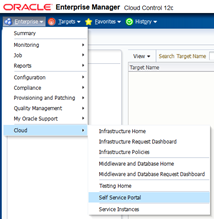
Now we have to access the self-service portal as a normal user. We will use the dbaas_exploit user and the Schema as a service.
From the Enterprise Menu, we select the Cloud and Self Service Portal:
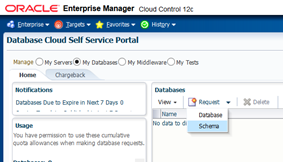
Select My Database, and in the Request tab, select schema:
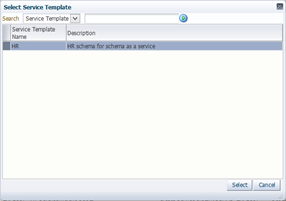
We select the Service Template named HR:
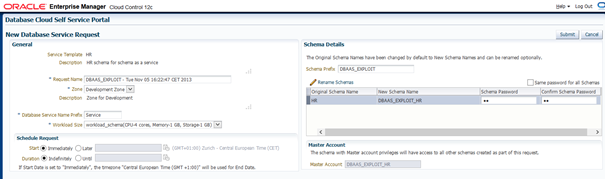
The original schema name HR will be created in the target database with the new name DBAAS_EXPLOIT_HR.
We fill in the password for this new schema and select submit:
The next screen shows the provisioning screen:
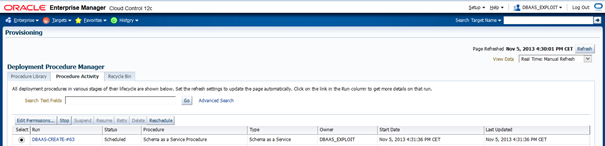
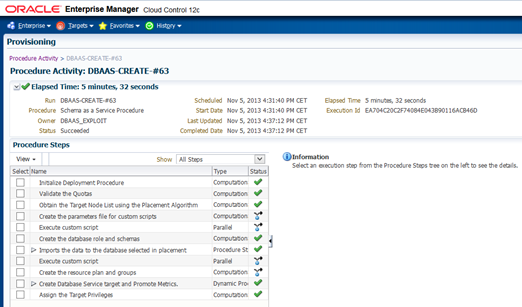
By selecting DBAAS_CREATE#63, we can follow the deployment:
In the target database, the dbass_exploit_hr schema is created and the data is successfully imported:
SQL> select username from dba_users where username like ‘DBAAS%’;
DBAAS_EXPLOIT_HR
DBAAS_EXPLOIT
DBAAS_ADMINISTRATOR
This way, non-privileged users have the possibility to acces specific Enterprise Manager Cloud 12c interface allowing them to use resources such as create database or import schemas.
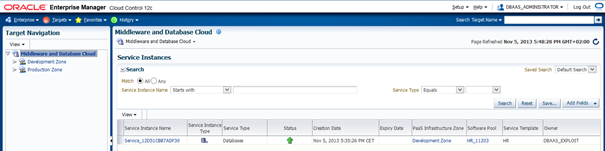
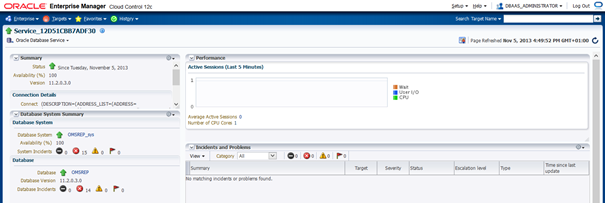
The provisioning process creates a database service that is completely manageable by Oracle Enterprise Manager Cloud 12c:
Connected as DBAAS_ADMINISTRATOR.
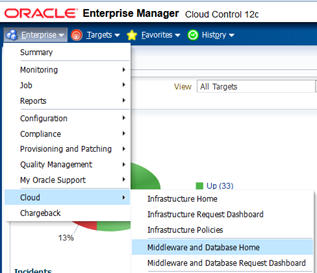
Select Middleware and Database Home:
A new service template has been defined:
Conclusion
Database as a service presents a lot of advantages for the managing of huge infrastructures:
- The DBAs can define a catalog in the software library containing multiple Oracle Software versions, different kind of database instances (RAC or Cluster instances), or a list of schema dumps that will be available to end-users for deployment.
- Even if the DBAAS configuration and usage can be a hard and long work, in the end, it is a very efficient way to optimize and standardize the IT environment.
- Adding the DBAAS functionality speeds up the application deployment – and, as a result, enables significant cost savings.
- Obviously, the Oracle Cloud Management Pack and the Database Lifecycle Management Pack are necessary to use those features.
![Thumbnail [60x60]](https://www.dbi-services.com/blog/wp-content/uploads/2022/12/oracle-square.png)
![Thumbnail [90x90]](https://www.dbi-services.com/blog/wp-content/uploads/2022/08/STH_web-min-scaled.jpg)
![Thumbnail [90x90]](https://www.dbi-services.com/blog/wp-content/uploads/2022/08/FRJ_web-min-scaled.jpg)
![Thumbnail [90x90]](https://www.dbi-services.com/blog/wp-content/uploads/2024/01/HME_web.jpg)
![Thumbnail [90x90]](https://www.dbi-services.com/blog/wp-content/uploads/2022/10/STS_web-min-scaled.jpg)