In this Blog post I will try to give a pure technical cheat sheet using Btrfs on any distribution. Additionally I will explain how to use one of the most sophisticated backup/ restore tool called “snapper”.
What is Btrfs and how to set it up if not already installed?
Btrfs (aka Butter FS or aka B-Tree FS) is like xfs and ext4 a filesystem which offers any linux user many features to maintain or manage their filesystem. Usually Btrfs is used stand-alone but it works with LVM2 too, without any additional configuration.
Key Features of Btrfs:
- Copy-on-Write (CoW): Btrfs uses CoW, meaning it creates new copies of data instead of overwriting existing files.
- Snapshots: You can create instant, space-efficient snapshots of your filesystem or specific directories, like with Snapper on SUSE. These are perfect for backups, rollbacks, or tracking changes (e.g., before/after updates).
- Self-Healing: Btrfs supports data integrity with checksums and can detect and repair errors, especially with RAID configurations.
- Flexible Storage: It handles multiple devices, RAID (0, 1, 5, 6, 10), and dynamic resizing, making it adaptable for growing storage needs.
- Compression: Btrfs can compress files on the fly (e.g., using Zstandard or LZO), saving space without sacrificing performance.
- Subvolumes: Btrfs lets you create logical partitions (subvolumes) within the same filesystem, enabling fine-grained control. It is like having separate root, home, or snapshot subvolumes.
Usually Btrfs is used by default in any SuSE Linux Server (and OpenSuSE) and can be used in RHEL & OL and other distribution. To use Btrfs on any RPM based distribution just install the package “btrfs-progs”. With Debian and Ubuntu this is a bit more tricky, which is why we will keep this blog about RPM-based distributions only.
Create new filesystem and increase it with Btrfs
# Wipe any old filesystem on /dev/sdb (careful—data’s toast!)
wipefs -a /dev/vdb

# Create a Btrfs filesystem on /dev/sdb
mkfs.btrfs /dev/vdb

# Make a mount point
mkdir /mnt/btrfs

# Mount it—basic setup, no fancy options yet
mount /dev/vdb /mnt/btrfs

# Check it’s there and Btrfs
df -h /mnt/btrfs

# Add to /etc/fstab for permanence (use your device UUID from blkid)
/dev/vdb  /mnt/btrfs  btrfs  defaults  0  2

# Test fstab
mount -a

# List all Btrfs Filesystems
btrfs filesystem show

# Add additional storage to existing Btrfs filesystem (in our case /)
btrfs add device /dev/vdd /

# In some cases it is smart to balance the storage between all the devices
btrfs balance start /

# If the space allows it you can remove devices from a Btrfs filesystem
btrfs device delete /dev/vdd /
Restore Btrfs filesystem to a specific point
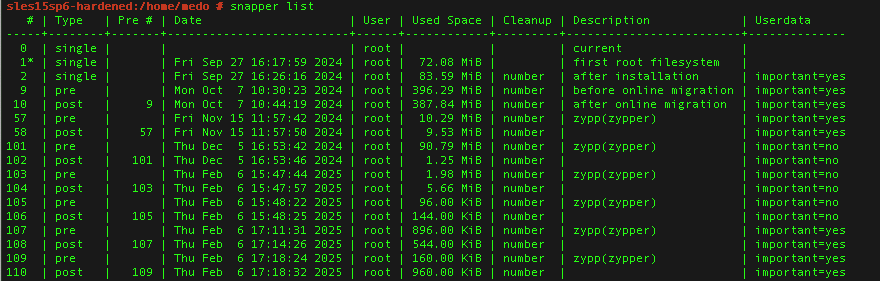
# List all snapshots for the root config
snapper -c root list

# Pick a snapshot and check its diff (example with 5 & 6)
snapper -c root diff 5..6

# Roll back to snapshot 5 (dry run first)
snapper -c root rollback 5 --print-number

# Do it for real—reboots to snapshot 5
snapper -c root rollback 5
reboot

# Verify after reboot—root’s now at snapshot 5
snapper -c root list
Btrfs Subvolume explained and used
# Mount the Btrfs root filesystem (not a subvolume yet)
mount /dev/vdb /mnt/butter

# Create a subvolume called ‘data’ (only possible inside a existing Btrfs volume)
btrfs subvolume create /mnt/butter/data

# List subvolumes
btrfs subvolume list /mnt/butter

# Make a mount point for the subvolume
mkdir /mnt/data

# Mount the subvolume explicitly
mount -o subvol=data /dev/vdb /mnt/data

# Check it’s mounted as a subvolume
df -h /mnt/data

# Create a new subvolume by creating a snapshot inside the btrfs volume
btrfs subvolume snapshot /mnt/data /mnt/butter/data-snap1

# Delete the snapshot which is a subvolume
btrfs subvolume delete /mnt/data-snap1
Configuring Snapper for automatic snapshots
# Install Snapper if it’s not there
zypper install snapper

# Create a snapper config of filesystem
snapper -c <ConfigName> create-config <btrfs-mountpoint>

# Enable timeline snapshots (if not enabled by default)
echo "TIMELINE_CREATE=\"yes\"" >> /etc/snapper/configs/root

# Set snapshot limits (e.g., keep 10 hourly)
sed -i 's/TIMELINE_LIMIT_HOURLY=.*/TIMELINE_LIMIT_HOURLY="10"/' /etc/snapper/configs/root

# Start the Snapper timer (if not enabled by default)
systemctl enable snapper-timeline.timer
systemctl start snapper-timeline.timer

# Trigger a manual snapshot to test
snapper -c <ConfigName> create -d "Manual test snapshot"

# List snapshots to confirm
snapper -c <ConfigName> list
Here is a small overview of the most important settings to use within a snapper config file:
- SPACE_LIMIT=”0.5″
- Sets the maximum fraction of the filesystem’s space that snapshots can occupy. 0.5 = 50%
- FREE_LIMIT=”0.2″
- Ensures a minimum fraction of the filesystem stays free. 0.2= 20%
- ALLOW_USERS=”admin dbi”
- Lists users allowed to manage this Snapper config.
- ALLOW_GROUPS=”admins”
- A list of Groups that are allowed to manage this config.
- SYNC_ACL=”no”
- Syncs permissions from ALLOW_USERS and ALLOW_GROUPS to the .snapshots directory. If yes, Snapper updates the access control lists on /.snapshots to match ALLOW_USERS/ALLOW_GROUPS. With no, it skips this, and you manage permissions manually.
- NUMBER_CLEANUP=”yes”
- When yes, Snapper deletes old numbered snapshots (manual and/ or automated ones) when they exceed NUMBER_LIMIT or age past NUMBER_MIN_AGE.
- NUMBER_MIN_AGE=”1800″
- Minimum age (in seconds) before a numbered snapshot can be deleted.
- NUMBER_LIMIT=”50″
- Maximum number of numbered snapshots to keep.
- NUMBER_LIMIT_IMPORTANT=”10″
- Maximum number of numbered snapshots marked as “important” to keep.
- TIMELINE_CREATE=”yes”
- Enables automatic timeline snapshots.
- TIMELINE_CLEANUP=”yes”
- Enables cleanup of timeline snapshots based on limits.
- TIMELINE_LIMIT_*=”10″
- TIMELINE_LIMIT_HOURLY=”10″
- TIMELINE_LIMIT_DAILY=”10″
- TIMELINE_LIMIT_WEEKLY=”0″ (disabled)
- TIMELINE_LIMIT_MONTHLY=”10″
- TIMELINE_LIMIT_YEARLY=”10″
- Controls how many snapshots Snapper retains over time. Keeps 10 hourly, 10 daily, 10 monthly, and 10 yearly, but skips weekly 0.
For further information about the settings, check out the SUSE documentation.
Btrfs RAID and Multi-Device management
# Format two disks (/dev/vdb, /dev/vdc) as Btrfs RAID1
mkfs.btrfs -d raid1 -m raid1 /dev/vdb /dev/vdc

# Mount it
mount /dev/vdb /mnt/btrfs-raid

# Check RAID status
btrfs filesystem show /mnt/btrfs-raid

# Add a third disk (/dev/sdd) to the array
btrfs device add /dev/sdd /mnt/btrfs-raid

# Rebalance to RAID1 across all three (dconvert is data raid and mconvert is metadata raid definition)
btrfs balance start -dconvert=raid1 -mconvert=raid1 /mnt/btrfs-raid

# Check device stats for errors
btrfs device stats /mnt/btrfs-raid

# Remove a disk if needed
btrfs device delete /dev/vdc /mnt/btrfs-raid
Troubleshooting & using Btrfs and Snapper
# Check disk usage?
btrfs filesystem df /mnt/btrfs

# Full filesystem and need more storage? Add an additional empty storage device to the Btrfs volume:
btrfs add device /dev/vde /mnt/btrfs

# If the storage devices has grown (via LVM or virtually) one can resize the size to max:
btrfs filesystem resize max /mnt/btrfs

# Balance to free space if it’s tight (dusage defines from what % the rebalance should start. In our case only 50% or less data per block will trigger the re-balance)
btrfs balance start -dusage=50 /mnt/btrfs

# Too many snapshots? List them
snapper -c root list | wc -l

# Delete old snapshots (e.g., #10)
snapper -c root delete 10

# Check filesystem for corruption
btrfs check /dev/vdb

# Repair if it’s borked (careful—backup first!)
btrfs check --repair /dev/vdb

# Rollback stuck? Force it
snapper -c root rollback 5 --force
Hint
Something that needs to be pointed out is that the snapper list is sorted from the oldest (starting at point 1) to the newest. BUT: At the top there is always the current state of the filesystem with the number 0.
![Thumbnail [60x60]](https://www.dbi-services.com/blog/wp-content/uploads/2022/05/open-source-author.png)
![Thumbnail [90x90]](https://www.dbi-services.com/blog/wp-content/uploads/2025/05/martin_bracher_2048x1536.jpg)
![Thumbnail [90x90]](https://www.dbi-services.com/blog/wp-content/uploads/2022/08/DWE_web-min-scaled.jpg)
![Thumbnail [90x90]](https://www.dbi-services.com/blog/wp-content/uploads/2024/04/SIT_web.png)