Snapshot mechanism of VirtualBox
With VirtualBox you can take snapshots of the current state (without snapshot functionality of a filesystem like btrfs)
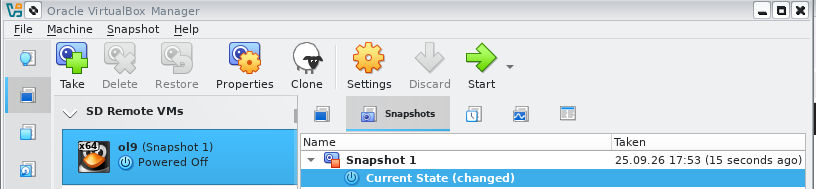
This kind of snapshot will create a kind of differential file and the original file will be untouched.
$  ls -lh ol9.vdi Snapshots/\{dfef3efe-1a67-466d-b968-835d7c2c915b\}.vdi
-rw------- 1 mnb mnb 463M Sep 25 17:55 '/Snapshots/{dfef3efe-1a67-466d-b968-835d7c2c915b}.vdi'
-rw------- 1 mnb mnb 9.5G Sep 25 17:52  ol9.vdi
Every changed block is written to this difference file in the Snapshot/ directory.
If you will do tests with always the same starting point, and after the test you will go back to the snapshot (restore). For this scenario it is a good solution. Virtualbox only needs to delete the differential file.
But if you take a snapshot before an upgrade, and if it is successful, you will keep this state and delete the snapshot state. For this scenario, VirtualBox has to copy all the blocks from the differential file back to the original file (ol9.vdi), which can be very time-consuming after patching big software (e.g. the OS or Oracle database).
You can also clone a VM with VirtualBox. You have the choice of a full- and a linked-clone. The full clone will create an independent copy of the disk files. The linked clone is only a snapshot of the disks of the source VM. So, the original disk will no longer be changed, but the original and the cloned VM will have an individual differential file in Snapshots/
ol9/ol9.iso  # will no longer be changed
ol9/Snapshots/{xxxxxxxxxxx}.vdi
ol9clone/Snapshots/{xxxxxxxxxxx}.vdi
This type of clone we should only use for short-term usage. Create a snapshot of the production, do some tests, and afterwards, immediately delete it! But after deleting the clone, you have to do a cleanup with the original VM. On the original VM, the snapshot is not deleted! (if you forget to delete it, you will need more and more diskspace…)

But is there a better solution? Yes, if you are using Linux. Use filesystem based file-snapshots.
Snapshots with btrfs
Some Linux filesystems with snapshots
- OCFS2: I used it often in the past, it works very well, but is not widely used. It is a cluster filesystem, but it can also be used for single-hosts.
- OpenZFS: I never used it.
- btrfs: Available in most Linux distributions (*) with subvolume snapshots. In this blog post I will show the examples with btrfs.
(*) Btrfs is no longer included in RedHat Enterprise linux and 1:1 forks like Rocky Linux. With these distributions, you can use the kernel from https://elrepo.org/. I used the “ml” Kernel and it worked well.
In Fedora (the development release of RedHat) btrfs is included. That means, there are political, not technical reasons that RedHat no longer delivers the modules for btrfs…
In Oracle Linux OL (also a RedHat fork) it is available with the UEK-kernel (a more modern Kernel than the RedHat Kernel). OL is freely available at https://yum.oracle.com.
SuSE uses btrfs as the default root filesystem.
A good overview of btrfs you will get with this SuSE article.
Your VMs are located in a directory. If you create a VM, you will specify the name and a directory (VM Folder)

Then, it creates the VM (virtual disks and configuration file) in the subdirectory /u00/virtualbox/vm1/
Snapshots with btrfs works with subvolumes. For us, for the application, a subvolume is visible as a directory. We can mount such a subvolume separately. And important for our use-case: we can create a snapshot of a subvolume.
[root@ltp14 virtualbox]  btrfs subvolume list .
ID 264 gen 1015763 top level 5 path virtualbox/olvmm01
ID 289 gen 1015763 top level 5 path virtualbox/winxp_2023-06-26
ID 290 gen 1015763 top level 5 path virtualbox/winxp
ID 292 gen 1015783 top level 5 path virtualbox/ol9
ID 307 gen 1015763 top level 5 path virtualbox/ubuntu2204
ID 354 gen 1015763 top level 5 path virtualbox/ol9a
ID 362 gen 1015763 top level 5 path virtualbox/ol9b
As you can see, most of my VMs are installed in subvolumes. I created a master image ol9, and ol9a and ol9b are snapshots of ol9 used for the “clone” functionality. And from my good old winxp installation i created a snapshot winxp_2023-06-26 which can be used similar to the “Snapshot” of virtualbox.
Difference of VirtualBox and btrfs
But what is the difference? As we have seen before, VirtualBox stores changed blocks in a separate file. If we access a virtual disk, we have to access 2 files. First check, if the block is in the snapshot file, and if not, take the unchanged block from the (no longer changed) original.
Btrfs is a copy-on-write filesystem. If we change a block, it will not change the current block on disk, instead, it allocates a new block and releases the old one. In case a snapshot exists, it will not release the old block as long as it is assigned in another snapshot.
[root@ltp14 virtualbox] btrfs subvolume snapshot vm1 vm2
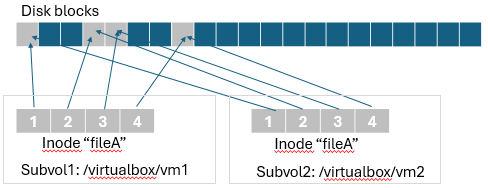
After we created the subvolume vm2 as a snapshot of subvolume vm1, fileA in both subvolumes share the same disk blocks, which is recorded in the inodes (mapping table between file and disk blocks). Of course, we can rename one of “FileA”, its inode assignment remains unchanged. If you update block 3 and 4 of fileA in vm1, then 2 new blocks are allocated (green, orange). If you update block 4 in vm2, then also a new block (light blue) is allocated and the old block (with white “x”) is deallocated (unused) because it is no longer allocated in any other snapshot.
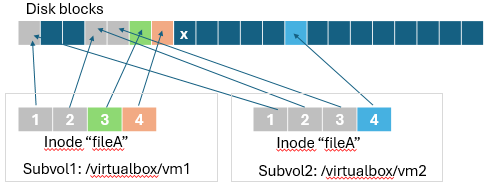
For us, for the application, there are 2 independent files. There is no “original” and a snapshot file.
Snapshots
Subvolumes
Now, let’s see how to replace VirtualBox snapshot functionality by btrfs snapshots. Fist of all, we need a subvolume of our VM. Unfortunately, we can not convert an existing directory directly to a subvolume. We have to move the files in a subvolume.
[root@ltp14 virtualbox]  btrfs subvolume create vm1sub
Create subvolume './vm1sub'
[root@ltp14 virtualbox]  chown mnb:mnb vm1sub/  #subvols are created as root
[root@ltp14 virtualbox]  mv -v vm1/* vm1sub/
copied 'vm1/vm1.nvram' -> 'vm1sub/vm1.nvram'
removed 'vm1/vm1.nvram'
copied 'vm1/vm1.vbox' -> 'vm1sub/vm1.vbox'
removed 'vm1/vm1.vbox'
copied 'vm1/vm1.vbox-prev' -> 'vm1sub/vm1.vbox-prev'
removed 'vm1/vm1.vbox-prev'
copied 'vm1/vm1.vdi' -> 'vm1sub/vm1.vdi'
removed 'vm1/vm1.vdi'
[root@ltp14 virtualbox]  rmdir vm1
[root@ltp14 virtualbox]  mv vm1sub vm1
[root@ltp14 virtualbox]  btrfs subvolume list . |grep vm1
ID 367 gen 1016224 top level 5 path virtualbox/vm1
[root@ltp14 virtualbox]
Afterwards, we can use the VM as before.
Create a snapshot
Now we will create a snapshot of it. Ideally we stop it before the snapshot. If we snapshot a running VM, there may be some application inconsistencies. For Oracle databases, do an “alter database begin backup” before and end backup afterwards keeping the database recoverable. What we can not do with btrfs, is the snapshot of the memory, so we can not restore it “running”. VirtualBox can do that, but it is not “online”, Our VM is freezed during the time of the snapshot.
[root@ltp14 virtualbox]   sudo -u mnb vboxmanage controlvm vm1 shutdown  #or poweroff
[root@ltp14 virtualbox]  time  btrfs subvolume snapshot vm1 vm1_snap01
Create snapshot of 'vm1' in 'vm1_snap01'

real    0m0.030s
user    0m0.000s
sys     0m0.016s
[root@ltp14 virtualbox]  sudo -u mnb vboxmanage startvm vm1
Delete a snapshot
To delete a snapshot means, remove the subvolume of the old state. The big advantage compared to VirtualBox is, that we do not have to wait until the changed blocks are copied back in the “original” file. With btrfs, this is done “online” without influence of our running VM.
[root@ltp14 virtualbox] btrfs subvolume delete vm1_snap
Restore a snapshot
To restore a snapshot means, renaming the subvolumes:
[root@ltp14 virtualbox]  sudo -u mnb vboxmanage controlvm vm1 poweroff
[root@ltp14 virtualbox]  mv vm1 vm1_bck
[root@ltp14 virtualbox]  btrfs subvolume snapshot vm1_snap01 vm1  #now the vm can be restarted
[root@ltp14 virtualbox]  btrfs subvolume delete vm1_bck  # (*)
Delete subvolume 367 (no-commit): '/u00/virtualbox/vm1_bck'
(*) in VirtualBox restoring a snapshot asks for “Create a snapshot of the current machine state” De-selecting this option is similar to delte the subvolume. And instead of “Create a snapshot…”, simply keep the renamed subvolume.
The “delete” snapshot of VirtualBox is equivalent to delete the current subvolume and rename the old subvolume back to the original name.
[root@ltp14 virtualbox]  sudo -u mnb vboxmanage controlvm vm1 poweroff
[root@ltp14 virtualbox]  btrfs subvolume delete vm1_snap
[root@ltp14 virtualbox]  mv vm1_snap vm1
Clone
The next subject is to clone a VM. I will demonstrate that by creating a master/template VM of Oracle Linux 10 (OL10) and then to create clones of it for different purposes.
Create a master VM
To define the VM you can start with the VirtualBox GUI. That will create the definition and an empty virtual disk. As described above, we will move it afterwards to a subvolume, then install and configure OL10 like every other VM.
After you have prepared the VM as a master-VM, that means you have installed all software you need in each clone, especially the VirtualBox tools, stop it and create clones.
Create a new VM from the master-VM
From the point of view of virtualbox, we create a full clone. From the point of view of the filesystem, it is similar to a linked clone (each VM stores its own modified blocks. But the old blocks are released when both VM’s have changed these blocks).
We create a subvolume ol10a from ol10, then we remove all files in ol10a, except the disk image. This, we rename to ol10a.vdi. VirtualBox tracks the file by an uuid, so we have to set a new uuid for the cloned disk.
Tip: look at the space consumption before and after cloning (df -k).
[root@ltp14 virtualbox]   btrfs subvolume snapshot ol10 ol10a
Create snapshot of 'ol10' in 'ol10a'
[root@ltp14 virtualbox]  cd ol10a/
[root@ltp14 ol10a]  ls -l
total 3383436
drwx------ 1 mnb mnb         16 Sep 28 11:55 Logs
-rw------- 1 mnb mnb       4138 Sep 28 12:58 ol10.vbox
-rw------- 1 mnb mnb       6432 Sep 28 12:55 ol10.vbox-prev
-rw------- 1 mnb mnb 3466592256 Sep 28 12:58 ol10.vdi
[root@ltp14 ol10a]   rm -f *.vbox* Logs/*
[root@ltp14 ol10a]   mv ol10.vdi ol10a.vdi
[root@ltp14 ol10a]   VBoxManage internalcommands sethduuid /u00/virtualbox/ol10a/ol10a.vdi
UUID changed to: 81927ab2-e2ac-4143-9077-98af702ec82d
Afterwards, you can create a new VM with the GUI. But do not create an new disk. Attach the existing cloned disk.
You can also create the VM on commandline which is recommended if you need many clones. You can do it with your useraccount, or if you prefer to do all steps as root, with “sudo -u your_username”. First, create the VM, then attach/modify the desired virtual hardware (disk-controllers, ram, cpus, network, and attach the cloned virtual disk to a controller).
root@ltp14 ol10a]  sudo -u mnb  VBoxManage  createvm --name ol10a --basefolder /u00/virtualbox/ol10a --register
Virtual machine 'ol10a' is created and registered.
UUID: d983c059-2e2f-4e89-bad0-fd3676d567c7
Settings file: '/u00/virtualbox/ol10a/ol10a/ol10a.vbox'
[root@ltp14 ol10a]  sudo -u mnb   VBoxManage modifyvm ol10a --memory 4096 --cpus 2 --ostype Oracle10_64 --vram 4
[root@ltp14 ol10a]  sudo -u mnb VBoxManage storagectl ol10a --name "SATA Controller" --add sata --controller IntelAhci
[root@ltp14 ol10a]  sudo -u mnb   VBoxManage storagectl ol10a --name "IDE Controller" --add ide --controller PIIX4
[root@ltp14 ol10a]  sudo -u mnb   VBoxManage storageattach ol10a --storagectl "SATA Controller" --port 0 --device 0 --type hdd --medium /u00/virtualbox/ol10a/ol10a.vdi
[root@ltp14 ol10a]  sudo -u mnb   VBoxManage modifyvm ol10a --nic1 hostonly --hostonlyadapter1 vboxnet0
[root@ltp14 ol10a]  sudo -u mnb VBoxManage modifyvm ol10a --nic2 nat
Now you are ready to boot your cloned VM ol10a. This can be done from commandline (as your user) or in the VirtualBox GUI. After booting, log in and change immediately the hostname. Afterwards, adapt the clone for your needs.
hostnamectl hostname ol10a
![Thumbnail [60x60]](https://www.dbi-services.com/blog/wp-content/uploads/2025/05/martin_bracher_2048x1536.jpg)
![Thumbnail [90x90]](https://www.dbi-services.com/blog/wp-content/uploads/2025/11/LTO_WEB.jpg)
![Thumbnail [90x90]](https://www.dbi-services.com/blog/wp-content/uploads/2025/05/JDE_Web-1-scaled.jpg)