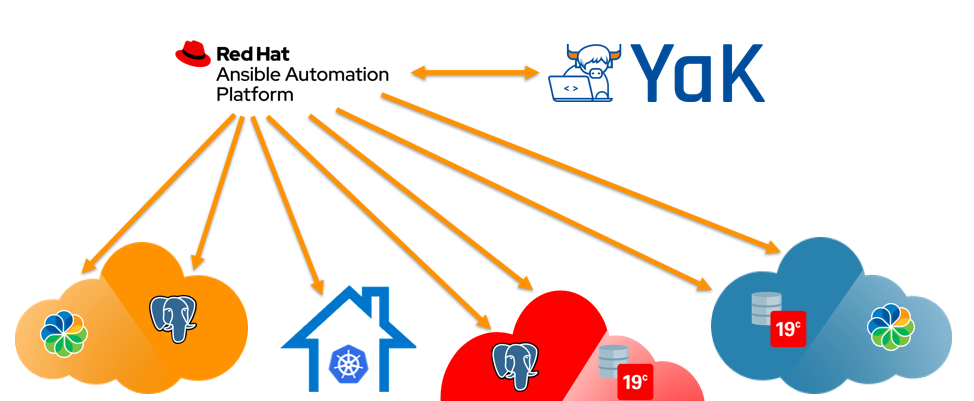
Introduction to YaK
YaK is an open-source automation project developed by dbi services. Built on Ansible playbooks, YaK streamlines the deployment process for various components across any platform. It ensures adherence to best practices, maintains deployment quality, and significantly reduces time-to-deploy.
Initially created in response to the growing demand from dbi services’ consultants and clients, YaK simplifies and accelerates deployments across multi-technology infrastructures. Whether targeting cloud environments or on-premises systems, YaK drastically cuts down deployment effort, optimizing the overall time-to-market.
Find more informations on the YaK website
Why Integrate YaK into Red Hat Ansible Automation Platform (AAP)?
YaK Advantages:
- User-Friendly Interface: YaK simplifies configuration and deployment through an intuitive user interface, allowing teams to quickly manage servers and applications deployments.
- Centralized Metadata Database: It replaces traditional YAML configuration files with a centralized database to store deployment metadata, ensuring improved manageability and consistency.
- Comprehensive Reporting: YaK provides capabilities for generating detailed reports on all deployments, offering insights for continuous improvement.
- dbi services components: dbi services offering a range of subscriptions components readily deployable on any platform, further easing the accessibility, management of deployments. These components integrates all the expertise of dbi services’ expertise.
- Custom Application Integration: YaK supports creating custom components for your specific applications. Developers can easily add Ansible playbooks to deploy the application into the component template.
Why Red Hat Ansible Automation Platform (AAP) with YaK:
- Expert-Crafted Packages: YaK provides expertly maintained Ansible packages, ensuring reliability and built-in support for a wide range of scenarios, fully compatible with AAP.
- Unified Dynamic Inventory: A single dynamic Ansible inventory for all your infrastructures, supporting multi-platform environments.
- Platform-Agnostic Deployments: Seamless deployment across various platforms, enabling true platform independence.
- Deep Integration with AAP Features: Full integration with AAP’s scheduler, workflows, and other advanced features, simplifying automation of servers, components (databases, applications, etc..), and complex multi-component infrastructures. of servers/component and/or multi-component infrastructure automation.
Integration Steps
Generate a YaK API Token
To start integration, generate an API token from the YaK database pod. So you need:
- To have access to the Kubernetes cluster (rke2 for exemple) on which is deployed your YaK instance, with the kubectl command
- Know the namespace on which is deployed your YaK instance
Once you have access, you only have to type this command (replace <yak-namespace> by the namespace on which is deployed your YaK instance) :
$ kubectl -n <yak-namespace> exec -it deploy/yak-postgres -- psql -U postgres -d agoston -c 'select set_user_token(agoston_api.add_user()) as "token";'
                               token
-------------------------------------------------------------------
 <generated_token>
(1 row)
You can store the YaK API generated token for next steps.
AAP Resources Configuration
Access to Ansible Automation Platform with an administrator rôle.
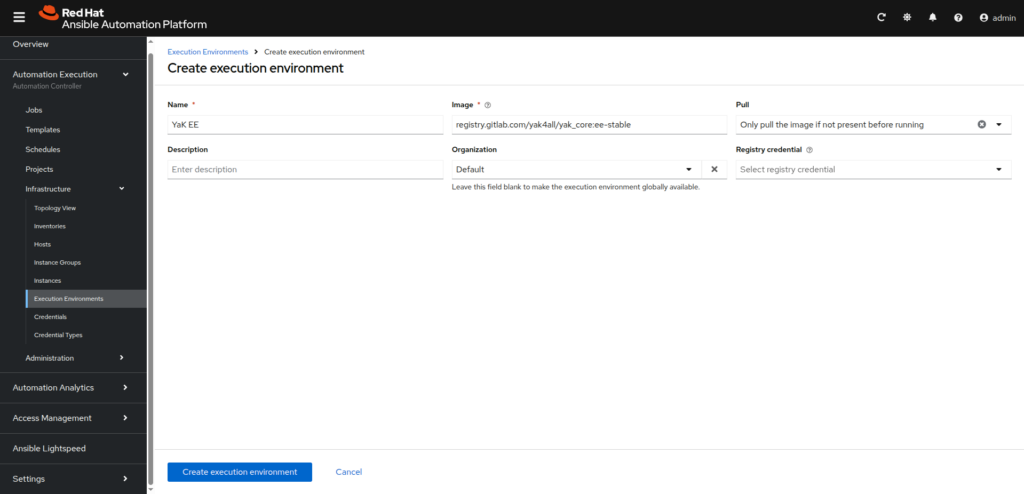
- Execution Environment: Define a customized execution environment in AAP that includes YaK-specific dependencies and tools.
In the left menu, go to Automation Execution ⟶ Infrastructure ⟶ Execution Environments, then click onCreate execution environmentbutton
Fill the form like this:
– Name: YaK EE
– Image: registry.gitlab.com/yak4all/yak_core:ee-stable
– Pull: Only pull the image if not present before running
– Registry credential: <empty> (YaK images are publicly available on GitLab repository)
– Description: Execution environment for YaK related jobs
– Organization: Default (or any other if you have a specific policy)
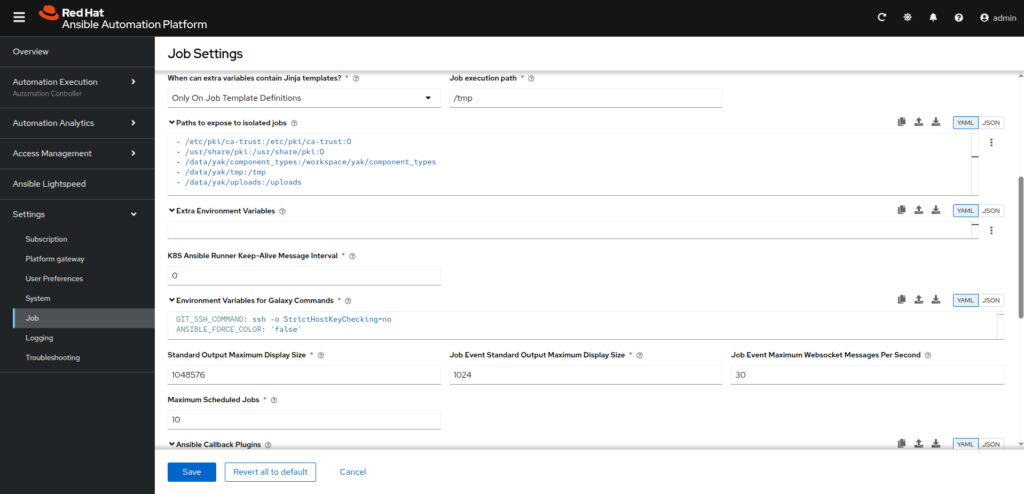
- Job Settings: Update parameters to add persistency for YaK jobs.
In the left menu, go to Settings ⟶ Job then click onEditbutton
update the parameterPaths to expose to isolated jobs, and add these lines at the end:
- /data/yak/component_types:/workspace/yak/component_types
- /data/yak/tmp:/tmp
- /data/yak/uploads:/uploads
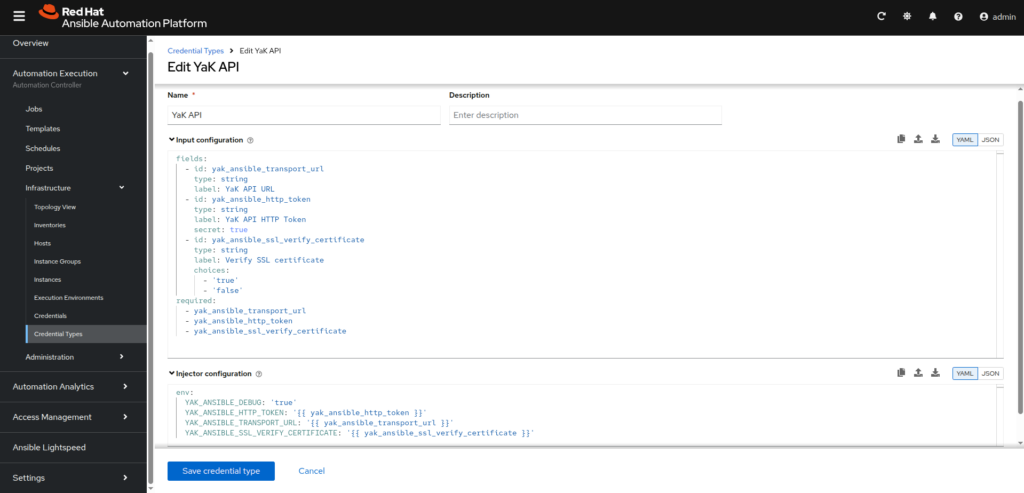
- Credential Types: Create customs credential types to securely handle YaK specific credentials.
In the left menu, go to Automation Execution ⟶ Infrastructure ⟶ Credential Types, then click onCreate credential typebutton
- YaK API:
– Name: YaK API
– Input configuration:
fields:
  - id: yak_ansible_transport_url
    type: string
    label: YaK API URL
  - id: yak_ansible_http_token
    type: string
    label: YaK API HTTP Token
    secret: true
  - id: yak_ansible_ssl_verify_certificate
    type: string
    label: Verify SSL certificate
    choices:
      - 'true'
      - 'false'
required:
  - yak_ansible_transport_url
  - yak_ansible_http_token
  - yak_ansible_ssl_verify_certificate
⠀⠀⠀⠀- Injector configuration:
env:
  YAK_ANSIBLE_DEBUG: 'false'
  YAK_ANSIBLE_HTTP_TOKEN: '{{ yak_ansible_http_token }}'
  YAK_ANSIBLE_TRANSPORT_URL: '{{ yak_ansible_transport_url }}'
  YAK_ANSIBLE_SSL_VERIFY_CERTIFICATE: '{{ yak_ansible_ssl_verify_certificate }}'
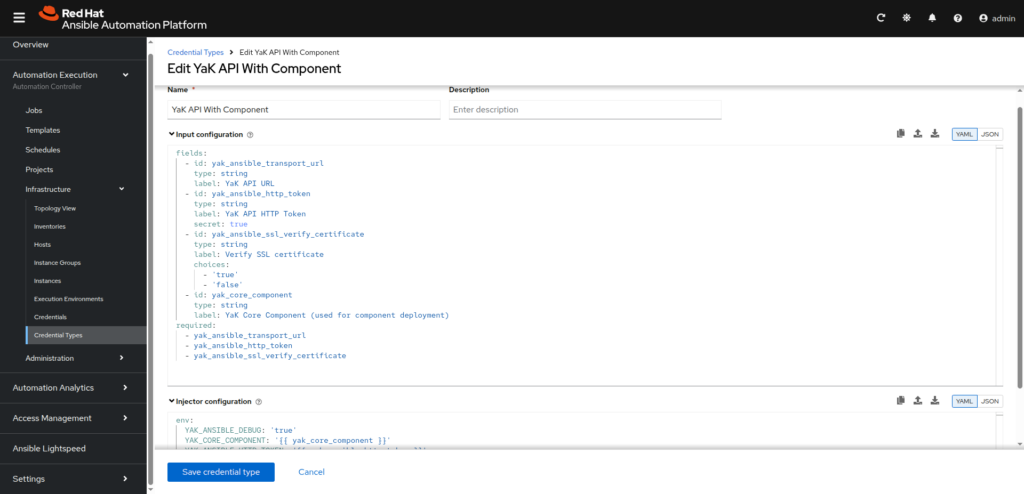
- YaK API With Component:
– Name: YaK API With Component
– Input configuration:
fields:
  - id: yak_ansible_transport_url
    type: string
    label: YaK API URL
  - id: yak_ansible_http_token
    type: string
    label: YaK API HTTP Token
    secret: true
  - id: yak_ansible_ssl_verify_certificate
    type: string
    label: Verify SSL certificate
    choices:
      - 'true'
      - 'false'
  - id: yak_core_component
    type: string
    label: YaK Core Component (used for component deployment)
required:
  - yak_ansible_transport_url
  - yak_ansible_http_token
  - yak_ansible_ssl_verify_certificate
⠀⠀⠀⠀- Injector configuration:
env:
  YAK_ANSIBLE_DEBUG: 'true'
  YAK_CORE_COMPONENT: '{{ yak_core_component }}'
  YAK_ANSIBLE_HTTP_TOKEN: '{{ yak_ansible_http_token }}'
  YAK_ANSIBLE_TRANSPORT_URL: '{{ yak_ansible_transport_url }}'
  YAK_ANSIBLE_SSL_VERIFY_CERTIFICATE: '{{ yak_ansible_ssl_verify_certificate }}'
- Credentials: Set up credentials in AAP using the custom credential type to securely store and manage YaK API tokens.
In the left menu, go to Automation Execution ⟶ Infrastructure ⟶ Credential, then click onCreate credentialbutton
- YaK API Core:
– Name: YaK API Core
– Credential type: YaK API
– YaK API URL: <url to your yak instance>/data/graphql
– YaK API HTTP Token: <YaK API token generated previously>
– Verify SSL certificate: depending if your YaK url have a valid SSL certificate (select true) or not (select false)

- YaK API Component:
– Name: YaK API Component – <component name set in YaK>
– Credential type: YaK API Withe Component
– YaK API URL: <url to your yak instance>/data/graphql
– YaK API HTTP Token: <YaK API token generated previously>
– YaK Core Component (used for component deployment): <component name set in YaK>
– Verify SSL certificate: depending if your YaK url have a valid SSL certificate (select true) or not (select false)

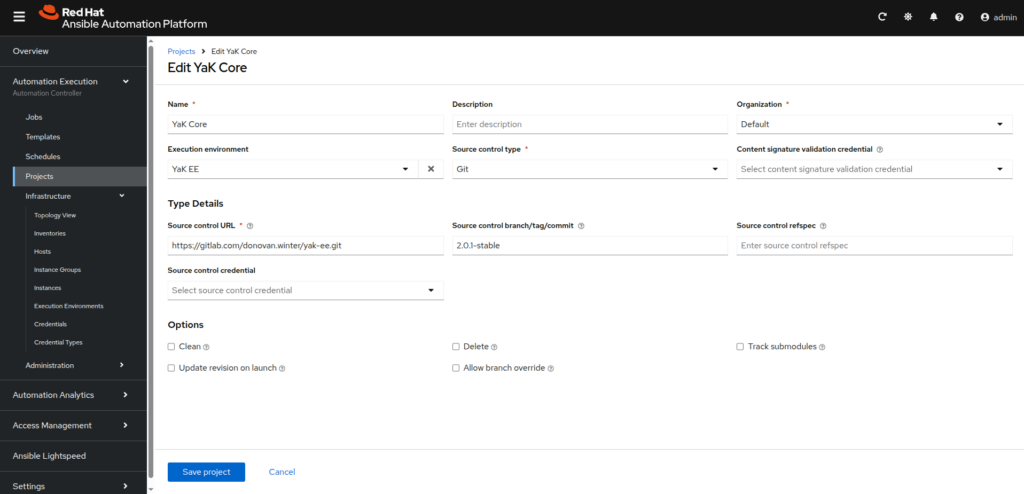
- Project: Create an AAP project pointing to your YaK repository containing playbooks.
In the left menu, go to Automation Execution ⟶ Project, then click onCreate projectbutton
- YaK Core:
– Name: YaK Core
– Execution environment: YaK EE
– Source control type: Git
– Source control URL: https://gitlab.com/yak4all/yak_core.git
– Source control branch/tag/commit: <select the same release version than your YaK deployed>
You can find the YaK release version at the bottom of the YaK left menu:
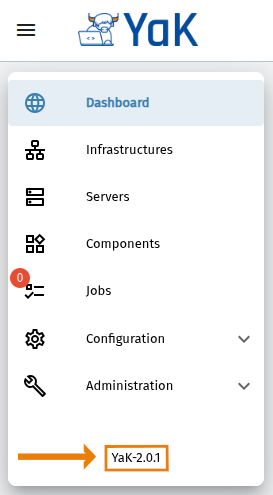
- YaK Component:
– Name: YaK <component type> Component
– Execution environment: YaK EE
– Source control type: Git
– Source control URL: <private git repository url to your component>
– Source control branch/tag/commit: main
– Source control credential: <your credential where stored your authentications to the git repository>

- Inventory: Configure the inventory, aligning it with YaK’s managed targets and deployment definitions.
In the left menu, go to Automation Execution ⟶ Infrastructure ⟶ Inventories, then click onCreate inventorybutton
- YaK Inventory:
– Name: YaK Inventory

⠀⠀From the YaK Inventory, go to Sources tab, then click on Create source button
⠀⠀- Name: YaK Core
⠀⠀- Execution environment: YaK EE
⠀⠀- Source: Sourced from a Project
⠀⠀- Credential: YaK API Core
⠀⠀- Project: YaK Core
⠀⠀- Inventory file: inventory/yak.core.db.yml
⠀⠀- Verbosity: 0
⠀⠀- Options: Overwrite, Overwrite variables, Update on launch

- YaK Inventory for component (you will need to create one inventory by component you want to manage from AAP):
– Name: YaK Inventory – <component name>

⠀⠀From the YaK Inventory – <component name>, go to Sources tab, then click on Create source button
⠀⠀- Name: YaK <component type>
⠀⠀- Execution environment: YaK EE
⠀⠀- Source: Sourced from a Project
⠀⠀- Credential: YaK API Component – <component name>
⠀⠀- Project: YaK <component type> Component
⠀⠀- Inventory file: inventory/yak.core.db.yml
⠀⠀- Verbosity: 0
⠀⠀- Options: Overwrite, Overwrite variables, Update on launch

- Template: Develop AAP templates leveraging YaK playbooks and workflows, enabling repeatable and consistent deployments.
In the left menu, go to Automation Execution ⟶ Templates, then click onCreate templatebutton and selectCreate job template
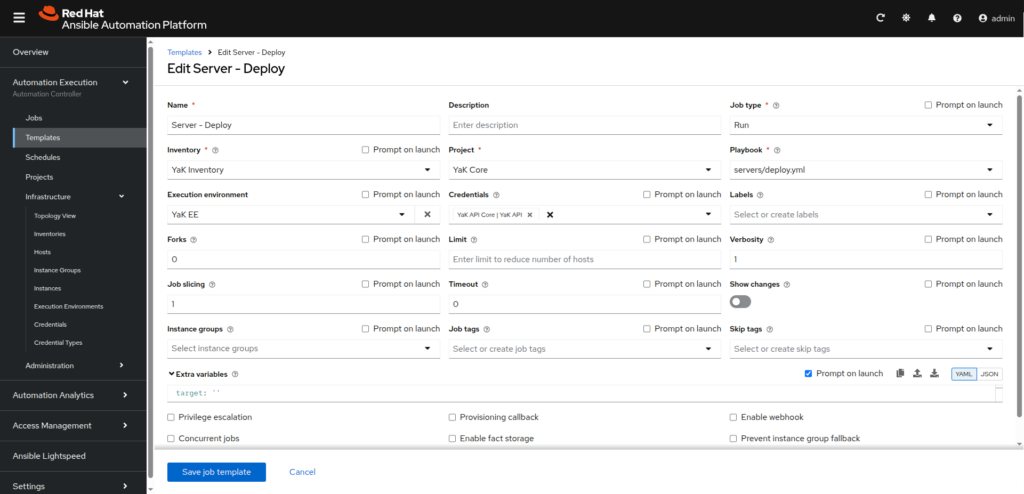
- Server – Deploy:
– Name: Server – Deploy
– Job type: Run
– Inventory: YaK Inventory
– Project: YaK Core
– Playbook: servers/deploy.yml
– Execution environment: YaK EE
– Credentials: YaK API Core
– Extra variables: target: ”
Select the checkboxPrompt on launchfor the Extra variables section. It will permit to set the server you want to deploy when you will run the job.
- Your component – Deploy:
– Name: <component name> – Deploy
– Job type: Run
– Inventory: YaK Inventory – <component name>
– Project: YaK <component type> Component
– Playbook: <path to your component deployment playbook>
– Execution environment: YaK EE
– Credentials: YaK API Component – <component name>

Creating an AAP Workflow for Full-Stack Deployment
Leveraging AAP workflows enables structured, automated deployments. In this chapter we will deploy a server named redhat-demo and the attached PostgreSQL component named pg-demo. These resources have already been created in the YaK, using the UI.
- In AAP, create a new workflow:
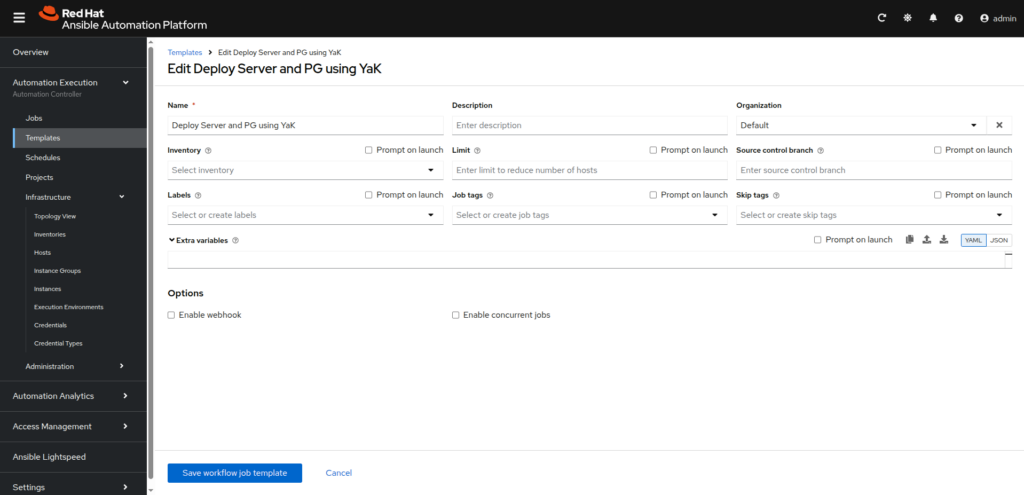
In the left menu, go to Automation Execution ⟶ Templates, then click onCreate templatebutton and selectCreate workflow job template:
– Name: Deploy Server and PG using YaK
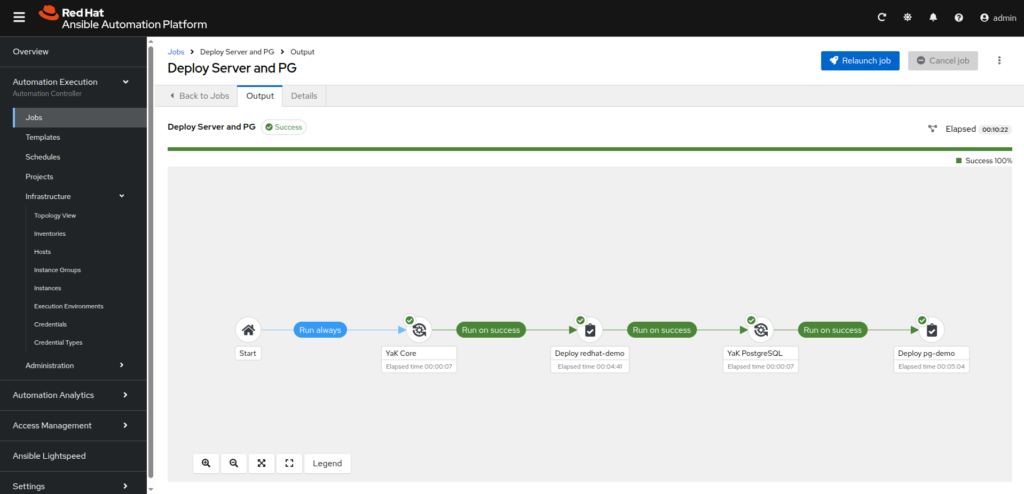
- Add and connect job templates corresponding to each deployment stage using YaK inventories and playbooks, here the complete workflow to create:
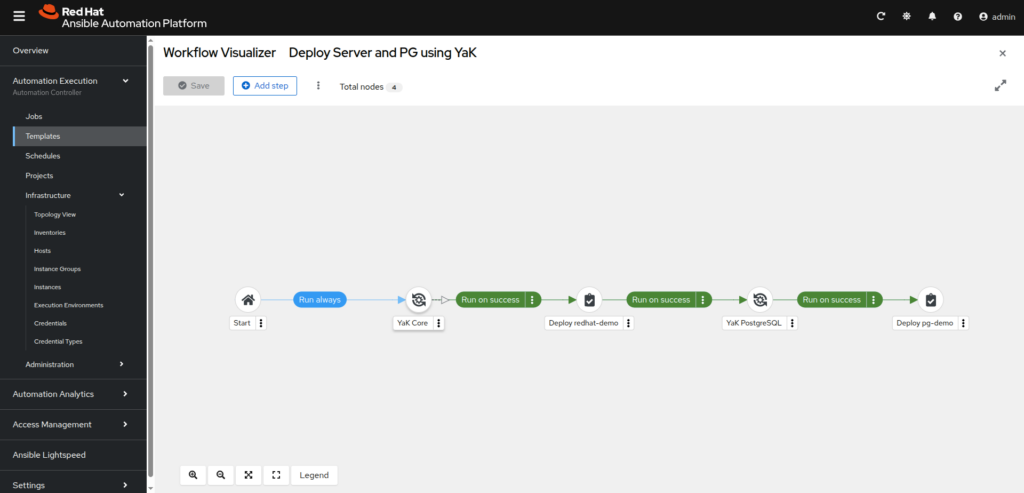
- YaK Core:
After theStart, add a new step with the following infos:
– Node type: Inventory Source Sync
– Inventory source: YaK Core
– Convergence: Any

- Deploy redhat-demo server:
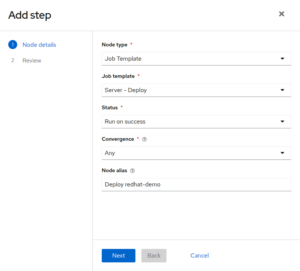
After theYaK Core, add a new step with the following infos:
– Node type: Job Template
– Job template: Server – Deploy
– Status: Run on success
– Convergence: Any
– Node alias: Deploy redhat-demo
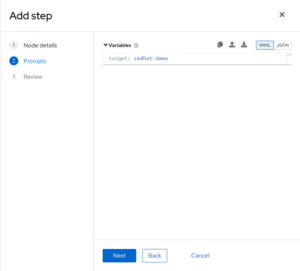
⠀⠀⠀⠀After clicking on Next button, you will have to set the playbook extra variables:
⠀⠀⠀⠀- Variables:
target: redhat-demo
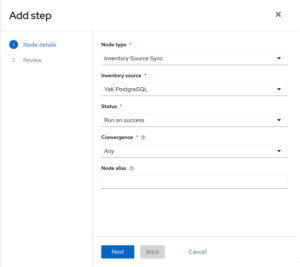
- YaK Component inventory:
After theDeploy redhat-demo, add a new step with the following infos:
– Node type: Inventory Source Sync
– Inventory source: YaK PostgreSQL
– Status: Run on success
– Convergence: Any
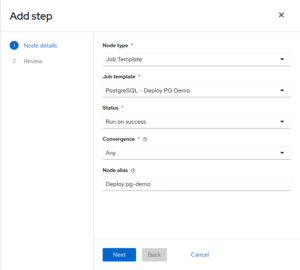
- Deploy redhat-demo server:
After theYaK PostgreSQL, add a new step with the following infos:
– Node type: Job Template
– Job template: PostgreSQL – Deploy PG demo
– Status: Run on success
– Convergence: Any
– Node alias: Deploy pg-demo
- You can save your workflow template.
- Initiate the workflow manually or configure scheduled runs for fully automated deployments.
By integrating YaK into AAP workflows, teams can automate entire stack deployments efficiently, achieving unprecedented consistency and speed.
Conclusion
Integrating YaK with Red Hat Ansible Automation Platform combines YaK’s ease-of-use and powerful features with AAP’s comprehensive automation capabilities. This synergy ensures that deployment processes are more structured, faster, and consistently aligned with best practices, thus significantly enhancing overall efficiency and reducing time-to-market for businesses.
![Thumbnail [60x60]](https://www.dbi-services.com/blog/wp-content/uploads/2022/08/DWI_web-min-scaled.jpg)
![Thumbnail [90x90]](https://www.dbi-services.com/blog/wp-content/uploads/2022/08/FRJ_web-min-scaled.jpg)
![Thumbnail [90x90]](https://www.dbi-services.com/blog/wp-content/uploads/2022/08/GRE_web-min-scaled.jpg)