Oracle Cloud Infrastructure (OCI) provides an easy-to-use command line interface named oci, with which you can do a lot of administrative tasks. Let’s see in this blog how to create virtual machines in OCI with this.
Setting up oci-cli
If you are already connected to your OCI tenancy with the command line, you can skip this part. Otherwise, let’s begin.
The first step is to install and configure the oci-cli utility. The full list of installation steps is available in the documentation and depends on the platform from which you want to administer OCI.
On macOS, just run this command:
brew install oci-cliSome Linux distributions (like OEL 7 or 8) come with the utility already installed. Otherwise, you can run the following command.
bash -c "$(curl -L https://raw.githubusercontent.com/oracle/oci-cli/master/scripts/install/install.sh)"Once this is installed, you need the connection information from your OCI account. You can finish the setup either by running the oci setup config command, which will ask for all the information needed, or by doing the following if you are not sure about the information required.
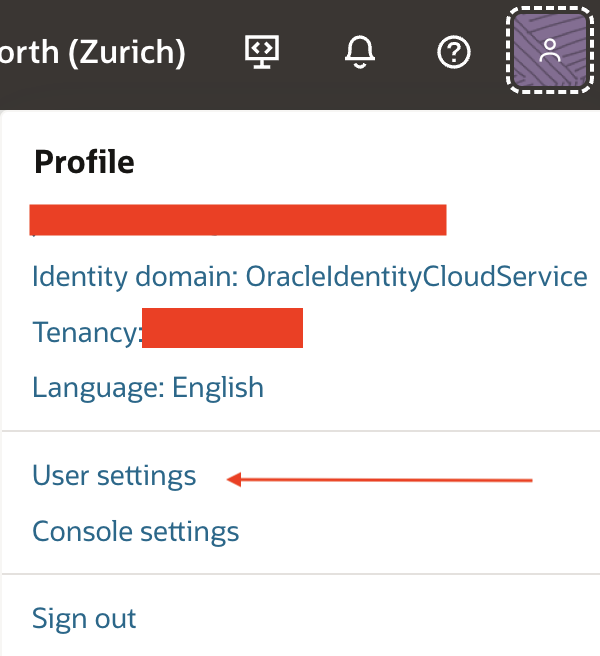
- Log in the OCI interface, and go in your Profile > User settings
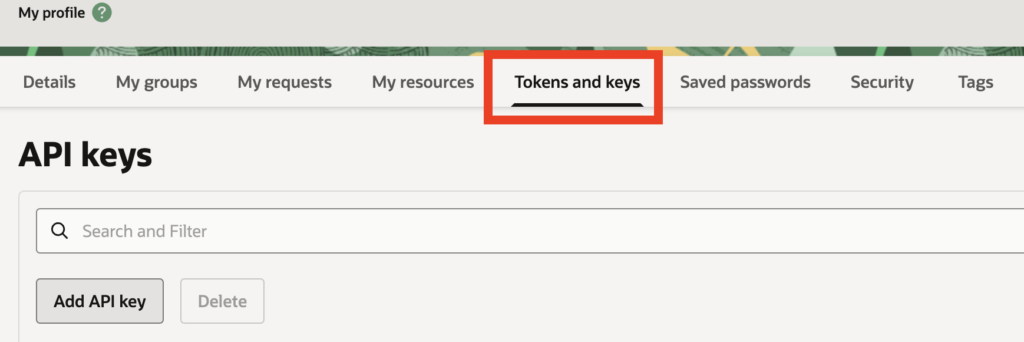
- In the User settings tab, click on Tokens and keys, and Add API key
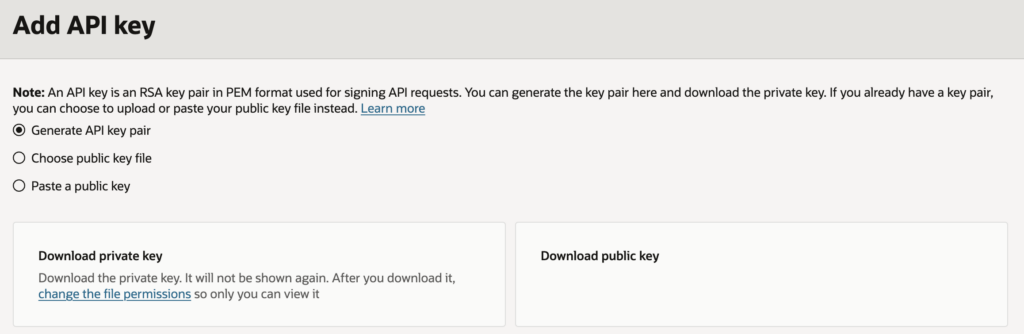
- Here, you have the option to generate a new key pair or to register an existing public key. Make sure to save the private key if you generate a new pair.
- After clicking on Add key, OCI will provide a configuration file that you can use.
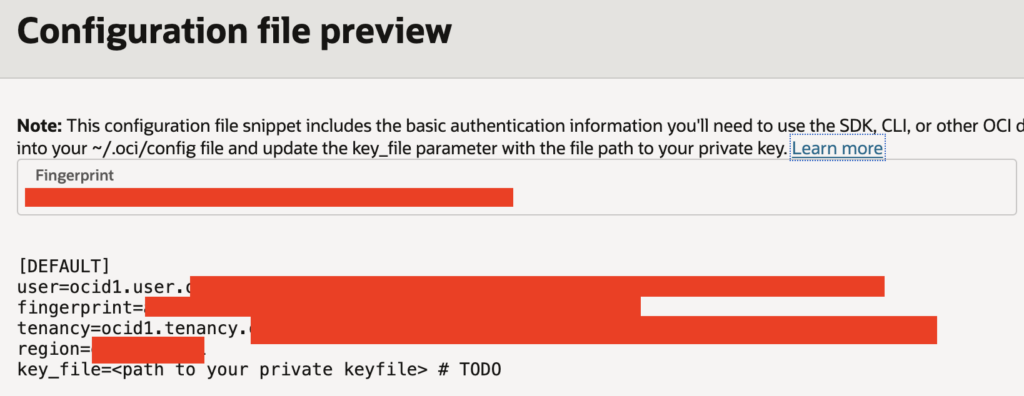
- Edit this configuration file with the location of your private key and place it at
~/.oci/config
> cat ~/.oci/config
[DEFAULT]
user=<user_ocid>
fingerprint=<fingerprint>
tenancy=<tenancy_ocid>
region=<your_region>
key_file=/path/to/private_key.pem
And that’s it ! To test the connection, run the oci iam region list command. It should return a JSON document containing all the available regions.
> oci iam region list
{
  "data": [
    {
      "key": "AMS",
      "name": "eu-amsterdam-1"
    },
    ...
    {
      "key": "ZRH",
      "name": "eu-zurich-1"
    }
  ]
}
Creating your first VM with the oci CLI
An OCI virtual machine is always created within a specific set of cloud components, for which you will have to retrieve the OCIDs.
- Compartment: it can be the root compartment or any other compartment, but the user defined in the
.oci/configfile should have access to it - Availability domain: depending on your OCI setup, you will have access to specific availability domains. We’ll see how to retrieve the correct one.
- Subnet: public subnet in which the VM will be available.
- Shape: shape of the VM.
- Image: the OS image used to create the VM.
Retrieve your compartment OCID
For the compartment, you can retrieve the list of all compartments with the following command:
> oci iam compartment list --all
{
  "data": [
    {
      "compartment-id": "compartment_ocid",
      "defined-tags": {
        "Oracle-Tags": {
          "CreatedBy": "...",
          "CreatedOn": "..."
        }
      },
      "id": "compartment_ocid",
      "inactive-status": null,
      "is-accessible": null,
      "lifecycle-state": "ACTIVE",
      "name": "compartment_name",
      "time-created": "..."
    },
    ...
}
If you know the name of the compartment you want to retrieve, you can get the OCID with this command. Just replace the compartment_name.
> oci iam compartment list --compartment-id-in-subtree true -all --query "data[?name=='compartment_name'].id" --raw-output
[
  "ocid.compartment..."
]
Choose an availability domain
If you don’t know it already, you can easily retrieve the availability domains available with the compartment OCID.
> oci iam availability-domain list --compartment-id ocid1.compartment.oc1... --query 'data[].name' --raw-output
[
  "AlWD:EU-ZURICH-1-AD-1"
]
Retrieve the subnet OCID
In a basic configuration, you should use the OCID of the only public subnet available. Let’s display the subnet names and OCID to help you choose the correct one.
> oci network subnet list --compartment-id ocid1.compartment.oc1... --query "data[].{name:\"display-name\", ocid:id}" --output table
+--------------------+---------------------+
| name               | ocid                |
+--------------------+---------------------+
| private subnet-vcn | ocid1.subnet.oc1... |
| public subnet-vcn  | ocid1.subnet.oc1... |
+--------------------+---------------------+
Select the desired shape
You can list the available shapes with the oci compute shape list command. Because it contains a lot of useless information for us, we will filter it. Below is a display of all available shapes and whether they are resizable. Indeed, some shapes cannot be resized and come with specific CPU/memory settings.
> oci compute shape list --compartment-id ocid1.compartment.oc1... --query  "data[].{name:shape,resizable:\"is-flexible\"}" --output table
+------------------------+-----------+
| name                   | resizable |
+------------------------+-----------+
| BM.Standard.E5.192     | False     |
| BM.Standard.A1.160     | False     |
| BM.Standard3.64        | False     |
| BM.Standard2.52        | False     |
| BM.Optimized3.36       | False     |
| BM.Standard.E4.128     | False     |
| BM.Standard.E3.128     | False     |
| BM.Standard.E2.64      | False     |
| BM.DenseIO2.52         | False     |
| VM.Optimized3.Flex     | True      |
| VM.Standard.E4.Flex    | True      |
| VM.Standard.E3.Flex    | True      |
| VM.Standard.A1.Flex    | True      |
| VM.Standard2.1         | False     |
| VM.Standard2.2         | False     |
| VM.Standard2.4         | False     |
| VM.Standard2.8         | False     |
| VM.Standard2.16        | False     |
| VM.Standard2.24        | False     |
| VM.Standard.E2.1       | False     |
| VM.Standard.E2.2       | False     |
| VM.Standard.E2.4       | False     |
| VM.Standard.E2.8       | False     |
| VM.Standard.E2.1.Micro | False     |
| VM.Standard3.Flex      | True      |
| VM.DenseIO2.8          | False     |
| VM.DenseIO2.16         | False     |
| VM.DenseIO2.24         | False     |
| VM.Standard.E5.Flex    | True      |
+------------------------+-----------+
Choose a specific image
Use the oci compute image list command to retrieve the available images inside your compartment. You might already have a name shape in mind, so just find the one you are interested in.
> oci compute image list --compartment-id ocid1.compartment.oc1... --query --query "data[].{name:\"display-name\",ocid:id}" --all --output table
+----------------------------------+--------------------+
| name                             | ocid               |
+----------------------------------+--------------------+
| Windows-Server-2025-...          | ocid1.image.oc1... |
| Oracle-Linux-9.7-2026.01.29-0    | ocid1.image.oc1... |
| Oracle-Linux-8.10-2026.01.29-0   | ocid1.image.oc1... |
| CentOS-8-Stream-2024.04.25-0     | ocid1.image.oc1... |
| custom_image                     | ocid1.image.oc1... |
+----------------------------------+--------------------+
Build your first virtual machine
You now have all the necessary information to create your own VM from the CLI ! Combine it together with the following flags, and you’re good to go:
--display-name: Name of the virtual machine--assign-public-ip: Whether to assign a public IP.--metadata: Useful to add an ssh key to the default user.--shape-config: If the shape you selected can be customized, you can select its attributes here, likeocpusormemoryInGBs.
At the end, we have the following command:
oci compute instance launch \
    --compartment-id ocid1.compartment.oc1... \
    --availability-domain "EiFV:EU-ZURICH-1-AD-1" \
    --shape "VM.Standard.E5.Flex" \
    --shape-config '{"ocpus":1,"memoryInGBs":4}' \
    --subnet-id ocid1.subnet.oc1... \
    --image-id ocid1.image.oc1... \
    --display-name "vm_dbi" \
    --assign-public-ip true \
    --metadata '{"ssh_authorized_keys": "ssh-rsa ssh_key_content== user@host"}'
Of course, there are other options that you could use:
--wait-for-state: useful if you want to wait for the VM to beRUNNINGbefore ending the command. It is very useful in combination with the--query 'data.id'option, which will give you the OCID of the newly created VM, that you can then use to retrieve its IP, among other things.--user-data-file: this is especially useful if you want to add a customcloud-init.yamlfile for the VM setup.--boot-volume-size-in-gbs: size of the boot volume, in GB.
With this, you have everything you need for a basic VM creation in OCI.
![Thumbnail [60x60]](https://www.dbi-services.com/blog/wp-content/uploads/2025/05/JDE_Web-1-scaled.jpg)
![Thumbnail [90x90]](https://www.dbi-services.com/blog/wp-content/uploads/2022/08/ADE_WEB-min-scaled.jpg)
![Thumbnail [90x90]](https://www.dbi-services.com/blog/wp-content/uploads/2025/07/ALK_MIN.jpeg)
![Thumbnail [90x90]](https://www.dbi-services.com/blog/wp-content/uploads/2022/08/STH_web-min-scaled.jpg)