If your Oracle database is running in ARCHIVELOG mode, monitoring your backups is essential.
Without proper backup supervision, the Fast Recovery Area (FRA) can eventually become full, which may block archive log generation and, in the worst case, stop database activity.
In this article, we will see how to monitor Oracle backups using Zabbix and the Oracle plugin available with Zabbix Agent 2.
This guide assumes that:
- ARCHIVELOG mode is already enabled,
- RMAN backups are already configured,
- and Zabbix Agent 2 is already installed on the Oracle server.
Setup Zabbix agent 2
By default, the Oracle template provided with Zabbix does not include items dedicated to backup monitoring.
To achieve this, we will use the Oracle plugin feature called CustomQueries. You can find the documentation for this plugin on the official web-site.
The approach is straightforward:
- create custom SQL queries,
- store them locally on the database server,
- and let Zabbix execute them periodically
First, create a directory that will contain your monitoring SQL scripts:
mkdir -p /etc/zabbix/oracle/sql

chmod 755 -R /etc/zabbix/oracle/sql
Create a SQL script that returns the timestamp of the latest level 0 backup.
vi /etc/zabbix/oracle/sql/last_inc0.sqlSELECT
CAST(((CAST(BS.COMPLETION_TIME AS DATE) - DATE '1970-01-01') * 86400) AS NUMERIC) AS LAST_INC0
FROM
V$BACKUP_SET BS
WHERE
BS.INCREMENTAL_LEVEL = 0
ORDER BY
BS.COMPLETION_TIME DESC
FETCH FIRST 1 ROWS ONLY;This query retrieves the completion time of the latest RMAN level 0 backup. Then, it converts the value into Unix epoch format, which makes preprocessing and trigger calculations much easier inside Zabbix.
You can easily adapt this query to monitor:
- archive log backups,
- level 1 incremental backups,
- controlfile backups,
- or even backup duration.
Configure the Oracle Plugin
Now edit the Oracle plugin configuration file:
vi /etc/zabbix/zabbix_agent2.d/plugins.d/oracle.confPlugins.Oracle.CustomQueriesPath=/etc/zabbix/oracle/sql/With this configuration, the Oracle plugin knows exactly where to find your custom SQL scripts.
Afterward, restart the Zabbix Agent 2 service:
systemctl restart zabbix-agent2Setup Zabbix template
In your Oracle template, create a new Zabbix agent item using the following key:
oracle.custom.query[“{$ORACLE.CONNSTRING}”,”{$ORACLE.USER}”,”{$ORACLE.PASSWORD}”,”{$ORACLE.SERVICE}”,last_inc0]
Make sure that:
- the query name matches your SQL file name (
last_inc0.sql), - and the preprocessing steps are correctly configured.
Once the item becomes active, Zabbix immediately starts collecting the timestamp of the latest level 0 backup.
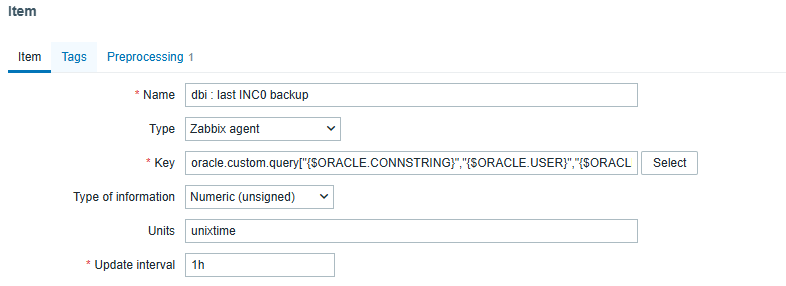
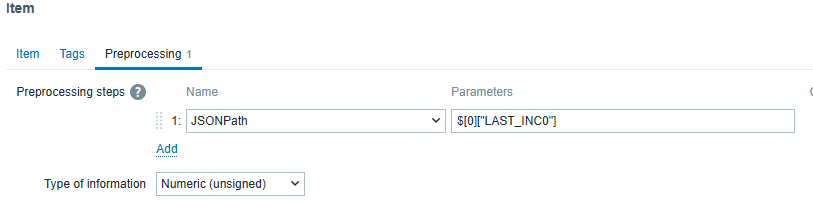
- And now you can see your last backup time. Then you just have to create a trigger with this item and you have finished !

Conclusion
By using custom Oracle queries with Zabbix Agent 2, you can quickly extend the default Oracle monitoring capabilities with very little configuration effort.
More importantly, this approach helps you detect backup issues early before the FRA fills up and impacts production systems.
Because the solution remains fully customizable, you can easily extend it later to monitor additional RMAN metrics that match your operational requirements.
You can find other blog regarding Zabbix with this link.
![Thumbnail [60x60]](https://www.dbi-services.com/blog/wp-content/uploads/2023/01/APY_web-scaled.jpg)
![Thumbnail [90x90]](https://www.dbi-services.com/blog/wp-content/uploads/2025/05/martin_bracher_2048x1536.jpg)
![Thumbnail [90x90]](https://www.dbi-services.com/blog/wp-content/uploads/2022/09/DDI_web-min-scaled.jpg)
![Thumbnail [90x90]](https://www.dbi-services.com/blog/wp-content/uploads/2025/11/LTO_WEB.jpg)