Tailscale is a mesh VPN (Virtual Private Network) service that streamlines connecting devices and services securely across different networks. It enables encrypted point-to-point connections using the open source WireGuard protocol, which means only devices on your private network can communicate with each other.
(source: https://tailscale.com/kb/1151/what-is-tailscale)
I’ve been using Tailscale to connect my personal devices for a while. I have it installed almost everywhere: on my laptop, my phone, my Synology NAS, etc. It is very convenient as it helps me connect to any device, from anywhere. Tailscale adds a virtual interface to your device and manages its own IP address (you’ll understand why this is important in a minute)
Tailscale automatically assigns a unique IP address to each device in your Tailscale network (known as a tailnet). This IP address is known as a Tailscale IP address and comes from the shared address space defined in RFC6598, known as Carrier-Grade NAT (CGNAT).
(source: https://tailscale.com/kb/1015/100.x-addresses)
Today, I’m taking it to the next level: I’d like to install Tailscale alongside one of my application pod and access the web interface my pod exposes, directly from my Tailscale network (aka Tailnet).
The challenge:
I’ve installed Tailscale on the VM hosting my Kubernetes cluster (it’s a 1 node cluster, just for playing). Cool, I can access the VM from any other device. However, what about the web app my pod provides? How can I access it from my Tailnet?
As mentioned before, Tailscale has its own IP addressing, using 100.x.y.z addresses : your devices are assigned an IP from this address space.
Moreover, the network interface Tailscale creates (tailscale0) is not a standard interface and Kubernetes cannot simply expose services through that interface as for any other NodePort. To do so, you need to deploy Tailscale in your Kubernetes cluster.
Let’s do that.
The options:
Tailscale offers several options to connect your cluster to your tailnet:
- Proxy: Tailscale proxies traffic to one of your Kubernetes services. Your tailnet devices can communicate with the service but not with any other Kubernetes resources. Tailscale users can reach the service using the proxy’s name.
- Sidecar: Tailscale runs as a sidecar next to a specific pod in your cluster. It lets you expose that pod on your tailnet without allowing access to any others. Tailscale users can connect to the pod using its name.
- Subnet router: A subnet router deployment exposes your entire cluster network in your tailnet. Your Tailscale devices can connect to any pod or service in your cluster, provided that applicable Kubernetes network policies and Tailscale access controls allow it.
My use-case is to expose a specific pod to my tailnet (my speedtest-tracker app frontend), the “sidecar” option is then enough for my need.
Let’s see how to configure that together.
I invite you to read my other blog about speedtest-tracker. This is the app we are going to work with today.
I’ve been using speedtest-tracker for a while, but the app is only available from within my local network for now. Let’s see how to adapt my app’s deployment definition to add the Tailscale sidecar container.
What we need:
- An application (that’s my speedtest-tracker app that already exists)
- To generate an auth key that will be used by the Tailscale service deployed into the cluster
- A secret with this auth key value in my cluster, for my pod to authenticate to my Tailscale account.
- A service account, role and role binding to configure RBAC for my deployment ( my pod will use this service account and RBAC permissions to interact with the cluster)
- Finally, I will add the sidecar container running Tailscale alongside my speedtest-tracker app container
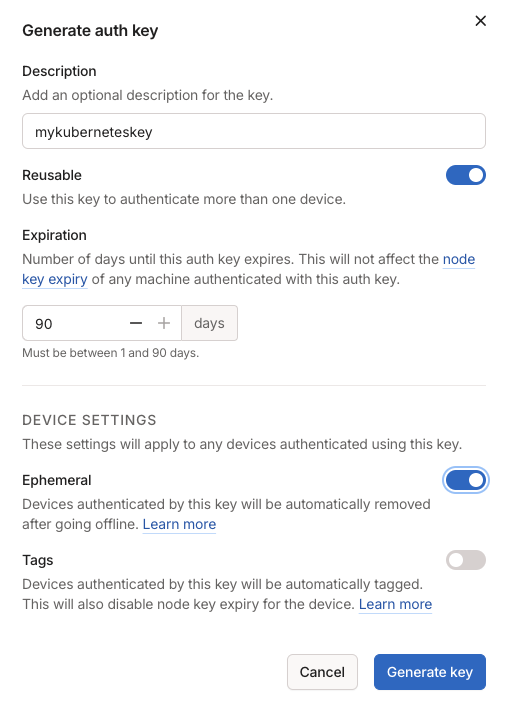
Generate an auth key
First, let’s generate the auth key from my Tailscale account web interface.
This is done under Settings –> Keys –> Generate auth key…
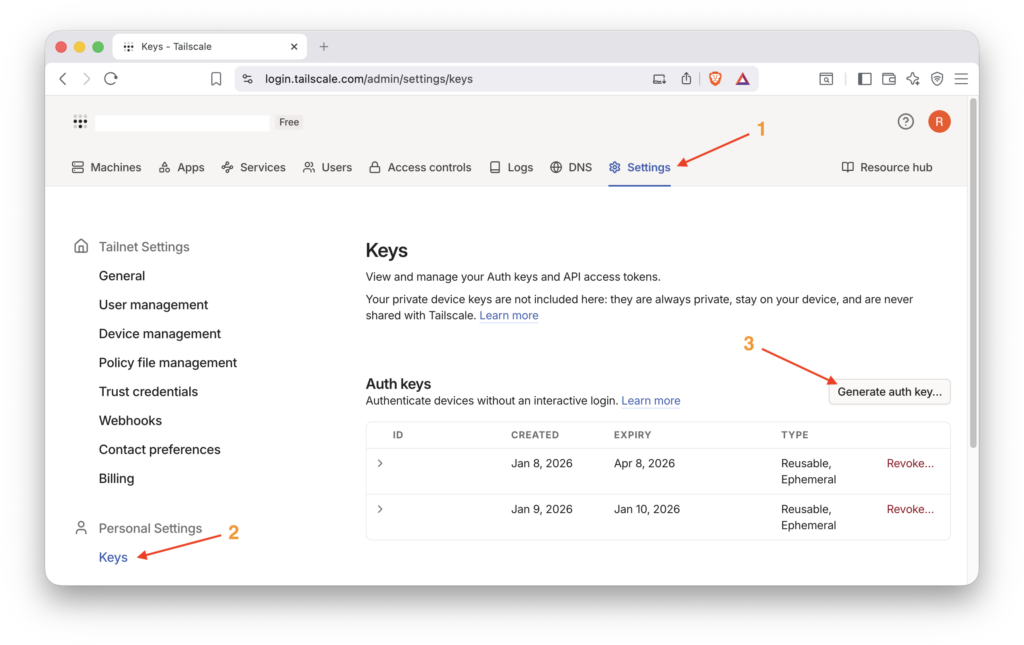
Fill out the form, and make the key reusable. Then configure the device this key applies to as ephemeral (so is your pod).
Copy the key value somewhere as we are going to need it in a moment.
Create a secret
I create my secret, here is my tailscale-secret.yaml file:
apiVersion: v1
kind: Secret
metadata:
  name: tailscale-auth
stringData:
  TS_AUTHKEY: <my key value from previous step>
I apply the configuration to my speedtest namespace:
kubectl apply -f tailscale-secret.yaml -n speedtestService account, role and role binding
Next step is to configure RBAC for my Tailscale deployment. I need a service account, a role and role binding. Lucky me, Tailscale doc is well written, all I need is to follow their instructions.
I create a manifest called tailscale-rbac.yaml:
apiVersion: v1
kind: ServiceAccount
metadata:
  name: tailscale

---

apiVersion: rbac.authorization.k8s.io/v1
kind: Role
metadata:
  name: tailscale
rules:
  - apiGroups: [""]
    resourceNames: ["tailscale-auth"]
    resources: ["secrets"]
    verbs: ["get", "update", "patch"]

---

apiVersion: rbac.authorization.k8s.io/v1
kind: RoleBinding
metadata:
  name: tailscale
subjects:
  - kind: ServiceAccount
    name: tailscale
roleRef:
  kind: Role
  name: tailscale
  apiGroup: rbac.authorization.k8s.io
I apply the configuration to my speedtest namespace:
kubectl apply -f tailscale-rbac.yaml -n speedtestAdd the sidecar container to my deployment
Last step is to adapt my existing deployment to add the tailscale sidecar container.
Under the spec section, we need to assign the serviceAccount created previously, to the pod:
serviceAccountName: tailscaleThen I create the sidecar container as per the tailscale documentation
apiVersion: apps/v1
kind: Deployment
metadata:
  name: speedtest-tracker
spec:
  replicas: 1
  revisionHistoryLimit: 0
  selector:
    matchLabels:
      app: speedtest-tracker
  template:
    metadata:
      labels:
        app: speedtest-tracker
    spec:
      serviceAccountName: tailscale  ## <-- Add the Service Account Name
      containers:
        ##### Tailscal sidecar container definition#######
        - name: tailscale-sidecar
          image: ghcr.io/tailscale/tailscale:latest
          env:
            - name: TS_KUBE_SECRET
              value: tailscale-auth
            - name: TS_AUTHKEY
              valueFrom:
                secretKeyRef:
                  name: tailscale-auth
                  key: TS_AUTHKEY
            - name: TS_USERSPACE
              value: "false"
          securityContext:
            capabilities:
              add:
               - NET_ADMIN
        ######################

        - name: speedtest-tracker
          image: lscr.io/linuxserver/speedtest-tracker:latest
          ports:
            - containerPort: 80
          env:
            - name: PUID
              value: "1000"
            - name: PGID
              value: "1000"
            - name: DB_CONNECTION
              value: pgsql
            - name: DB_HOST
              value: postgres
            - name: DB_PORT
              value: "5432"
            - name: DB_DATABASE
              value: speedtest_tracker
            - name: DB_USERNAME
              value: speedy
            - name: DB_PASSWORD
              value: password

          volumeMounts:
            - mountPath: /config
              name: speedtest-tracker
      volumes:
        - name: speedtest-tracker
          persistentVolumeClaim:
            claimName: speedtest-tracker
I apply the configuration to my speedtest namespace:
kubectl apply -f speedtest-tracker.yaml -n speedtestQuick check, my speedtest-tracker pod is now running with 2 containers inside:
Rancher:~/syno/speedtest # kubectl get pods -n speedtest
NAME                                READY   STATUS    RESTARTS   AGE
postgres-7958dd877c-f4d2l           1/1     Running   0          22h
speedtest-tracker-8975967cd-s2fmc   2/2     Running   0          105m
And that’s it!
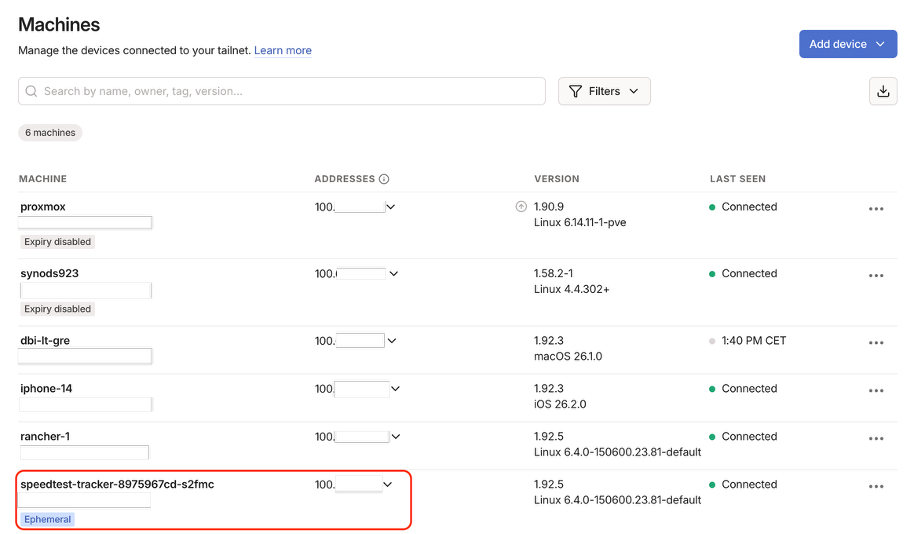
I can now access my app from both networks : my local network and my tailnet.
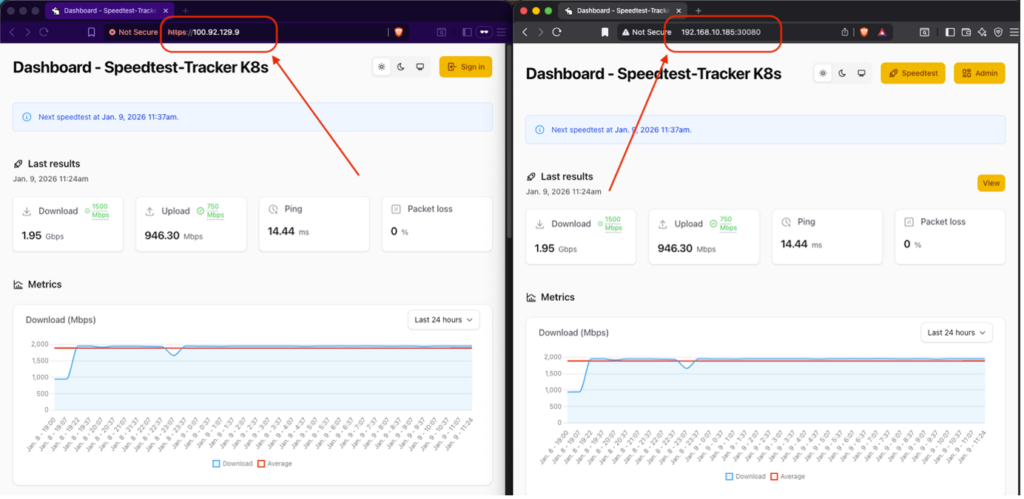
My pod is now seen as a device in my Tailscale network and can communicate with my other machines.
Conclusion
What we’ve done is to turn our Pod into a Tailscale node by injecting a WireGuard interface into the Pod’s shared network namespace, with the help of a tailscale sidecar container. This allows encrypted traffic to flow directly to the app container without Kubernetes Services or Ingress.
This is it, I hope you enjoyed reading this blog and that you learned something new.
If so, drop a like, it’s always appreciated 😉
To go further, please visit the Tailscale official documentation that will take you through all the steps and options to configure your tailnet on Kubernetes:
https://tailscale.com/learn/managing-access-to-kubernetes-with-tailscale#sidecar-deployments
![Thumbnail [60x60]](https://www.dbi-services.com/blog/wp-content/uploads/2022/08/GRE_web-min-scaled.jpg)
![Thumbnail [90x90]](https://www.dbi-services.com/blog/wp-content/uploads/2022/08/ADE_WEB-min-scaled.jpg)
![Thumbnail [90x90]](https://www.dbi-services.com/blog/wp-content/uploads/2022/08/NME_web-min-scaled.jpg)