More often than not, migrating a database is not much about moving the data but about ensuring that nothing was lost in the process. In all migration projects, a DBA will have to answer the following question: “Is my target database really identical to the source ?“
This is what Oracle GoldenGate Veridata was made for, and before diving into more specific use cases of Veridata in upcoming blog posts, we will see how to install and set up GoldenGate Veridata 23c (not called 23ai, for some reason…), while answering the most common questions.
Table of contents
- Can GoldenGate Veridata be installed on the same host as a GoldenGate hub ?
- Prerequisites for GoldenGate Veridata installation
- Installing GoldenGate Veridata with the OUI (graphic installation)
- Installing GoldenGate Veridata with the CLI (silent installation)
- Accessing GoldenGate Veridata Web UI
- Veridata Agent Installation and Configuration
- Appendix
Can GoldenGate Veridata be installed on the same host as a GoldenGate hub ?
This sounds like a very good idea at first sight. You have a GoldenGate hub setup for all your GoldenGate replications, with access to all databases being at both ends of your GoldenGate replications.
However, there is no real reason to have both GoldenGate and Veridata on the same host, since they have two very different roles. In addition to this, Oracle strongly recommends having a host dedicated to Veridata operations.
Prerequisites for GoldenGate Veridata installation
Certification Matrix
To make sure you respect the requirements for a Veridata setup, check the official Oracle certification matrix. For Veridata 23c, Oracle and Red Hat Linux 8 and 9 are supported.
Download the latest patched complete installation
In recent years, Oracle provided patched installations, which saved a lot of time during setup. For Veridata, I strongly recommend using the latest patch for the installation instead of patching it later. Indeed, a new feature was added in the configuration assistant, so please download the installer from patch 38437002 (released in November 2025) before continuing.
For the installation, we will use the standard oracle user and oinstall group. Unzip the binaries to a stage directory.
[root@vmvdt~] mkdir -p /u01/app/oracle/product
[root@vmvdt ~] mkdir -p /u01/stage
[root@vmvdt ~] unzip -oq p38437002_231000_Linux-x86-64.zip -d /u01/stage
[root@vmvdt ~] chown oracle:oinstall -R /u01
Contrary to usual Oracle installations, you will also need to download the JDK. Oracle recommends downloading JDK 17 from the archive, and I’ve never tried using a newer version, so we will stay with this one.
[oracle@vmvdt ~] cd /u01/app/oracle/product
[oracle@vmvdt ~] tar zxvf /u01/stage/jdk-17.0.17_linux-x64_bin.tar.gz
Installing GoldenGate Veridata with the OUI (graphic installation)
Installing binaries
With the oracle user, run the runInstaller to install Veridata binaries.
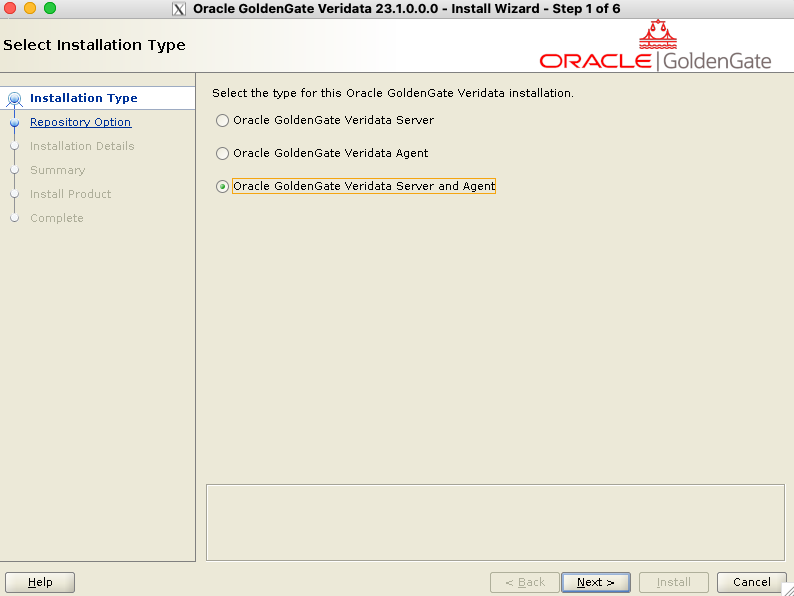
[oracle@vmvdt ~] /u01/stage/fbo_oggvdt_linux_services_shiphome/Disk1/runInstallerOn the first panel, you can decide whether to install only Veridata Server, only Veridata Agent or both. We’ll choose the latter option here.
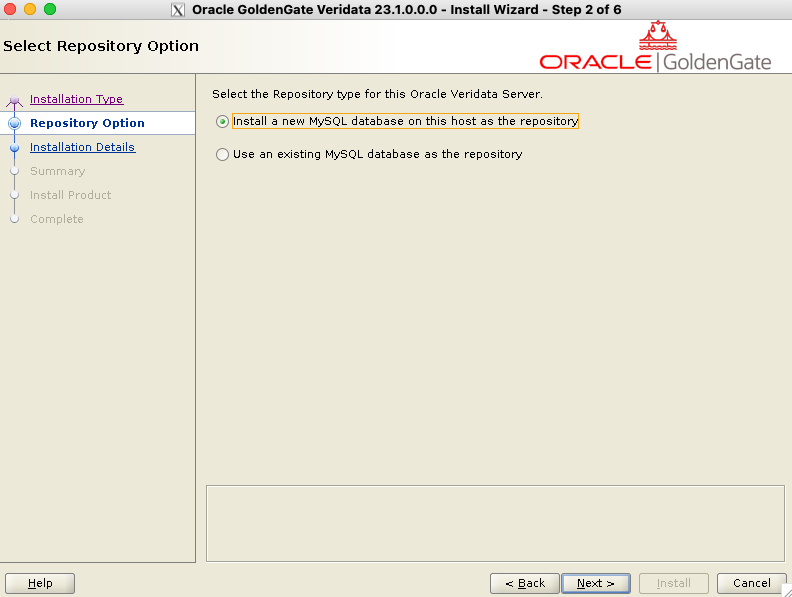
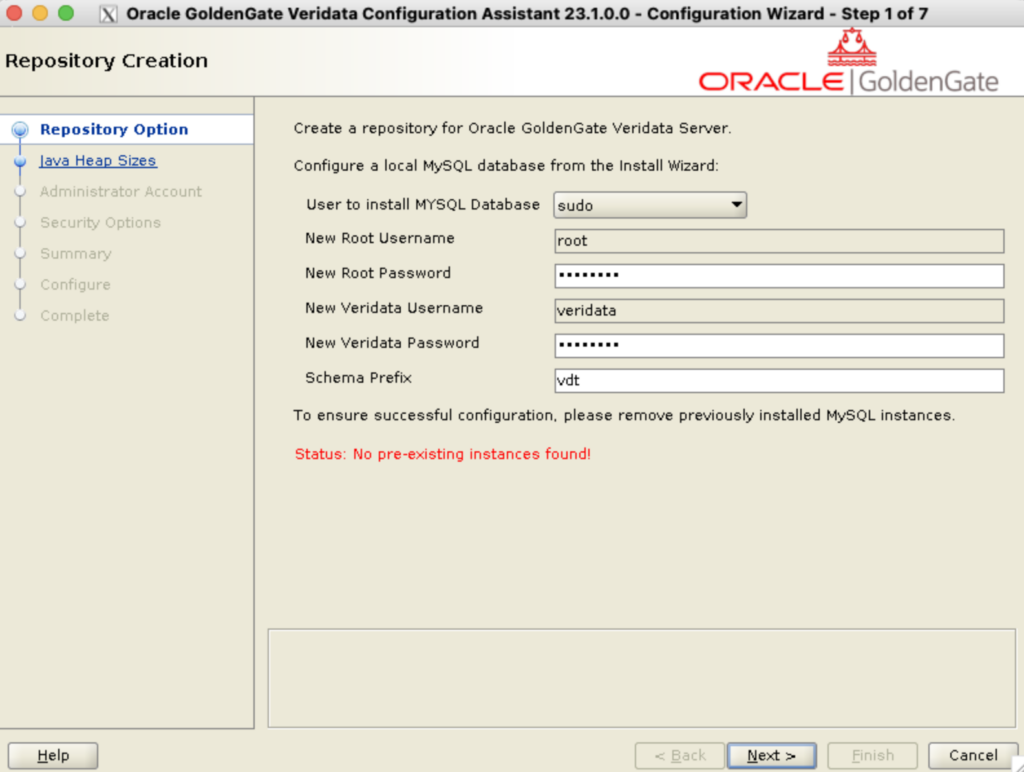
You can then pick whether to install a new MySQL database or use an existing one. As a reminder, only MySQL is supported for storing metadata, so you cannot opt for an Oracle database here. To keep things simple, let’s decide to install a new MySQL database. The installation will be done by the configuration assistant in a later process.
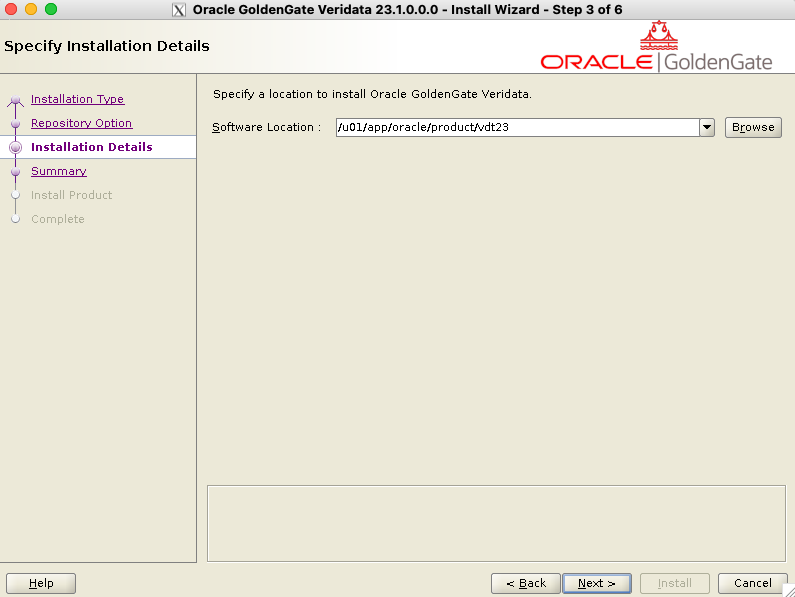
After entering the software location (/u01/app/oracle/produdct/vdt23 in this example), you can click on Next for all the following steps, since no action is required. If it’s your first Oracle installation on the server, you must give the inventory directory location. You can keep the default /u01/oraInventory if you follow OFA.
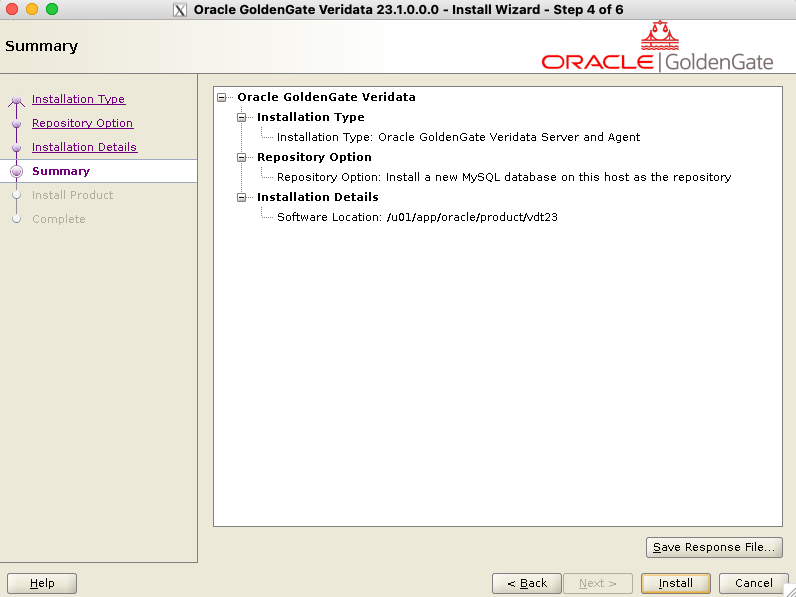
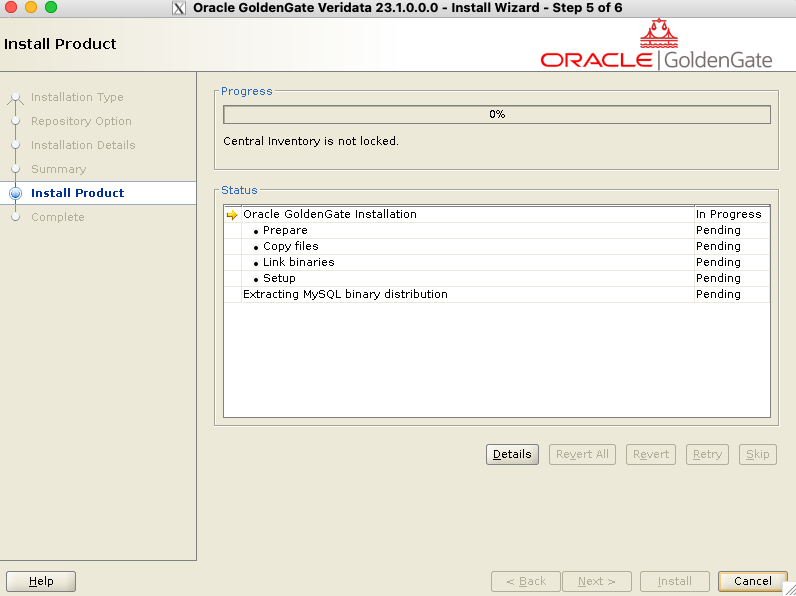
The binaries are installed, and you can now run the Configuration Assistant.
Running the Configuration Assistant
After installing the binaries, you can run the Configuration Assistant. Make sure JAVA_HOME is declared, and add the binaries to the PATH variable.
[oracle@vmvdt ~]$ export JAVA_HOME=/u01/app/oracle/product/jdk-17.0.17
[oracle@vmvdt ~]$ export PATH=$JAVA_HOME/bin:$PATH
[oracle@vmvdt ~]$ /u01/app/oracle/product/vdt23/bin/vdtca.sh
First, give a root password and a veridata password. These will be passwords of the root and veridata users for the MySQL instance, not the Web UI !
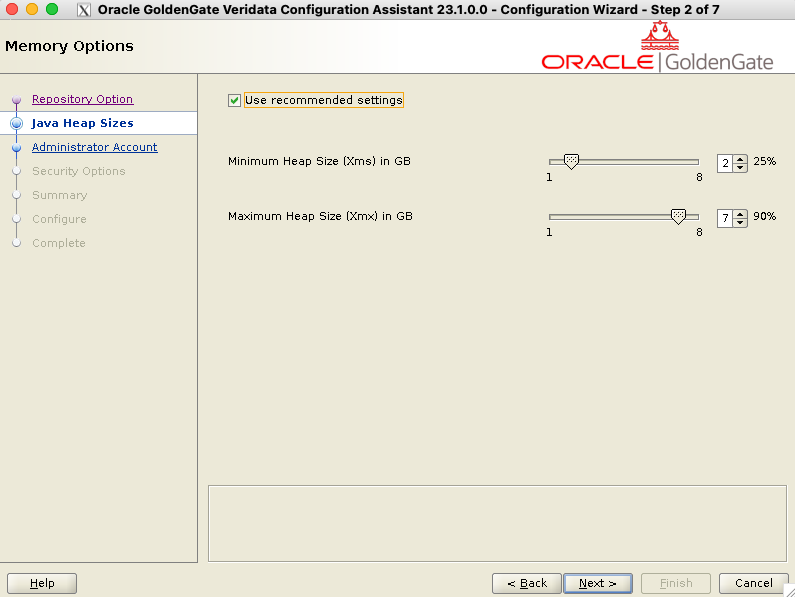
For now, we’ll also keep the default recommended memory parameters:
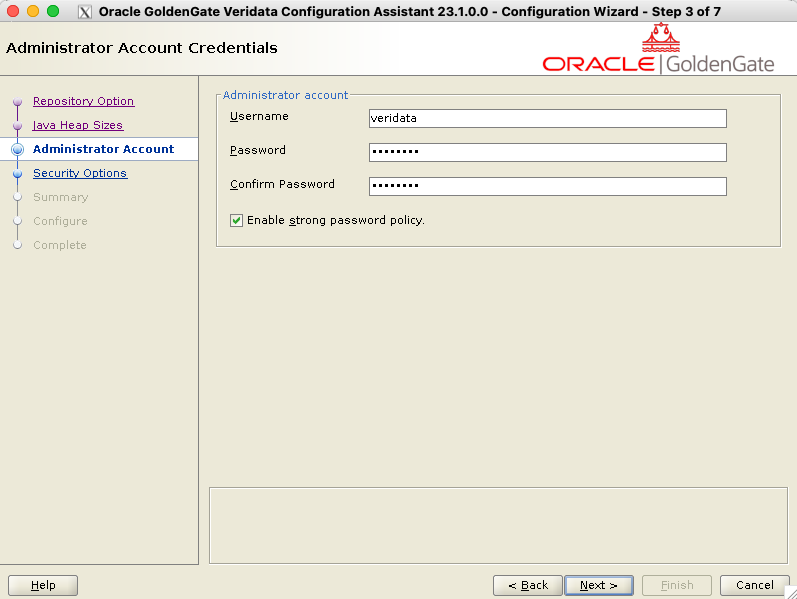
After this, choose the Web UI administrator account.
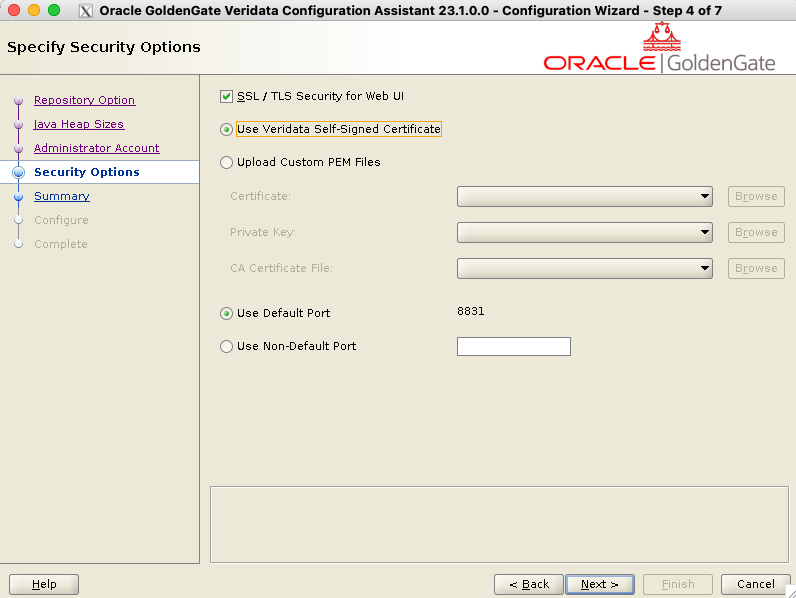
Then, decide how to secure your installation. We will keep things simple here by using self-signed certificates, but you should not use them in production, of course. If you want a port that is not the default 8831, now is the time to specify it.
A window should pop up, asking you to run a script.
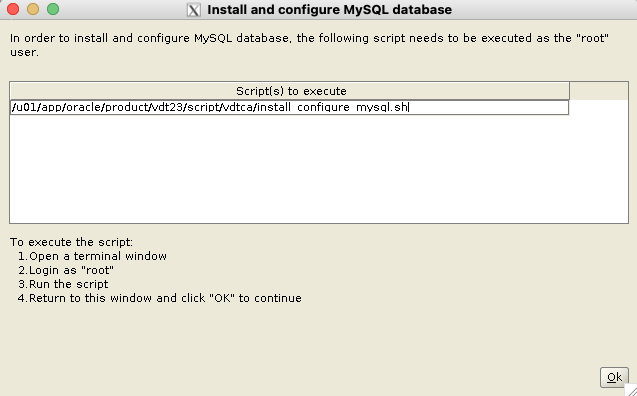
As root, run the MySQL installation script located at $VERIDATA_HOME/script/vdtca/install_configure_mysql.sh, and then click Ok. The rest of the installation will follow. You can find below the output of the MySQL installation script.
[root@vmvdt oracle]# /u01/app/oracle/product/vdt23/script/vdtca/install_configure_mysql.sh
[INFO] Searching in '/u01/app/oracle/product/vdt23/script/vdtca/../..' for a directory matching 'mysql-commercial*'...
[INFO] Found a matching directory: '/u01/app/oracle/product/vdt23/script/vdtca/../../mysql-commercial-8.0.42-linux-glibc2.17-x86_64-minimal'
2025-12-21T09:29:57.376559Z 0 [System] [MY-013169] [Server] /u01/app/oracle/product/vdt23/mysql-commercial-8.0.42-linux-glibc2.17-x86_64-minimal/bin/mysqld (mysqld 8.0.42-commercial) initializing of server in progress as process 50020
2025-12-21T09:29:57.383296Z 1 [System] [MY-013576] [InnoDB] InnoDB initialization has started.
2025-12-21T09:29:58.173524Z 1 [System] [MY-013577] [InnoDB] InnoDB initialization has ended.
2025-12-21T09:29:59.799156Z 6 [Warning] [MY-010453] [Server] root@localhost is created with an empty password ! Please consider switching off the --initialize-insecure option.
[INFO] The Configuration Assistant will set the root user password as what you entered in the next stage of veridata repository creation.
[INFO] MySQL has been installed and started.
[INFO] Please return to the Configuration Assistant and click "OK" to continue.
After this, the installation is complete, and the last window displays the URL for the GoldenGate Veridata Web UI:
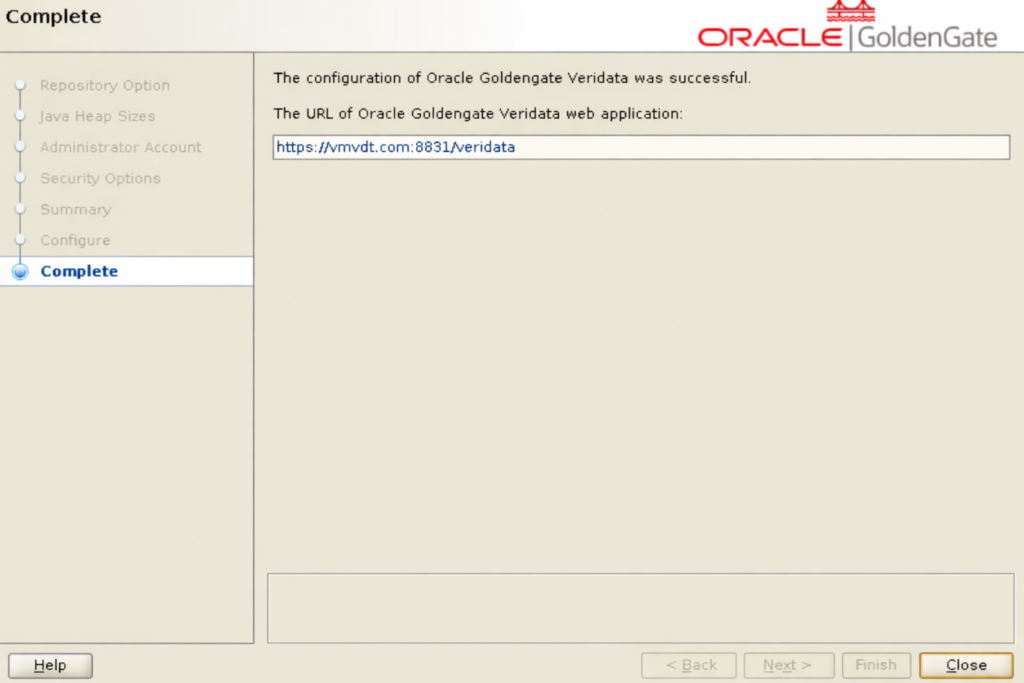
You have successfully installed GoldenGate Veridata, and can now connect to the Web UI !
Installing GoldenGate Veridata with the CLI (silent installation)
Installing binaries
To perform a silent installation, let’s create a vdt.rsp file. As mentioned in the graphic installation chapter, you must decide what to install, and whether to build a new MySQL repository. This is what the file should look like for a Server/Agent setup with a new repository.
[oracle@vmvdt ~]$ cat vdt.rsp
oracle.install.responseFileVersion=/oracle/install/rspfmt_ogginstall_response_schema_v23_1_0
INSTALL_OPTION=SERVERAGENT
IS_NEWREPO=true
SOFTWARE_LOCATION=/u01/app/oracle/product/vdt23
INVENTORY_LOCATION=/u01/oraInventory
UNIX_GROUP_NAME=oinstall
Specify INSTALL_OPTION=SERVER for a server-only setup, and AGENT for an agent-only setup.
Then, run the installer with the -silent and -responseFile options:
[oracle@vmvdt stage]$ /u01/stage/fbo_oggvdt_linux_services_shiphome/Disk1/runInstaller -silent -responseFile /home/oracle/vdt.rsp
Starting Oracle Universal Installer...

Checking Temp space: must be greater than 120 MB.   Actual 17959 MB    Passed
Checking swap space: must be greater than 150 MB.   Actual 4095 MB    Passed
Preparing to launch Oracle Universal Installer from /tmp/OraInstall2025-12-21_10-01-20AM. Please wait ...
You can find the log of this install session at:
 /tmp/OraInstall2025-12-21_10-01-20AM/installActions2025-12-21_10-01-20AM.log
The installation of Oracle Veridata Services was successful.
Please check '/u01/oraInventory/logs/silentInstall2025-12-21_10-01-20AM.log' for more details.
Successfully Setup Software.
The log of this install session can be found at:
 /u01/oraInventory/logs/installActions2025-12-21_10-01-20AM.log
Running the Configuration Assistant
After this, prepare a vdtca.rsp file with the following content (full file in the appendix below):
oracle.install.responseFileVersion=/oracle/install/rspfmt_oggca_response_schema_v23_1_0
# SECTION A - GENERAL
DB_TYPE=MYSQL
ORACLE_USER=
ORACLE_PASS=
WALLET_LOC=
SERVICE_NAME=
IS_NEW_MYSQL=true
MYSQL_INSTALL_USER_TYPE=sudo
EXISTING_MYSQL_HOST=
EXISTING_MYSQL_PORT=
EXISTING_MYSQL_USERNAME=
EXISTING_MYSQL_PASSWORD=
NEW_MYSQL_ROOT_USERNAME=root
NEW_MYSQL_ROOT_PASSWORD=root_strong_password
NEW_MYSQL_VERIDATA_USERNAME=veridata
NEW_MYSQL_VERIDATA_PASSWORD=veridata_strong_password
SCHEMA_PREFIX=vdt
MIN_HEAP_SIZE=3g
MAX_HEAP_SIZE=10g
ADMINISTRATOR_USER=veridata
ADMINISTRATOR_PASSWORD=veridata_strong_password
STRONG_PWD_POLICY_ENABLED=true
IS_SSL_ENABLED=true
IS_SELF_SIGNED_CERTIFICATE=true
IS_PEM_FILES=false
CERTIFICATE_LOCATION=
PRIVATE_KEY_LOCATION=
CA_CERTIFICATE_LOCATION=
PRIVATE_KEY_PASSWORD=
VERIDATA_PORT=8831
And run the vdtca.sh script in the binary directory. Don’t forget to set JAVA_HOME and add binaries to the path !
[oracle@vmvdt ~]$ export JAVA_HOME=/u01/app/oracle/product/jdk-17.0.17
[oracle@vmvdt ~]$ export PATH=$JAVA_HOME/bin:$PATH
[oracle@vmvdt ~]$ /u01/app/oracle/product/vdt23/bin/vdtca.sh -silent -responseFile /home/oracle/vdtca.rsp
Accessing GoldenGate Veridata Web UI
Before connecting to the URL, make sure the port is open (below commands are just examples)
[root@vmvdt ~]# firewall-cmd --list-ports

[root@vmvdt ~]# firewall-cmd --add-port 8831/tcp --permanent
success
[root@vmvdt ~]# firewall-cmd --reload
success
[root@vmvdt ~]# firewall-cmd --list-ports
8831/tcp
Then, you can open the following URL, depending on your configuration: https://vmvdt.com:8831/veridata
Login with the username and password given for the Web UI during the installation process (not the ones from the MySQL installation !)

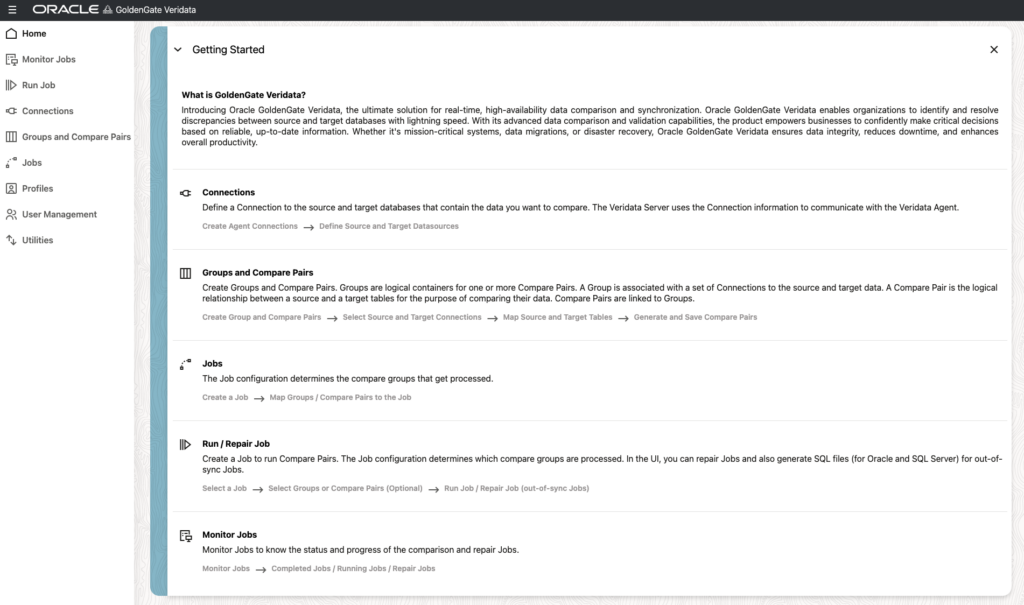
You now have access to the Web UI !
Veridata Agent Installation and Configuration
Since we opted for the SERVERAGENT option when setting up Veridata, we don’t need to install the agent separately. If you only installed Veridata server in the first place, run the OUI or the silent installation once more where you want your agent to be, with the AGENT option.
Run the agent_script.sh to configure the agent. Warning: you must select a location that is outside the Veridata home ! I will choose /u01/app/oracle/product/vdt_agent1.
[oracle@vmvdt ~]$ export JAVA_HOME=/u01/app/oracle/product/jdk-17.0.17
[oracle@vmvdt ~]$ /u01/app/oracle/product/vdt23/agent/agent_config.sh /u01/app/oracle/product/vdt_agent1
Successfully deployed the agent.
Then, configure the agent, by copying the template properties file:
[oracle@vmvdt ~]$ cd /u01/app/oracle/product/vdt_agent1
[oracle@vmvdt vdt_agent1]$ cp -p agent.properties.sample agent.properties
[oracle@vmvdt vdt_agent1]$ vim agent.properties
Specify the following parameters in the agent.properties file:
server.port=8832: Listening port for the agent.database.url=jdbc:oracle:thin:@hostname:1521:PDB1: Connection string for the database. Example for other databases are given in the sample file.server.jdbcDriver=ojdbc11-23.2.0.0.jar: for an Oracle databaseserver.driversLocation=/u01/app/oracle/product/vdt23/agent/drivers: points to theagent/driversdirectory in your Veridata home directory.
The full list of drivers available is shown below. For other drivers, see the documentation.
[oracle@vmvdt ~]$ ll /u01/app/oracle/product/vdt23/agent/drivers/
total 44584
-rw-------. 1 oracle oinstall  2487576 Nov  6 03:10 mysql-connector-j-8.3.0.jar
-rw-------. 1 oracle oinstall  7493107 Nov  6 03:10 ojdbc11-23.9.0.25.07.jar
-rw-------. 1 oracle oinstall  1098916 Nov  6 03:10 postgresql-42.7.7.jar
-rw-------. 1 oracle oinstall 19019852 Nov  6 03:10 vddb2-5.1.4.jar
-rw-------. 1 oracle oinstall 13643019 Nov  6 03:10 vdsqlserver-6.0.0.jar
-rw-------. 1 oracle oinstall  1899742 Nov  6 03:10 vdsybase-5.1.4.jar
You can finally start the agent:
[oracle@vmvdt vdt_agent1]$ ./agent.sh start agent.propertiesFore some reason, Oracle didn’t bother with having a log mentioning the agent is successfully started. To be sure, you can check the java processes.
[oracle@vmvdt ~]$ ps -ef | grep java | grep agent
oracle     56408       1  0 12:47 pts/0    00:00:00 /u01/app/oracle/product/jdk-17.0.17/bin/java -Djava.util.logging.config.class=oracle.core.ojdl.logging.LoggingConfiguration -Doracle.core.ojdl.logging.config.file=/u01/app/oracle/product/vdt_agent1/config/odl.xml -Dhome=/u01/app/oracle/product/vdt23/agent -DagentHome=/u01/app/oracle/product/vdt_agent1 -XX:+UseParallelGC -Xms1024M -Dagent-manifest.jar=/u01/app/oracle/product/vdt23/agent/agent-manifest.jar -jar /u01/app/oracle/product/vdt23/agent/JavaAgent.jar agent.properties
You have successfully installed and configured GoldenGate Veridata server and agent !
Appendix
[ERROR] [MY-013276] [Server] Failed to set datadir to when running install_configure_mysql.sh as root
If you stumble on this error when running the install_configure_mysql.sh script as root, it is most probably related to the grants of the directories leading to the Veridata installation directory. Make sure they all have the x (execute) permission; otherwise, the vdtrepouser won’t be able to access them.
And remember, you shouldn’t install Veridata on a host where other Oracle processes are running !
Appendix : vdtca.rsp example
Here is an example of a response file for the configuration assistant. I included at the end the full file with Oracle annotations:
oracle.install.responseFileVersion=/oracle/install/rspfmt_oggca_response_schema_v23_1_0
# SECTION A - GENERAL
DB_TYPE=MYSQL
ORACLE_USER=
ORACLE_PASS=
WALLET_LOC=
SERVICE_NAME=
IS_NEW_MYSQL=true
MYSQL_INSTALL_USER_TYPE=sudo
EXISTING_MYSQL_HOST=
EXISTING_MYSQL_PORT=
EXISTING_MYSQL_USERNAME=
EXISTING_MYSQL_PASSWORD=
NEW_MYSQL_ROOT_USERNAME=root
NEW_MYSQL_ROOT_PASSWORD=root_strong_password
NEW_MYSQL_VERIDATA_USERNAME=veridata
NEW_MYSQL_VERIDATA_PASSWORD=veridata_strong_password
SCHEMA_PREFIX=vdt
MIN_HEAP_SIZE=3g
MAX_HEAP_SIZE=10g
ADMINISTRATOR_USER=veridata
ADMINISTRATOR_PASSWORD=veridata_strong_password
STRONG_PWD_POLICY_ENABLED=true
IS_SSL_ENABLED=true
IS_SELF_SIGNED_CERTIFICATE=true
IS_PEM_FILES=false
CERTIFICATE_LOCATION=
PRIVATE_KEY_LOCATION=
CA_CERTIFICATE_LOCATION=
PRIVATE_KEY_PASSWORD=
VERIDATA_PORT=8831
And the full file:
################################################################################
## Copyright(c) Oracle Corporation 2016, 2022. All rights reserved.           ##
##                                                                            ##
## Specify values for the variables listed below to customize your            ##
## installation.                                                              ##
##                                                                            ##
## Each variable is associated with a comment. The comments can help to       ##
## populate the variables with the appropriate values.                        ##
##                                                                            ##
## IMPORTANT NOTE: This file should be secured to have read permission only   ##
## by the Oracle user or an administrator who owns this configuration to      ##
## protect any sensitive input values.                                        ##
##                                                                            ##
################################################################################

#-------------------------------------------------------------------------------
# Do not change the following system generated value.
#-------------------------------------------------------------------------------
oracle.install.responseFileVersion=/oracle/install/rspfmt_oggca_response_schema_v23_1_0


################################################################################
##                                                                            ##
## Oracle GoldenGate Veridata deployment configuration options and details    ##
##                                                                            ##
################################################################################

#-------------------------------------------------------------------------------
##                                                                            ##
## Instructions to fill out this response file                                ##
## -------------------------------------------                                ##
## Specify an option true or false                                            ##
## Specify true to use the Build-In MySql Repository Database                 ##                                            ##
## Specify false to use an existing MySql database for Repository             ##
##                                                                            ##
##                                                                            ##
#-------------------------------------------------------------------------------

DB_TYPE=MYSQL

#------------------------------------------------------------------------------------------
#
#    This section needs to be filled only if the Parameter DB_TYPE is set to ORACLE
#
#------------------------------------------------------------------------------------------

ORACLE_USER=

ORACLE_PASS=

WALLET_LOC=

SERVICE_NAME=


#--------------------------------------------------------------------------------------
#
#  This section needs to be filled only if the Parameter IS_NEW_MYSQL is set to false                                             #
#
#--------------------------------------------------------------------------------------


IS_NEW_MYSQL=true

MYSQL_INSTALL_USER_TYPE=sudo

EXISTING_MYSQL_HOST=

EXISTING_MYSQL_PORT=

EXISTING_MYSQL_USERNAME=

EXISTING_MYSQL_PASSWORD=

#------------------------------------------------------------------------------------------
#
#    This section needs to be filled only if the Parameter IS_NEW_MYSQL is set to true
#
#------------------------------------------------------------------------------------------

NEW_MYSQL_ROOT_USERNAME=root

NEW_MYSQL_ROOT_PASSWORD=root_strong_password

NEW_MYSQL_VERIDATA_USERNAME=veridata

NEW_MYSQL_VERIDATA_PASSWORD=veridata_strong_password

#------------------------------------------------------------------------------------------
#
#      Specify a prefix for the schema which will be created in the repository database
#
#------------------------------------------------------------------------------------------

SCHEMA_PREFIX=vdt

#--------------------------------------------------------------------------------
#       Specify the Minimum and Maximum Heap Size
#--------------------------------------------------------------------------------

MIN_HEAP_SIZE=3g

MAX_HEAP_SIZE=10g

#-------------------------------------------------------------------------------
# Specify if the admin user should enforce a strong password policy.
#-------------------------------------------------------------------------------

ADMINISTRATOR_USER=veridata

ADMINISTRATOR_PASSWORD=veridata_strong_password

#-------------------------------------------------------------------------------
# Specify if the admin user should enforce a strong password policy.
# Specify true to enable strong password policy management.
#-------------------------------------------------------------------------------
STRONG_PWD_POLICY_ENABLED=true

#-------------------------------------------------------------------------------------------
# Specify an option true or false
# Specify true to enable SSL
# Specify false to disable SSL
#-------------------------------------------------------------------------------------------

IS_SSL_ENABLED=true

#-------------------------------------------------------------------------------------------
# This section needs to be filled only if the parameter IS_SSL_ENABLED is set to true
# Specify an option true or false
#-------------------------------------------------------------------------------------------

IS_SELF_SIGNED_CERTIFICATE=true

IS_PEM_FILES=false

#-------------------------------------------------------------------------------------------
# Specify the certificate location
#-------------------------------------------------------------------------------------------

CERTIFICATE_LOCATION=

PRIVATE_KEY_LOCATION=

CA_CERTIFICATE_LOCATION=

PRIVATE_KEY_PASSWORD=

#-------------------------------------------------------------------------------------------
# The Default Port used by Veridata is 8830. You can also provide your own Custom Port.
# If SSL is enabled, the Defualt Port is 8831. You can also provide your own Custom Port
#-------------------------------------------------------------------------------------------

VERIDATA_PORT=8831
![Thumbnail [60x60]](https://www.dbi-services.com/blog/wp-content/uploads/2025/05/JDE_Web-1-scaled.jpg)
![Thumbnail [90x90]](https://www.dbi-services.com/blog/wp-content/uploads/2022/11/CBL_web-min-min-scaled.jpg)