YaK core Multi-Platform open source Automation Tool simplifies the deployment of Ansible playbooks through a clean UI and API. It offers an intuitive interface where users can upload playbooks, configure parameters, and deploy them seamlessly across various platforms, and all managed through a centralized inventory stored in a PostgreSQL database. With YaK Core, developers can focus on writing application code without worrying about infrastructure setup or management.
YaK consists of two parts: YaK Core, which is open source, and YaK Components, which can be installed on top. These YaK Components are platform-agnostic service packages (e.g., PostgreSQL, Oracle DB, MongoDB, Kubernetes, etc.), written in Ansible by experts. They provide essential operational features such as backup, patching, upgrades, and high availability. If you’d like to learn more about the available YaK components, feel free to contact us!
But that’s not all. YaK Core also lets you create your own YaK Components 😊. Once created, your component becomes immediately available for deployment across all platforms supported by YaK Core.
In this blog, I’ll show you how easy it is to create your own YaK Component using Ansible, upload it to YaK Core, and deploy it across any supported platform.
YaK Demo platform provisioning
To get started with YaK Core Multi-Platform open source solution, visit https://yak4all.io and provision your own YaK demo environment (take 5 minutes to be ready).
Build your YaK Component
To build a YaK Component, you need to declare at least the following three files
1. playbooks/create_linux_users.yml
2. manifest.yml
3. yak_variables_specifications/basic_variables_specifications.yml
1. The Ansible Playbook
playbooks/create_linux_users.yml
This file is simply your Ansible playbook, nothing more. The only requirement is that the code uses variables, which will be exposed in the UI for configuration. The example playbook below will create a user and optionally grant them sudo privileges.
---
- name: Create Linux users
  hosts: linux_hosts
  become: true
  gather_facts: true

  tasks:
    - debug:
        var: user

    - name: Create users
      ansible.builtin.user:
        name: "{{ item.username }}"
        create_home: "{{ item.create_home | default(true) }}"
        state: present
      loop: "{{ user }}"

    - name: Add users to sudoers
      community.general.sudoers:
        name: "yak-sudoer-{{ item.username }}"
        user: "{{ item.username }}"
        commands: ALL
        state: present
      loop: "{{ user }}"
      when: item.is_sudoer

  post_tasks:
    - name: Update component state
      delegate_to: localhost
      yak.core.yak_component_state_update:
        component_state_name: 'deployed'
...
2. Manifest file
manifest.yml
This file contains the basic information about your component and specifies which playbooks can be executed.
name: linux_users

version:
  major: 1
  minor: 0
  patch: 0

sub_component_types:
  - display_label: Linux users
    name: create_linux_users
    features:
      - display_label: Create Linux users
        name: create_linux_users
        playbook_name: playbooks/create_linux_users.yml

    inventory_maps:
      - group_name: linux_hosts
        group_nicename: Linux hosts
        group_description: Host on which the users will be created
        group_min_hosts: 1
        group_max_hosts: 100
        type: host
        os_type: Linux
3. Variable specification file
yak_variables_specifications/basic_variables_specifications.yml
Now you can define and provide all the specifications for the variables you want to make configurable, with all the required settings 😉.
- variableName: user
niceName: Users to create
dataType: array
children:
- variableName: username
niceName: Username
dataType: string
mandatory: true
defaultValue: yak
isOneOffSetting: false
usage: Name of the user to create
- variableName: create_home
niceName: Create Home directory
dataType: boolean
mandatory: true
defaultValue: true
isOneOffSetting: false
usage: Tick the box if you want to create a Home directory for the user (/home/<username>)
- variableName: is_sudoer
niceName: Grant sudo privileges
dataType: boolean
mandatory: true
defaultValue: true
isOneOffSetting: false
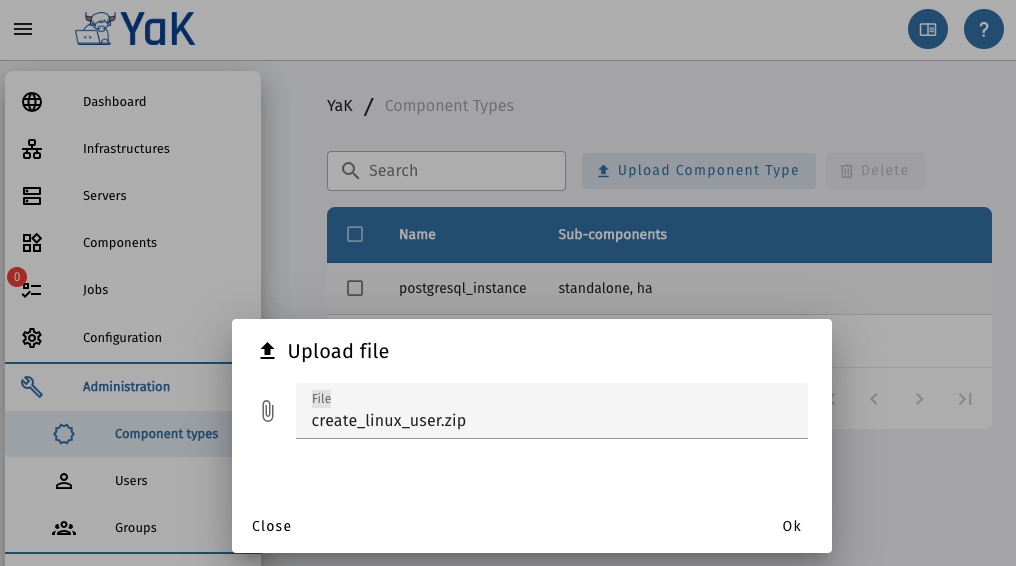
usage: Tick the box if you want to grant "ALL" privileges escalation to the userThat’s it! You now have all the necessary files for your first YaK Component. Next, create a ZIP package and upload it to your deployed YaK Demo environment.
To make things easier, I’ve created a ZIP file that you can upload directly. : create_linux_user.zip
Setup a Server
For this task, simply follow the documentation below up to Step 4: Deploy your server https://dbi-services.gitbook.io/yak-user-doc/introduction/yak-demo
Declare and deploy your Component
You’re now ready to declare and deploy your component!
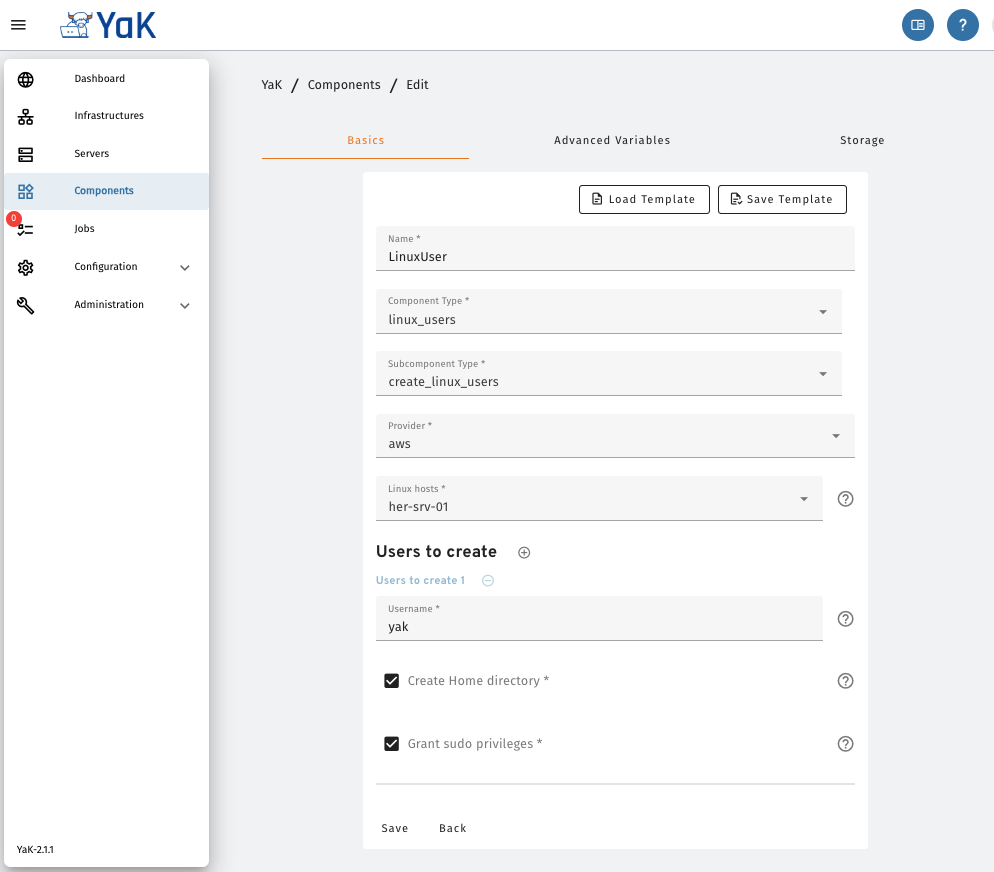
1. Declare
YaK UI -> Components -> Declare -> Component_type : linux_users -> Save
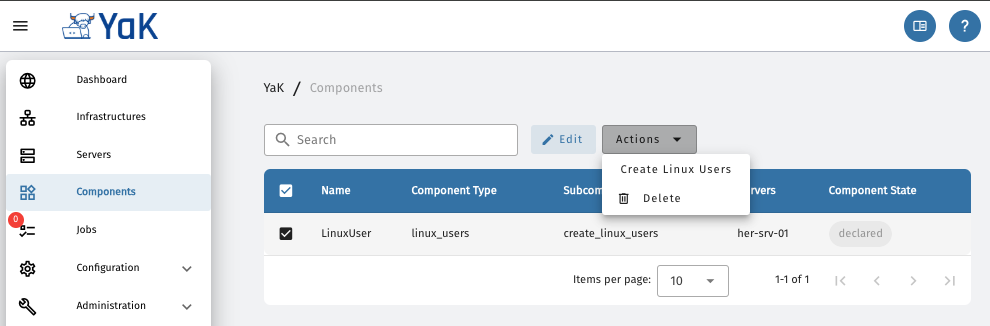
2 Deploy
YaK UI -> Components -> Select LinuxUser -> Action -> Create Linux User -> Confirm
Conclusion
This component can now be deployed on any cloud platform or integrated on On-Premises environment using the YaK UI, and can also be deployed in parallel on up to 100 servers, as specified in your Manifest file.
With this solution, you can provide your colleagues with an intuitive and efficient way to work with Ansible playbooks, enhancing their overall experience 😉.
For more Information about YaK see the blogs available here : https://www.dbi-services.com/blog/yak
![Thumbnail [60x60]](https://www.dbi-services.com/blog/wp-content/uploads/2022/08/HER_web-min-scaled.jpg)
![Thumbnail [90x90]](https://www.dbi-services.com/blog/wp-content/uploads/2022/08/STH_web-min-scaled.jpg)
![Thumbnail [90x90]](https://www.dbi-services.com/blog/wp-content/uploads/2022/08/FRJ_web-min-scaled.jpg)
![Thumbnail [90x90]](https://www.dbi-services.com/blog/wp-content/uploads/2022/08/GRE_web-min-scaled.jpg)
![Thumbnail [90x90]](https://www.dbi-services.com/blog/wp-content/uploads/2024/01/HME_web.jpg)